Showing posts with label Holidays. Show all posts

Sunday, February 12, 2012

February Date - Spa Night

Just in time for Valentine's day, here's another date idea from my Dates for a Year Basket!  For February, I wanted to create a date that would be fun, but also relaxing and romantic.  Something more intimate that gave Kim & Larry the opportunity to just spend time together basking in their still fresh newlywed love.  I know that is totally cheesy, but it is Valentine's month, isn't it?  February is all about recognizing, highlighting, and appreciating the mushy-gushy-ness of love!

So, since I wanted it to be intimate and something very "alone" I knew February had to be an at-home date.  I figured they would already make separate plans for Valentine's and this would just be a bonus date.  I didn't want to do any kind of activity, I wanted the focus to be on them.  So, I thought they needed something that would be relaxing, easy, and stress free.  The first thing that came to mind was a Spa Night!


Here's what was included in the February envelope:
  • Date Card
  • A package of tea light candles in a relaxing scent
  • "Spa-like" music on a CD
  • 2 individual packages of facial scrub (I chose Apricot and Pink Grapefruit)
  • 2 individual packages of facial masks (I chose Chocolate & Strawberry and maybe Mint & Lemon?  I don't remember!)
  • One bottle of Lavender & Chamomile Body Wash/Foaming Bath Oil (You could choose any relaxing scent in any kind of bubble bath)
  • One bottle of Neutrogena body oil (or any other body oil)


Here is the date card that was included in the envelope:


On the card, I suggest that they start the evening by lighting the candles, playing the music and filling the tub.  I know Larry probably won't be too into the scrub and mask, but I intended for this to be somewhat of a do-it-yourself spa night.  I pictured Kim doing a mini facial on Larry with the scrub and mask and vice versa.  After a warm bubble bath, they could use the oil to do massages like you would get at the spa.  

This date cost around $15-$20.  It was one of the more expensive dates for sure, but I figured Valentine's month was a good one to splurge on.  I already had the Zen Meditation music CD that, to be honest, wasn't played very often in my CD player.  Everything else I purchased at Wal-Mart.  The Freeman packets of scrub & masks were about a dollar a piece.  They had all different types and fragrances.  You could instead replace them with travel or full-size products if you were willing to spend a little more money.  The oil and bubble bath can also be purchased at different places, in smaller sizes or better quality.  However, I was pulling this date together the week of their honeymoon, so was running short on time and cash.  :o)  

This date could be cheaper by suggesting they use what they have or by buying travel-size containers and including something you already have on-hand.  You can easily make this more lavish and pricey in a lot of ways!  You can make it an individual date basket by including a bottle of wine or champagne and glasses; robes and slippers (maybe even personalized); add body scrub, foot scrub, body paint, lotion, a book or video on massage techniques, etc; possibly include a gift card to a local spa.  I'm sure there are many more things you can add to make this night even more extravagant and special.  But remember, I'm offering you ideas for CHEAP dates!

I tried to make this romantic, special, and something they felt was indulgent.  Being Kim's sister, I didn't want to get too sensual with this...I'm sure they can do that on their own!  But I hope they enjoy this night and it brings them back to the lovey-dovey feelings from when they first met.  This is date 8 of 13!    March is right around the corner, so stay tuned!

Monday, January 2, 2012

Life Box: Resolution Card

A few short days ago, I posted a tutorial to make a fun project to start for the new year called the Life Box.  I have been extremely overwhelmed and humbled by the fast and steady number of views that sprouted from that simple post.  I'm thrilled to see so many people are intrigued because I'm on day two of my box, and am still so excited about it!  I can already see how some days it will be challenging.  I've had a bit of a cold this weekend, so my days have been kind of boring and "uneventful".  But it's amazing what a little box and commitment of one line on an index card will point out in an uneventful day.

For me, Jan. 1 said "Traditional New Years dinner with the fam!"...something so simple and repetitive to me.  After thinking about it though, it's important to get that down.  Who knows what New Years Day will hold for me next year, let alone 5 years down the road?  It may look completely different, and it may be the same.  Actually, I think the repetitiveness of tradition is something that would be beautiful to see on a card year after year.  Jan. 2 seemed like it would be tough.  My day consisted of sleeping in, staying in my PJs until 2:00, watching TV, cleaning the fridge, grocery shopping...all boring stuff.  However, when I HAD to think of something to put on my card, reflecting on my day made me appreciate it more and draw more importance and meaning than "just another day".  Today, my card said, "Trashed the junk food, stocked up on healthy!"  Something so simple as cleaning out the refrigerator and pantry, tossing all the leftover Christmas goodies and then refilling the space with healthy options IS a big deal.  It could be the start of something incredible.  It definitely is a step towards my commitment to one of my resolutions.  Which brings me to today's post...the Resolution Card.

When I made my Life Box, I added a card that I hadn't seen in others' tutorials before.  A simple card with the year stamped at the top and left blank.


I decided to include this card to record my resolutions/goals for the upcoming year.  It's a good reminder so that I don't just forget about them after a month, and can kind of check in on my progress throughout the year.

I've heard before that until you share your goals with someone else, they're not real to you.  Sure, you have dreams of succeeding in this or that, but until you tell someone else you're going to do it, it's not something you really plan for.  If someone else knows about it, most people will do everything they can to achieve it to avoid embarrassment or disappointment of letting themselves (and/or others) down with failure.  Now I'm really putting myself out there telling you all of that!  I decided to share my resolutions for a few reasons.  One, for self documentation.  It's forever on my blog and shared with the world wide web, so I know where to find it if something should happen to my card.  Two, for the exact reason I just told you...to make them REAL to me, and something I'll try to achieve to prove to all of you that I can!  And finally, to share parts of me so that maybe some of you know that I've got the same goals as you this year.  Possibly to give you some ideas for your own!

So, here they are:  (If you don't care to know...you can skip the rest of this post and come back next time!)


I went with an even 10 resolutions this year.  Some big ones mixed in with some small.  Some that are repeats from years before, some new.  I wanted a good number so that I have several things to try to achieve this year and so that I don't feel like a complete failure when I don't do them all.  Surely, I can at least get a couple of these crossed off!

  • Be a "yes" girl - I mean this in a very specific way.  I've always been a yes girl in the sense that I will agree to do anything for anyone any time.  But I'm not a yes girl when it comes to doing things for me.  I have a lot of excuses, things that come up, ways to back out.  Honestly, I think I have a bit of commitment fear for some reason, and that's something I want to work on this year.  So when I say be a yes girl, I want to go all in when I say yes to something.  I want to say yes to more.  
  • Get healthy & stay active - Isn't this everyone's resolution...every year?  But if you're going to have a repetitive resolution, this would be the one.  For me, it's time to get back to being in shape and feeling good about myself.  This is the first time I'm doing it without a size or number in mind.  I just want to be healthy, active, and feel good about myself.
  • Start an etsy shop - I've had several people suggest this, and asked why I don't have one already. I always had an excuse, no real reason.  It's time to commit, going back to my first resolution.  It's something so simple that I think would bring me a lot of joy...and give me a great reason to craft more!
  • Read at least one book a month - for fun! - I read for community group, and right now I have to read for work.  I love to read for fun and need to make it a habit.  I have a pile of about 20 books waiting on me, I just need to get started!
  • Visit a new state - One of the major things on my life list is to visit every one of the 50 states.  For me, it doesn't count unless I spend more than 24 hours in that state.  So far, my list consists of: Alabama, California, Florida, Illinois, Kentucky, Michigan, Missouri, Nevada, Ohio, Pennsylvania, Tennessee, Texas, and West Virginia.  That's 13...why not add to my number this year?  
  • Be intentional with strengthening friendships - old and new - I'll be honest.  I'm horrible about keeping in touch with people.  Life gets busy, and phone conversations and e-mails seem to get squeezed out of my schedule.  This year, I want to aim to be better about making those things priorities.  My friends are too great and awesome to lose touch with...old friends from high school and college as well as my newer ones.
  • Replace my wardrobe! - Maybe it's not realistic to do it completely, but I definitely need an update.  After college I taught elementary school, so style was not at the top of my list.  But now that I'm in adult world, I need to catch up and try to at least look the part.  :o)
  • Smile at strangers - So simple, but something that will be a challenge for me.  I'm outgoing and bubbly once I get to know you, but I am incredibly shy with strangers.  Eye contact and a smile is a struggle, but you never know what can stem from that.  If anything, I hope this new goal/habit will help me get over being so shy around new people.  
  • Save for/purchase a DSLR camera - I've wanted one for a long while, but never made it important enough to budget for.  My parents got me a photography class for Christmas (there's no way I can afford one before then), and it's a passion I want to pursue.  Who knows where it will lead, but I definitely want to learn more about the craft of photography and see what I can do with it.  I wrote save for SLASH purchase because the ability to purchase one sort of depends on my job situation and if that's something I'll be able to afford before the year is over.  
  • Strive to be a Proverbs 31 woman - This is another one that is a repeat for me.  I am constantly trying to be a Godly woman, but in my human-ness fall short daily.  There is no such thing as earthly perfection, but I hope to keep this verse in my heart as I walk with Him this year.  
So, there you have it, friends!  This may have been something I posted just for me, but that's okay!  I hope to be able to tell you that I accomplished at least a couple of these this time next year when I'm giving my new list for 2013!  And if you want to donate to my camera fund or have a place for me to stay in a state I haven't been, let me know!  ;o)

Promise to post again soon with another date and more craft ideas!

Friday, December 30, 2011

Life Box

I am so excited about the project I'm sharing with you today.  I put a lot of time into it because I'm hoping it's something that will grow near and dear to me in the coming years.

If you're on Pinterest, you may have seen this "Line A Day" Calendar Journal:


I love the idea of this.  It's something small, simple, and easy to do each day to halfway journal/document your life.  I have kept this project in mind since I saw it months ago, and it remained something I wanted to do before the new year started.  I'm calling it my "Life Box" since it will really be a documentation of the most important and special highlights of my life.  Basically each card has a date on it, and at the end of each day you write down one thing you did, accomplished, learned, experienced, etc.   Something significant from each day.  The first year is probably going to be pretty bland and boring, but I think it will be fun and interesting to do this the second year and forward to see how much I or life has (or hasn't) changed in a year's time.  I was kind of getting butterflies in my tummy when I was making this, imagining the possibilities of what is now a normal date in my life to become something so significant.  This year, I may write, "took Akela for a walk" or "slept in until 10:00".  But someday, that same card might say "bought a house", "started a new career", "got married", "had my first child".  AHH!!  It's just so exciting to me, and honestly makes me think this is going to be something that motivates me to LIVE more and better.  It's that little bit of accountability to do something significant every day.  Just knowing that I need to have something to write on my card at the end of the day will, I hope, encourage me to do more significant things.  Make sense?  I also think it will challenge me to continue to improve and grow.  It would be a bummer if year after year a card got worse or less exciting.  So it will also be something that motivates me to make my cards (days, life) better and more exciting.  I'm pretty pumped about all the possibilities of this!  

My Aunt Sharyn gave me a gift card to Michael's for Christmas, so I headed out in search of inspiration for this project.  I found the perfect supplies, came home, and got started.  I literally finished a few hours ago, and couldn't wait to share!  

If you're going to make a life box of your own using the tutorial I'm giving, you'll need:
  • A wooden box
  • Acrylic paint (Colors of your choice, I used four different colors)
  • Brush on gloss glaze (optional)
  • Paintbrushes in different sizes
  • Pencil
  • 365-ish 3X5 inch ruled index cards
  • White cardstock (I used textured, but you could use whatever you have, even colored or patterned if you wanted to)
  • Rubber stamps...alphabet and numbers
  • Black stamp ink
  • Small screwdriver

I started this project by first making the cards for each day of the year.  When I was getting my supplies, I found packs with 180 ruled index cards at Kroger.  I bought three because I'm a perfectionist and knew I would mess up a few.  I also pulled out my set of rubber stamp letters (the plastic container I keep my larger ones in is from Dove facial cleanser wipes...perfect!).  


When I first started this blog, I promised to share all my successes and also misses.  Because any crafter will tell you that you almost never get it right the first time.  So I started testing out the different stamps I had.  By the way, the original tutorial on Design Sponge suggests using a date stamp.  If you have one of those, it would certainly be faster than what I did!  But I didn't have one and didn't want to try to find where to buy one or spend the money on it for just this project.  So I used what I had.  In the end, I'm glad I did.

After looking at my two options for letters, I decided the larger (capital) letters were too big, and I didn't like the way they were all spaced out.  I like the small (lowercase) letters, but it took a long time and didn't line up perfectly stamping each letter.


I tried to do it anyway, but still didn't like the look of the giant numbers.  At least not in this "font"...it just looked a little off to me.  


Fortunately, I was working on this project at my mom's house, and she has stamps.  So I raided her collection and found these!


I was psyched because the clear block and stamps meant each month's lettering would be uniform and perfect and OCD-friendly.  YAY!  So I started out with January 31, testing out the letters and two-digit date for spacing.  I used my notecard lines to make it straight.  I was excited!  


Then...


FAIL!  I loved the font and everything, but it wouldn't stamp evenly.  Since they were from different companies (and different quality), the number stamps were thicker and the letters weren't evenly sized.  I could NOT get the full month abbreviation to stamp and the ink from the numbers was bleeding.  So on to plan C, or J, or whatever it is by now.

I just used mom's numbers.  I liked this collection because they were all different and magazine ransom note-looking.  If that makes any sense why I would think that's cute.  Anyway...


I LOVED the way they turned out.  It seemed to go pretty quickly the way I did my stamping.  I started with the end of the month and stamped 8 cards with the 31 (yes, using the knuckle trick I learned in elementary school and taught my 2nd and 3rd graders to remember which months have 31 days).  Then, I took off the 1 and replaced it with a 0 and stamped 11 cards.  Once I got to 29, I stamped 12 cards for each number.  As I stamped them, I laid them across the desk in 12 different piles.  Doing this gave the ink time to dry before I got around to laying the next card down.  By the time I was finished, I had each of the twelve months stamped with dates and laying in the right order.


Then it was on to the month abbreviations.  I knew I didn't want to do the whole name for each month (how long would it take to get September done?!?!) so I decided on 3 or 4 letter abbreviations.  That, I can handle.  Sadly, the clear stamps wouldn't work.  There were a couple of important letters missing from my mom's set.  So, it was back to my wooden rubber stamps.  I opted for the smaller letters and decided to do the month on the other side of the card so it's more balanced.  I also decorated a couple of special days with stamps I had for holidays.


So at this point, all my cards were stamped with month and date, with a few decorated for holidays.  Time to start on the fun part!  The box!


I got this plain wooden box with a latch at Michael's for $2.99 from the wooden shapes aisle.  It wasn't my favorite...I was looking for something simpler, sleeker, something without brass hinges and latches.  But this was the day after Christmas, and this was the best I could find.  I'm so glad, because it ended up being perfect!

I didn't do anything to the box to treat or prepare it...it's ready to paint once you bring it home.  I was originally going to just do two colors, a main color and accent color, but went a different direction once I spent some time in the paint aisle!  I wanted the main color to be something pretty neutral and basic so that it could easily sit on a shelf or desk in any room without being an eyesore.  But I also wanted it to be personalized...something "me"...something fun.  So, I picked out a color combination that made me happy.  If you're interested in using the same colors, the main color I used is Apple Barrel Gloss in "Dolphin Grey".  I used this color on the outside of the box on all sides and the bottom.  To help make sure I covered everything, I used a small screwdriver to first remove the hinges and latch and separate the lid from the base.

The other colors I used are all Americana and are called "Bluegrass Green", "Deep Midnight Blue", and "Vivid Violet".  FUN, fun colors (though the coloring in the pictures isn't quite the same as real life)!  I decided to write the word "Life" on the front.  No, I didn't perfectly scribe it the first time.  It took about 30 minutes to get the size and lettering I could deal with.  Use a light pencil to trace, draw, or write your design first.  You can erase and redo several times...the wood is very easy to work with and erases easily.  


When you do this, start with your LIGHTEST color of paint first.  I started with the violet lettering and painted over my pencil letters with 2-3 coats.  Then, I carefully went around it with the blue and filled in.  I did the green and violet border last.  For all the paint on the box, I used 2-3 coats, letting it dry between to get good, even coverage.  The wood soaks up the first coat really well, so you'll definitely want to do at least two.

I let my box and lid dry completely overnight, just to be safe.  Acrylic paint dries pretty fast, but I wanted to be SURE.  Then, I gave the entire thing a nice coat of this brush-on gloss glaze.  This can be found in the same place that you get your acrylic paint.  


I really only needed one good, even coat of this triple thick stuff.  It worked great, and made my box come to life!  It sealed the paint in, brightened the colors, and gave it a finished, shiny but not glitsy sheen.  I let this dry and cure for another full day, then re-attached the hinges and latch and put the box back together.

The final thing I needed to do was add dividers for each month.  This is where the white cardstock comes in.  I used textured cardstock that I found in the clearance section at JoAnn's a couple weeks ago.  I cut a card for each month that was 3.75" X 5" to fit the box.  If you have a larger box, you may be able to cut your cards a little bigger.  For me, this size worked out great because the dividers where the same width, but stuck above the date cards enough for the month title to be seen.  I used my rubber stamps with the capital letters and a centering ruler to get them straight and centered.

Then, I added something a little different.  I knew I would be pulling this box out daily, so I decided to write important dates (birthdays, anniversaries...) on each month divider for a quick glance of cards I need to send out that month.


And one final thing that I did, but haven't completed yet is a resolution card.  I decided this would be a good place to put a concrete, real, written list of things I want to accomplish for the next year.  I was just telling a friend the other day about how I think when we actually write down and/or share our resolutions, we are more likely to fulfill them.  Again, that accountability comes into play.  So I have a 2012 card that I will be writing my major goals on in the next week.  I plan to keep it in the front of my box, so I look at it daily as a reminder of what I plan to do.  I'm hoping to turn it into a checklist more than a "hope I do" list.  How awesome would it feel to be able to cross out/check off a resolution once you accomplish it??


So here is my finished box:


Look how perfectly those cards fit in!  I couldn't believe it!  


I'm loving this life box idea and hope that it's something I keep up with.  For now, I plan to put it on my nightstand to remind me each night to write something down.  I loved journaling in high school but don't make much time for it anymore.  This isn't quite the same, but maybe it will fulfill that itch in a small way.  I can't wait to see what it will be like in 5 years!


December Date - Volunteering

Christmas has come and gone.  :o(  I'm hoping to catch up on blogging soon because I am SO behind.  For now, here's the next in the series of the Dates for a Year Basket ideas.

For December, I had a lot of different ideas.  I could map out where they could drive around and see Christmas lights, send them to Opryland and/or ICE for the night, go get their picture with Santa, etc, etc, etc.  You get the idea.  There are a thousand and one things to do to celebrate the holidays.  I decided to go a different direction for a couple of reasons.  One, I find myself getting so wrapped up in the other fun events of the holidays that I forget to focus on the true meaning and spirit of Christmas.  Second, I knew that we would be doing a lot of those fun things together this time of the year, and didn't want them to be overloaded with that.  And third...I had already planned some stellar dates for the Spring and my budget was getting pretty tight. :o)


So, what I decided is to let December be another open-ended date that kind of just kick-started the process.  This date is all about volunteering and giving back!

Here's what was included in the December envelope:
  • Date Card
  • Two Packets of Swiss Miss hot chocolate mix


Here is the date card that was included in the envelope:


The cost of putting this date together was free (I already had hot cocoa mix).  I thought that using this month, when my budget and theirs was tight, was a perfect time to have them volunteer together.  I MEANT to include a list of ideas, but am just now realizing that I left that out (sorry, Kim & Larry)!!  However, it is really easy to find ways to volunteer.  You could go online and search your community's name and volunteering opportunities.  You could find a project that you can collect items for or make things for and send them off.  One thing that we did as a family this year was Operation Christmas Child.  This was something really easy and fun that we were able to do at home together.  If you belong to a church, they almost always have some opportunities for you to volunteer your time, money, and/or talents.  I'm sure you could search and find more than a handful of opportunities that interest you.  

So that is December's date!  It's certainly not the most creative, but I think it's one of the more sentimental and one that will create memories that will last a lifetime.  I'm hoping Kim & Larry found something to do this first married Christmas that means something to them and that they can possibly make an annual tradition.  This is date is number 6 of 13.  Fun and exciting dates are just around the corner!  Stay tuned!

Thursday, August 25, 2011

Finally Fall Argyle Wreath!

I am super thrilled to announce that I am FINALLY back to doing monthly wreaths!  I had to take an unexpected hiatus after doing only four: December/January, February, March, and April.  When I began blogging, I had high expectations that I would be able to keep up with making one wreath per month to keep my front door happy and refreshed.  Once wedding season got underway, my schedule got a little uncontrollable, but I feel like I finally have the reigns back!

My mom and I are both unemployed and applying for jobs like crazy right now, but have decided to take one day a week until we get jobs to do something crafty/pinspired.  So, we decided to both make a wreath for our first of many weekly pinterest-inspired crafts.  (Once one/both of us are employed, we still plan to do this weekly, we'll just have to move it to an evening instead)  Here is my Pinspiration:


Now, this was a wreath someone was selling on etsy, so there were no tutorials.  But it looked simple enough, so I gave it a try.  I loved the argyle design, the simplicity, and the fact that it is a reminder that sweater weather is hopefully just a few weeks away.  I headed to our local JoAnn's and bought the following:


  • 2 skeins of Wool-Ease worsted weight Lion Brand Yarn in Wheat (number 402).  It was on sale at JoAnn's 2 for $5.  The texture didn't matter much since I was just going for the look, not the texture.  I ended up only needing one skein to wrap the entire wreath.
  • 1 skein of Lion Brand "Vanna's Choice" Yarn in Magenta.  (You don't need a whole lot, so if you have extra scraps of yarn at home, you could just use that).  
  • 4 sheets each of two colors of felt.  I actually only needed one sheet of each color I wanted, I don't know what I was thinking when I bought 4 of each!  I got an olive green and a chocolate brown
  • 1 14-inch straw wreath.  Typically, I use styrofoam wreath forms for my wreath projects, but since I was wrapping this wreath, I went for the cheapest option.  The straw wreath was only $2.99 and a 12-inch styrofoam wreath was $4.99.
  • You will also need some straight pins, but I didn't need to buy those since I already had them on hand.  
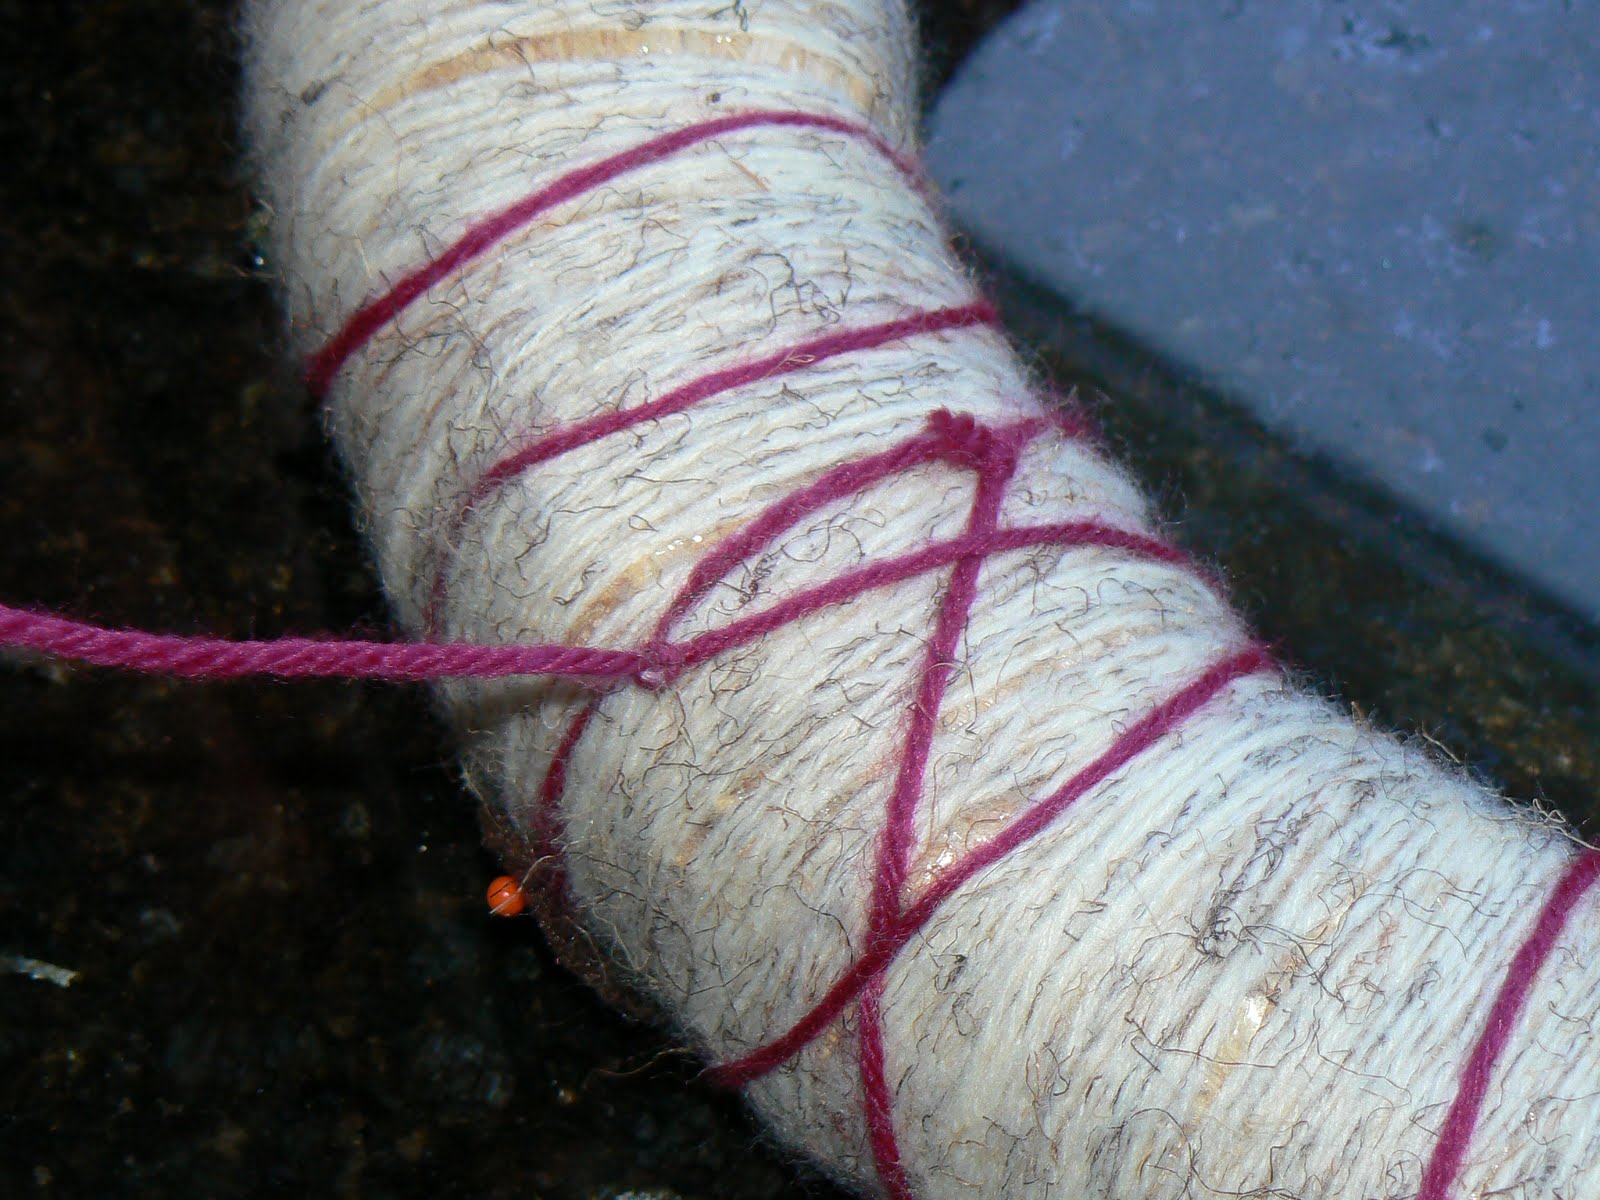
 To start this project, you need to wrap your wreath form in your base color.  Mine, as mentioned, was wheat.  I chose it because it was neutral and had little bits of darker fiber woven into the yarn.  This process takes a LONG time, but it's very easy.  To start, just tie the loose end of your yarn to the form in a basic, simple knot.


Then just wrap, wrap, wrap, wrap.  Make sure when you do this that you hold the yarn TIGHT to each piece you've already wrapped.  You also want to make sure you pull it tight.  With the gauge of this yarn, I had to pull it super tight and keep it tighter together, but if your yarn is thicker, you could probably leave it a little looser.  It actually would give it more of a cozy & cuddly look.   


Like I said, wrap wrap, wrap, wrap.  It gets boring.  And it gives your arm a workout.  I got into a rhythm of pulling the yarn tight, tossing the yarn ball through the center hole onto my lap, pushing the yarn close to the yarn already wrapped, and repeating.  It took me about an hour and a half to do the entire 14-inch form without a break.  With a cozy corner on the couch, a good crime show, and sleeping dogs at your side and your feet, it goes by pretty quick.  I even had a good bit of yarn leftover.  So now, I have an extra skein of wheat I need to find a project for...


When you're finished, you should have something that looks like this:  


You might notice there are some places where the straw form peeks through.  I left the plastic wrap on the form to keep it from poking out.  If I was not covering the whole wreath with detail, I would have been more of a perfectionist while I was wrapping to prevent "bald spots" or even wrapped it a second time.  But, I wasn't worried about that since this was really just the base.  

The next step is to decide on the size of diamonds you'll use for your argyle pattern.  I cut these three to choose from:  


After putting them on the wrapped wreath (and adding up how many of each I'd have to cut and attach) I decided on the largest size, which ended up being 3 1/2 inches tall and 2 1/2 inches wide.  


I used my sample diamond (which I cut out of cardstock) to trace directly onto my felt.  Like I said, I only needed one sheet of each color.  I like to line my shapes up with the already cut edge if possible to limit how much I need to cut.  That way, I can focus on cutting fewer lines and making them super straight.  I find the easiest tool to use when tracing onto felt is a ball-point pen.  It even shows up on darker colors because the ink leaves a little sheen.  


You'll end up having a bunch of cute little diamonds like this:  


Pictured is only six of each color, but for my 14-inch wreath I actually needed 7 of each color.  Once they are all cut, I laid them out, alternating colors and trying to line up the side corners of the diamonds by visualizing an invisible smaller circle.  Make sure when you do this that each diamond is "face-down" so that any ink lines from your pen tracing are not facing forward.  


The next step is to stick a straight pin in each of the diamonds at the top.  I chose to stick them on the outside edge.  You will remove these later, they are really only used to mark and hold each diamond for correct spacing.  


This part is the trickiest part of this wreath, but it's the FINAL STEP!  You will take your accent color yarn (in my case, the magenta).  To start wrapping this, you will need to tie it just like you did for wrapping the wreath form.  I rotated one of my diamonds to "hide" the tie underneath.  


Now, the tricky part is to start wrapping the wreath diagonally, trying to center the line on each diamond you pass over.  This is tricky to line it up so that it all looks symmetrical and even, but with some precision and focus, it's possible (and actually not as hard as it sounds).


As you can see, the way the back of the wreath looks really doesn't matter.  It will be against the door, so if the lines there are crooked, it's no big deal.  Once you get all the way around the wreath and have crossed over each diamond once, you will basically start going the opposite direction to cross over again diagonally.  You do not need to tie it again at the back.  If you have been keeping your yarn pulled tight, it should hold without tying.


The goal now is to cross over each diamond a second time, making the "X" across the center of each shape.  Something that also helped me keep things close to symmetrical and even was to try to make a smaller "x" between each pair of diamonds inside the center of the wreath (towards the bottom point of the diamonds).


Once you get all the way back around, you will tie your yarn off.  I chose to also pick up a couple pieces of my base yarn to make sure it was really secure.  I was really nervous that it would all fall apart once I let go!


Once you have tied it off, you can pull out each of the straight pins because the magenta "x's" will hold the diamonds in place.  Finally, I used extra magenta yarn and just layered a bunch of it for my hanger.  I cut one piece that was probably about 4-5 feet long, and just kept "folding" it until I had a good, thick bunch I felt could hold the weight of the wreath.  I also looped this yarn under the base (wheat) yarn to make sure the magenta wouldn't snap and cause my entire wreath to fall apart.


And you're done!  Here's the completed wreath:


I think it's a perfect transition wreath from summer into fall.  I didn't want to get too fall-typical with pumpkins and corn husks just yet.  That's why I chose these colors, too...so that I wouldn't have orange and red on my door for the next three months!  I also like this one because it's adjustable.  Just since looking at pictures on my computer for blog posting, I noticed some un-even spaces between my diamonds, off-centered "X's"...at least I can slide things around until I like it.  Oh, the life of an OCD perfectionist!  :o)  Total time to make this wreath was about 2 1/2 hours, start to finish.  Total cost was about $10 (if you count only what you really need, not the surplus of yarn and felt I bought)!  Hope you can use this tutorial, or at least get inspired to make something fun for Fall.  I can't WAIT for it to get here!  I miss my hoodies, rosy cheeks, football Sundays, and nightly hot chocolate!


Friday, April 8, 2011

Jeepers Peepers!

It's time again for another wreath!  Actually...time for an EASTER wreath!


I meant to get to this last weekend, but time just didn't allow it.  I saw this idea in a FABULOUS magazine for lovers of creativity, entertaining, and cooking.  It's called "Celebrate" and is done by Phyllis Hoffman.  My mom is subscribed to it, and I always steal borrow it shortly after it comes in the mail to browse at all the cute ideas.  It is a great starting place for party planning, even if you want to throw a party but don't know what kind.  She comes up with party ideas for anything and everything, and everything is cute and coordinated which I love.  The crafts and decor are not ones that LOOK homemade, if you know what I mean.  But most of the ideas are cheap, and the magazine (and website) has wonderful printables.  I will someday subscribe myself so I can have my own collection!  

Anyway...on to the WREATH!  Here is your tutorial for my twist on the one that is in the most recent issue of "Celebrate" complete with pictures:

Here's what you'll need:
1 Flat-Sided wreath form
2 boxes of bunny shaped Peeps (I obviously overbought, but that's ok because I love the fluffy little treats!)
Wide ribbon the color of the Peeps you purchased (Satin is best)
Glue Gun
Scissors
Ribbon for hanging
Jellybeans to coordinate if you choose

Step One:
Wrap your wreath form with your ribbon, placing a dot of hot glue every now and then to secure it in place.  I accidentally bought the ribbon that is stiffer, so mine doesn't look as smooth as it would if you used satin ribbon.  However, I knew that it would be covered, so if it's cheaper you can use it!

Step Two:
Lay out your Peeps.  DON'T glue them down yet!  I just laid mine out to get the spacing.  To help it look more fluid, I only separated the peeps at the ears and heads, and left their bootylicious hips attached.  This gave me a very close idea of how many would fit.

Step Three:
Attach your Peeps to the wreath using TINY dots of hot glue.  I put one under each bunny.  I ended up  taking one bunny out eating one bunny to make my wreath even.  I started with one set of four and moved around, letting the hot glue sit on the wreath for about 30 seconds before placing the Peeps so they wouldn't melt or roast from the heat.

Step Four:
This is where the twist comes in.  Phyllis Hoffman left her wreath with just the Peeps, but I wanted to add a little more color.  I checked out the jellybeans in the grocery store to see if I liked anything and found these WONDERFUL pastel Lifesavers jellybeans that were on sale.  I love the color of them, and think I'll actually put the rest in a glass bowl for my table decor.  After playing around with different colors and patterns I decided on using blue, green, and purple to add some contrast, but still keep some sophistication and not getting to childish with all the colors.  To place them, I just put another tiny dot of glue between the each two bunnies, then squeezed the jellybean in between.  You don't have to push it all the way to the glue, but it helps keep it in place once it's hardened.  I pushed mine only about halfway down, the fluff of the Peeps hold them in place.  They touch the glue just enough for secure placement.

Step Five:
I might change this on my wreath, because I didn't take my time and didn't like the kind of ribbon I was working with.  If you do want to make a bow, here's what you do.  Cut a strip of ribbon that is the length of the bow you want when folded in half.  Glue the two ends together to make a ring.

Step Six:
Use another piece of ribbon and glue it around the center of your loop.  I ended up folding the ends under to make it look nicer.  Here's what it will look like on the front:


Step Seven:
Pull the center together and use a safety pin to pull it together.

Step Eight:
Attach another piece of ribbon, folding over and gluing the end you attach.  You'll attach one on each side of the center.

Step Nine:
To make a finished edge, fold the ends of the ribbons in half, and cut at an angle.  They should look like this:


Step Ten:
 I attached a thin ribbon to the back of my wreath to hang it, and attached the bow to my hanger separately.


And there you have it!  Cute little Peep wreath for Easter!  Hope everyone is enjoying some sunshine and Spring weather!

LinkWithin

Related Posts Plugin for WordPress, Blogger...