Showing posts with label Recipes. Show all posts

Tuesday, May 8, 2012

Bridal Tea Food

When we started planning this Bridal Tea Shower one of the most important (and most fun) things to plan was the menu!  When you're planning any kind of tea party, you want to provide the right variety of food that will feed your guests' appetites without being too heavy.  A tea party menu should be light, fresh, and delicious!

Since this shower was at 2:00 in the afternoon, we wanted our guests to have enough to snack on in case they didn't eat lunch before arriving, but not fill them up in case they had dinner plans shortly after.  Here's what we decided on for our buffet table:


  • Veggies and Ranch Dressing
  • Rainbow Fruit Kabobs as inspired from here.
  • Variety of Mini Quiches (purchased from the frozen section of Costco)
  • Chicken Salad Rolls (sliced Hawaiian rolls and pre-made chicken salad from our grocer's deli)
  • Seafood Pastries (purchased from the frozen section of GFS)
  • Petit Fours (purchased from the frozen section of GFS)
  • Earl Grey Meringue Cookies (see below)
  • Butter Mints
  • Strawberry Cake and Cupcakes (see below)
As you can tell...mom and I were trying to make this as simple as possible.  There was more heating up and assembling than there was actual cooking involved.  We knew there would be a lot of set up with decorations and preparing for the activities, so we wanted the food to be as easy as possible.  Which is what a tea is supposed to be, I think...little work so you have more time to focus on your guests and less time in the kitchen!

I didn't get a close picture of the Earl Grey Meringue Cookies, but I do want to tell you about them.  I have been a lifetime subscriber of Food Network Magazine, and absolutely fell in love with a recipe that was included in one of their issues a while back.  The recipe is for Tea Cakes with Earl Grey Icing.  The first time I made the recipe, I made it as-is.  It was good, the cakes were alright, but the icing....the icing was freakin' incredible.  So the next time I made them, I made them with a plain chocolate cupcake from a box.  To.Die.For.  I have since been asked to make them several times.  They are so unique and different, I can't recommend them enough.  So, for Kim's shower, I wanted them incorporated somehow.  But, I had already decided on strawberry for the cake and cupcakes...there was no need to make MORE cake of any kind.  The icing is a meringue icing, made with mostly egg whites.  Our family loves the airy, light meringue cookies you can buy in the bakery at the grocery store.  So, why can't we use the icing recipe and just bake them as cookies?  That's exactly what we did!  They were delicious.  But I still prefer the cupcakes and icing over the cookies.  

Kim loves strawberries, and I liked the idea of having a teapot-shaped cake, so I came up with this strawberry cake.  I will do a separate, detailed post with how I created this beauty:


I had a ton of leftover batter, so also made a batch of cupcakes.  I incorporated one of the colors from our theme (purple) and the hydrangeas that I brought for the table, AND the inspiration I got from here to create these:


And of COURSE, you can't have a tea party without tea!  Mom and I had so much fun making a tea bar for this shower.


 As you read about in the decorations post, the teapots we used were from our grandmothers on both sides.  We brewed black tea, green tea, and had another carafe with just hot water.  We also set out cream, sugar, honey, lemon, and a variety of tea bags.  I got the idea for these jars here and the tea tags here.  I used my mom's Cricut machine to cut the hearts out of cardstock, then just pulled off the original paper tags and stuck the hearts together on the string with a dot of glue.  The tags for the jars were also made using her Cricut machine, and taped onto mason jars with a band of the same paper we used for the invitations.


To add a touch of elegance and indulgence, I made these:


This was as easy as buying a box of sugar cubes and whipping up a batch of royal icing.  I piped the leaves first and allowed them to dry before switching icing tips and adding the flowers.  I probably made way too many, but they were cute.  


For non-tea drinkers, we also provided a pitcher of ice water and a drink dispenser of raspberry lime punch.  You can also see the teacups we provided for each guest.  Mom and I had a blast hunting down a good selection and number of teacups and saucers.  Goodwill has a new set available almost every week.  Of course, you get odd numbers, but you can buy a set of cups and saucers for about $4.  Can't beat that!  We also looked around at thrift and antique stores, but they were a little pricier.  If you were doing a smaller shower, you could look there, but it wasn't price conscious for us.  With our collection, there were different colors and patterns, so guests had fun choosing one to claim for the afternoon.  We also used some from mom's (grandmother's) china set to make sure we had enough.  It's little touches like this that add personality and sincerity to a party!


The menu for this kind of event was absolutely perfect.  It provided light snacking, some indulgence, and a lot of fun for our guests.  We got a lot of compliments on the food, and I saw several guests going back to the tea bar to mix a new variety of tea.  I hope this gives you some ideas and inspiration for your own tea party!  I kind of envy the British after this...afternoon teas seem like something we should do more often!

Tuesday, August 30, 2011

Pinspiration Tuesday

Last week, I told you about how my mom and I were starting to take one day a week to actually DO something we pin on Pinterest, and not just dream about it.  This week, we took a different spin on this, but I'm super excited about it.

One of the first things we decided was to make some of the yummy food we've been drooling over.  This week, mom made dinner and I made dessert.  Next week, we'll switch and I'll do dinner while mom finds something sweet for dessert.  It was fun, and a huge success!  I think my dad and brother are going to really enjoy Pinterest day for the great meals we'll get to try!

**Sidenote:  We're actually calling this Pinterest/Food Network Day, since we're excited about trying out some of the things we're seeing on The Pioneer Woman's new show.  I'm also subscribed to Monthly Christmas FN Magazine that has HUNDREDS of delish recipes included!**

Mom made these Spinach Lasagna Rolls (I took the picture after we ate some...hehe):


The linked recipe was the inspiration, but she actually used alfredo sauce, and combined a bunch of different recipes she found.  She also tossed some ready-made frozen meatballs in the pan.  It was DELISH and surprisingly filling.  

She also tossed together this Marinated Tomato Salad with Herbs from Pioneer Woman's cooking show debut:


It was also super yummy and went really well with the pasta dish.

For dessert, I made these awesome Caramel Apple Cheesecake Bars:


It already sounded yummy, but when I got to the bottom of the recipe and saw it was adapted from Paula Deen, I knew it was a good choice!  We couldn't wait to eat it, so dove in when it was still warm instead of waiting for it to chill.  Even warm, it was also a winner!

So, that was the meal for this week.  We also got some rosemary olive oil bread and stuffed mushrooms from Kroger.  I am totally full & happy as I write this!

The second part of today's Pinspiration actually wasn't inspired by anything on Pinterest.  I know, I know, I'm already breaking my own rules.  But I AM currently unemployed, so going to JoAnn's, Michael's, or Hobby Lobby each week to get supplies is not a great habit.  I'm hoping that will change in the very near future.  But for now, I needed to figure out a way to cut down costs on my crafting addiction.  So, mom suggested heading to Goodwill to find something to renew, upcycle, or change into something new.  I had a few doubts, but figured it was worth a shot.  I wasn't sure how many things I'd be able to find and/or how I could make something simple into something I could be proud of creating.

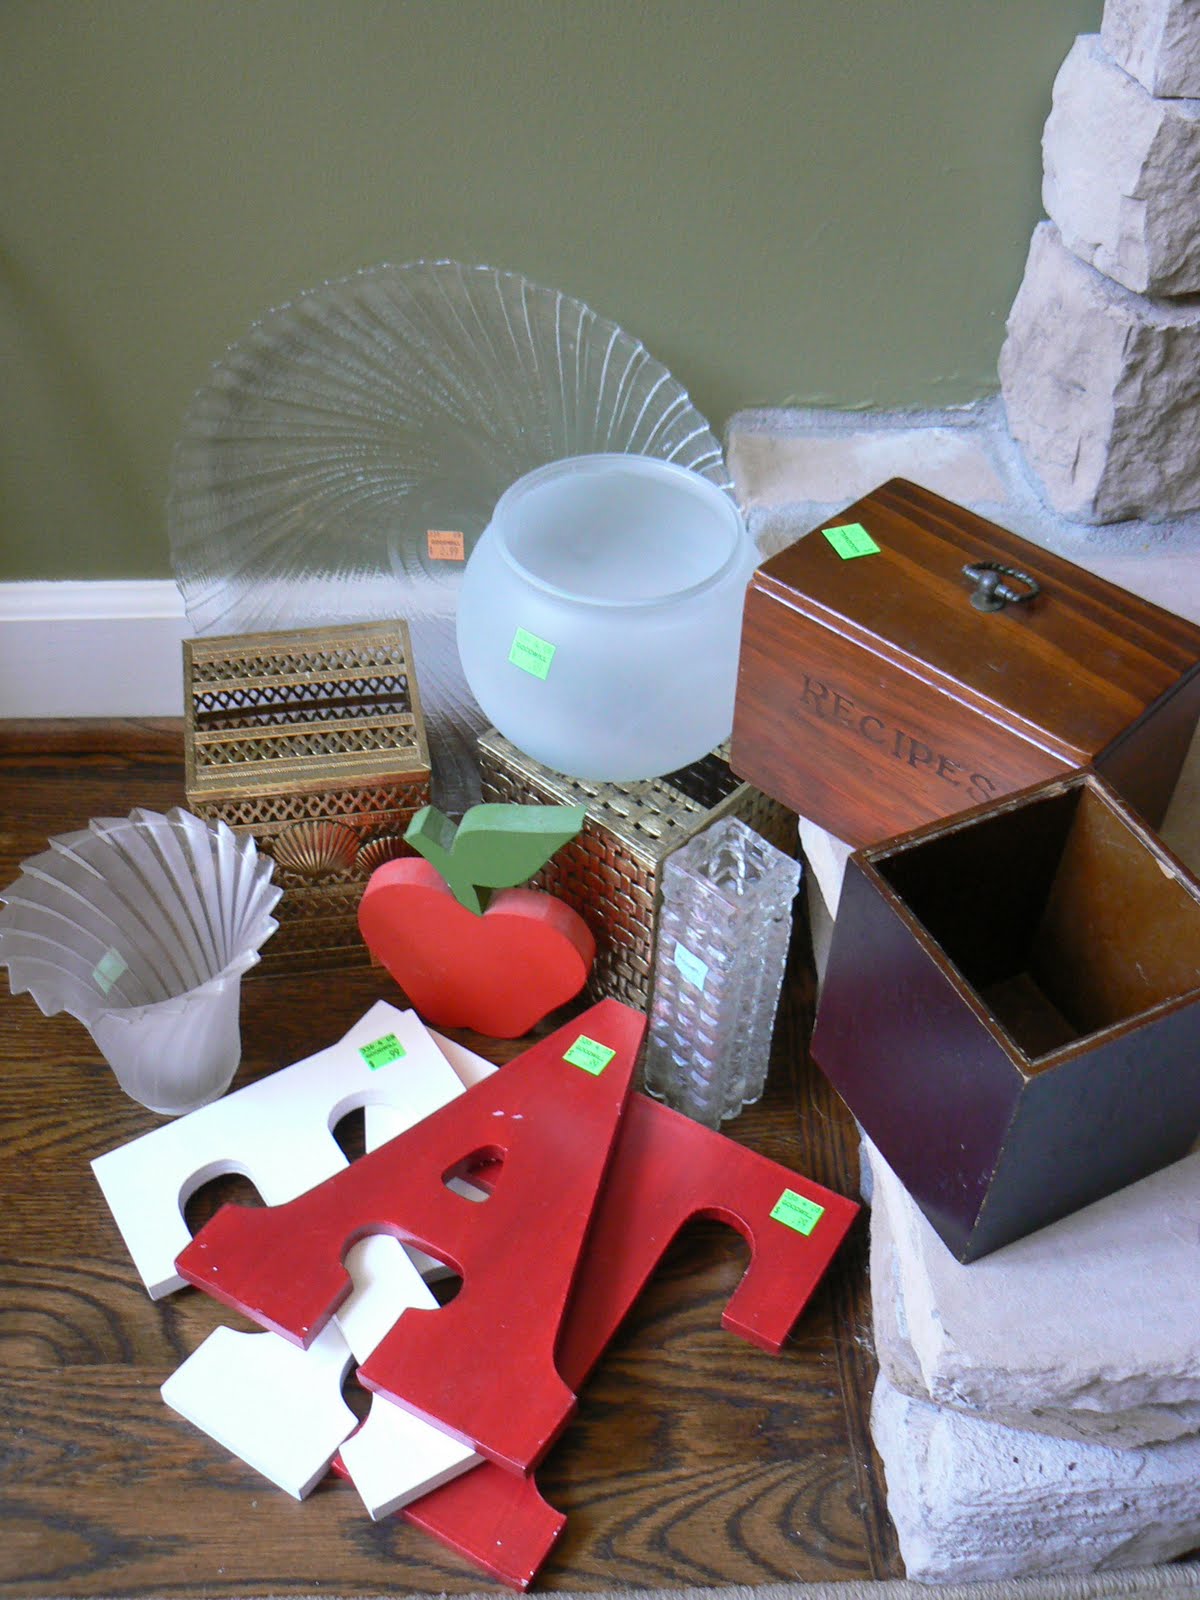
Well, We were not in Goodwill longer than 5 minutes and my arms were FULL of items I had plans for.  I actually had to start putting things back and deciding what to purchase and what to leave behind!  I found so many little treasures and my mind was racing with different ideas.  I've had many requests and suggestions from a lot of different people that I should launch my own etsy shop to sell some of the things I create.  So, my mind was going wild with what I could do.  Before I launch an etsy shop, I want to have a good stock of things to sell.  I think it's a great idea, because I love crafting and creating; it's definitely a deeply loved therapy of mine.  But in my little apartment, there's just not room for me to keep it all!  Walking around Goodwill, I got a ton of ideas of where I could start with that so hopefully my etsy will be up and running soon.  I'll keep you posted!  To start...here's what I got today:


A glass lampshade, four wooden painted letters, a wooden painted apple, two brass metal tissue box covers, a wooden box, a large glass plate, a tall rectangular vase, a frosted glass bowl, and my absolute favorite:  a wooden recipe box.  


Isn't she a beauty?  Well...she's pretty now, but with a little love and attention I think she'll be a star!  I love the vintage look, but the stain job has scratches, there are some nicks in the side, and it's a little dirty.  Nothing a little elbow grease and love can't fix!  I started on this project today, but don't want to reveal until I'm finished and know which direction I'm headed.  Most of my projects are a work in progress and ever-changing until the very end.  Stay tuned for how it turns out!

I'm excited about this new journey of creating things from my own mind an not necessarily copy someone else's creativity.  We'll see how it all goes!


Sunday, January 23, 2011

Striped Cake Trial

One of the things I've grown to love is cake decorating.  I love to cook...mostly bake...and last fall, my mom and I took a Wilton cake decorating class at JoAnn's.  It was tons of fun, and got me hooked.  I make a cake any chance I get now, making them for birthdays, holidays, parties, and just for fun.  I'm still an amateur and learning (mostly by trial and error).  My half-sister and niece were in town this past week and since Kelly's birthday was at the beginning of January, we had the chance to celebrate with her.  I immediately took the chance to make a cake!  I used my go-to recipe for cakes when I don't have to do a specific flavor.  I always use jelly as a filling and make two layers.  This time, I used Smuckers "Simply Orchard" Strawberry and it was delicious!  It tasted like homemade strawberry jam.  I have to say, even though it was still good, I was disappointed with the way it came out this time.  I don't know what it was yet...still trying to figure out what affected it.  Anyway...I was doing this cake as a surprise, so had no guidelines for decorating like I normally do when I make a cake.  I remembered seeing a cake on Food Network similar to this striped one a while back and thought it looked fun to try.


Well, I tried.  I think it's something that takes a lot of energy, stamina, and practice.  Here are some tips and steps to attempt this cake.  I think I'll be trying again when it hasn't been a long, exhausting day at work and it's earlier than 11:30 at night.  :o)


When you put icing into a decorating bag (or ziploc with the corner snipped off), fold the bag over itself about halfway. This helps you have room to get the icing all the way to the tip of the bag and also keeps your hand clean.  

I use a cake spatula to put the icing into the bag (you could also use a butterknife).   With the bag folded over like this, you can use your fingers to pinch the spatula at the top to slide the icing off and into the bag.  

Use a serated knife to cut off the "hump" left from baking.  It will make your cake level when stacked and also gives you something to snack on while you decorate.

It doesn't matter if they're the same height, as long as both cakes are relatively even.  choose the cake that has the smoother "bottom" surface to serve as the top of your stacked caked.  

Place the less smooth bottom on the cake stand or whatever you are serving your cake on with the cut side facing up.  Using your icing bag, pipe about a 1/2 inch tall "dam" around the edge of your cake.  This will keep the filling from oozing out the side and into your decorating icing.  

Here is that delicious jelly I was telling you about!  I use just enough to cover the surface and spread it just up to the edge of the icing dam.  You could add more or use less according to taste.  I also sometimes just pipe a spiral of icing in the center as opposed to jelly.  

Place the other cake crumb side down on top of your filling.  

When you ice a cake, start at the top with a HUGE glob, ice from the center out to the sides and push it over the edge.  

Once you have the cake covered with a thin layer, let it set for about 20-30 minutes.  Once it is hard, you can do another thin coat.  The first coat is called the "crumb coat" because you usually pull crumbs into your icing when you do it the first time.  If you let it set, you can add another layer of icing without pulling out crumbs so that you will not have crumbs in your final coat.  

While the second coat is setting, mix your colors.  I used store-bought liquid food coloring this time and HATED it.  You have to use a ton, you end up over-mixing the icing which makes it super stiff, and you don't get the colors you want.  I recommend getting the gel food coloring.  MUCH easier to work with.  

I used a small round bowl I had to indent a circle in the center of my cake so that I could make sure my stripes were evenly sized.

Now that I have a guide line, I can begin decorating.  The indentation will be covered with icing later.  

Using my stiff icing, I tried to make even stripes around.  I tried to do all one color, but soon realized it's easier to just switch bags while decorating, start on one side, and work your way around.  Now I know for next time.  

I wanted to do more stripes than this, but since I put orange on first, didn't have room.  Also, it was about 12:30 and I was tired.  :o)

I added a shell border to the bottom and piped stars on the top of the stripes to cover my uneven and messy ends.  

Using a small tip, I piped the lettering in the middle of the circle I left on top.  

Finished!
This was definitely a learning cake.  I would definitely use this design again, but with some adjustments.  I won't use liquid food coloring again.  I will just start on one side and work my way around.  I also need to adjust my cake and icing recipes, because they both turned out less than desirable for me this time.  Hopefully I'll be able to post again soon with a better attempt!

LinkWithin

Related Posts Plugin for WordPress, Blogger...