Showing posts with label Cakes. Show all posts

Tuesday, May 15, 2012

Teapot Cake Tutorial

Last time, I posted a nice preview of the teapot cake I made for my sister's Bridal Tea Shower, but today I'm going to try my best to do a written tutorial.  The cool thing about this cake is that it looks way more complicated than it actually is.  If you're a little hesitant, give it a try.  I think you'll surprise yourself.


If you've been following my blog or know me at all, you know that I love decorating cakes.  I have become "the cake lady" and am the one everyone turns to when a cake is needed for a birthday or event.  I absolutely LOVE it.  So, for Kim's tea party I decided I wanted to try doing a shaped cake as opposed to my regular round and square decorated cakes.  It was so fun, and I can't wait to try it again!  Actually, I was having so much fun, I forgot to take pictures while I assembled the teapot cake I came to be so proud of!

I started by purchasing a Wilton Sports Ball 3D Cake pan from JoAnn's for about $12.  There are directions included, but it's pretty much the same as baking in a regular pan besides having to balance each half of the ball on the discs included (which is really not a challenge at all).  I used my favorite strawberry cake recipe and filled the two halves 3/4 full with batter.  I saved the rest for the hydrangea cupcakes I also made that day.  Once they were done, I let them cool for about five minutes, then let them finish cooling on a wire rack.


Unfortunately, here is where my camera was forgotten.  However, I am a visual learner and as a teacher, like to provide as many channels of learning as possible.  So, please forgive my TuxPaint elementary diagrams.  I wanted to make sure you could understand what I explain.


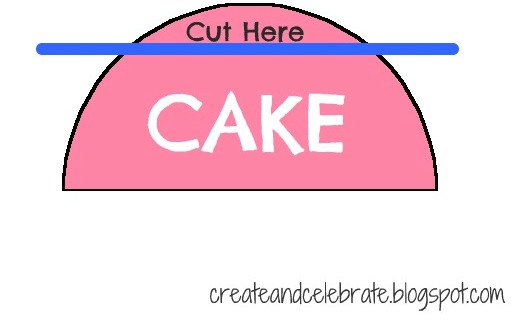
Once both pieces were cool, I needed to cut one of the halves so that it would stand flat and sturdy on the cake stand.  So, I cut about two inches off the rounded edge of one dome.  This was perfect because it later ended up being used as the "lid" of the teapot.  Here's an image to help you get an idea of where I cut:

Okay, if you can understand this next part of assembly...awesome!  This is the trickiest part, so bear with me.  I'm going to number these next steps to try to keep it easy to understand.
  1. I took the dome that I just sliced and turned it over, so the wider part was facing up and the side that I just cut from is on the cake plate.  You may also want to add a dot of icing to your plate before placing your piece to keep it from sliding around while decorating.
  2. Add your filling to the wide part of the bottom piece that is facing up.  So now you should have only one piece on your plate and filling on top of it.  
  3. Next, put the other half (not cut...even though the picture looks like it is cut) on top, wider side facing the filling.  When you place this piece on top, it should look like you have a ball sitting on your cake plate with a flat bottom.
  4. Like I mentioned, I created this image without taking too long to figure out how to do the top.  So, try to understand this part.  On TOP of your full dome half, put a small dot of icing.  Take the cut piece leftover from the bottom half that you cut to make the bottom flat.  Place that small part of cut cake on top of the dot of icing on top of the dome.  There will be a small gap between your top dome (half) and the small piece you placed on top.  So you should have a huge cake ball with a "hat," if you will.
Hopefully you could follow that.  I feel awful for not taking pictures this time around!  Here's a diagram to help you out:


Okay!  So, after you have assembled your cake pieces, you get to do the fun part...decorate!  Don't forget to start by covering your entire giant cake ball with a "crumb coat" or a first, light layer of icing.  This first layer will also help pin down the edges of the lid piece so you can't see the gap.  Let this dry first before doing a second layer.  The first layer also catches all of the crumbs that come off of the cake and put those speckles in your icing.  By allowing it to dry, your second layer should be near flawless.


For my spout, handle, and lid button, I used plain white, store-bought fondant.  You can find this at Wal-Mart, craft stores, or anywhere they sell cake-decorating supplies.  It is completely edible, and you can add flavor and/or color by kneading it in.  This was my first time working with fondant, and the white matched my cake, so I did nothing but take it out of the package to use it.  Once you take it out, you can pull off a chunk, roll it, and mold it into whatever shape you'd like.  It's kind of fun and reminded me of Play-Doh days!  If you are not a fan of fondant or can't find any, you could definitely use other things.  Royal icing is great for making solid shapes to decorate with, which is what I used to top the sugar cubes we used at the tea bar.  You could also bake cookies and stick them in as your extra pieces.  They're much lighter, easy to decorate, and, in my opinion, taste better than fondant.


One tip I would have for a cake this size is to make these pieces as thin and small as you can.  One problem I had is that my spout was a little heavy, so it took a lot to get them to stay where I wanted them!  Once your pieces are molded, allow them to air-dry a bit to harden.  That way, when you place them on the cake and are moving them around, you won't change their shapes too much.


So, once your cake is completely iced and your extra pieces are ready, add them to the cake.  This should be done when the base icing is complete, but you haven't decorated yet.  I did this by using toothpicks and sticking part in the fondant and part in the cake.  You will have to play around with angles and the number of picks you need to keep it sturdy.  I've learned this time to use smaller pieces next time.  I had to use lots of toothpicks.


Finally, you get to be creative!  I would recommend adding some kind of border around the edge of the lid to set it apart from the rest of the teapot.  I would also recommend adding a border around the spout and the handle to cover and imperfections or bumps from pushing them into the cake.  I always add a border to the base, too.  At this point, you can decide how to decorate your teapot.  I did small rosebuds around the middle with a polka-dot background.  You could make it fancier by doing flowers all over.  More whimsical by changing the colors and doing swirls, polka dots, and other fun shapes.  Have fun!


I had so much fun with this cake.  I am excited to find an excuse to make another teapot cake (and next time, I'll take pictures and edit this post).  Since the cake was so pretty and kind of realistic, I didn't want to write on it but did want there to be some recognition for Kim.  So, I added the words "Congrats Kim!" Straight to the cake plate.  


I got a lot of compliments on this cake.  Not only was it cute, but definitely delicious!  When I was trying to find a tutorial to help me out with figuring out how to do this, it was tough to find a step-by-step article or blog post anywhere.  I hope that my directions were easy enough to follow so you can make one, too!

Tuesday, May 8, 2012

Bridal Tea Food

When we started planning this Bridal Tea Shower one of the most important (and most fun) things to plan was the menu!  When you're planning any kind of tea party, you want to provide the right variety of food that will feed your guests' appetites without being too heavy.  A tea party menu should be light, fresh, and delicious!

Since this shower was at 2:00 in the afternoon, we wanted our guests to have enough to snack on in case they didn't eat lunch before arriving, but not fill them up in case they had dinner plans shortly after.  Here's what we decided on for our buffet table:


  • Veggies and Ranch Dressing
  • Rainbow Fruit Kabobs as inspired from here.
  • Variety of Mini Quiches (purchased from the frozen section of Costco)
  • Chicken Salad Rolls (sliced Hawaiian rolls and pre-made chicken salad from our grocer's deli)
  • Seafood Pastries (purchased from the frozen section of GFS)
  • Petit Fours (purchased from the frozen section of GFS)
  • Earl Grey Meringue Cookies (see below)
  • Butter Mints
  • Strawberry Cake and Cupcakes (see below)
As you can tell...mom and I were trying to make this as simple as possible.  There was more heating up and assembling than there was actual cooking involved.  We knew there would be a lot of set up with decorations and preparing for the activities, so we wanted the food to be as easy as possible.  Which is what a tea is supposed to be, I think...little work so you have more time to focus on your guests and less time in the kitchen!

I didn't get a close picture of the Earl Grey Meringue Cookies, but I do want to tell you about them.  I have been a lifetime subscriber of Food Network Magazine, and absolutely fell in love with a recipe that was included in one of their issues a while back.  The recipe is for Tea Cakes with Earl Grey Icing.  The first time I made the recipe, I made it as-is.  It was good, the cakes were alright, but the icing....the icing was freakin' incredible.  So the next time I made them, I made them with a plain chocolate cupcake from a box.  To.Die.For.  I have since been asked to make them several times.  They are so unique and different, I can't recommend them enough.  So, for Kim's shower, I wanted them incorporated somehow.  But, I had already decided on strawberry for the cake and cupcakes...there was no need to make MORE cake of any kind.  The icing is a meringue icing, made with mostly egg whites.  Our family loves the airy, light meringue cookies you can buy in the bakery at the grocery store.  So, why can't we use the icing recipe and just bake them as cookies?  That's exactly what we did!  They were delicious.  But I still prefer the cupcakes and icing over the cookies.  

Kim loves strawberries, and I liked the idea of having a teapot-shaped cake, so I came up with this strawberry cake.  I will do a separate, detailed post with how I created this beauty:


I had a ton of leftover batter, so also made a batch of cupcakes.  I incorporated one of the colors from our theme (purple) and the hydrangeas that I brought for the table, AND the inspiration I got from here to create these:


And of COURSE, you can't have a tea party without tea!  Mom and I had so much fun making a tea bar for this shower.


 As you read about in the decorations post, the teapots we used were from our grandmothers on both sides.  We brewed black tea, green tea, and had another carafe with just hot water.  We also set out cream, sugar, honey, lemon, and a variety of tea bags.  I got the idea for these jars here and the tea tags here.  I used my mom's Cricut machine to cut the hearts out of cardstock, then just pulled off the original paper tags and stuck the hearts together on the string with a dot of glue.  The tags for the jars were also made using her Cricut machine, and taped onto mason jars with a band of the same paper we used for the invitations.


To add a touch of elegance and indulgence, I made these:


This was as easy as buying a box of sugar cubes and whipping up a batch of royal icing.  I piped the leaves first and allowed them to dry before switching icing tips and adding the flowers.  I probably made way too many, but they were cute.  


For non-tea drinkers, we also provided a pitcher of ice water and a drink dispenser of raspberry lime punch.  You can also see the teacups we provided for each guest.  Mom and I had a blast hunting down a good selection and number of teacups and saucers.  Goodwill has a new set available almost every week.  Of course, you get odd numbers, but you can buy a set of cups and saucers for about $4.  Can't beat that!  We also looked around at thrift and antique stores, but they were a little pricier.  If you were doing a smaller shower, you could look there, but it wasn't price conscious for us.  With our collection, there were different colors and patterns, so guests had fun choosing one to claim for the afternoon.  We also used some from mom's (grandmother's) china set to make sure we had enough.  It's little touches like this that add personality and sincerity to a party!


The menu for this kind of event was absolutely perfect.  It provided light snacking, some indulgence, and a lot of fun for our guests.  We got a lot of compliments on the food, and I saw several guests going back to the tea bar to mix a new variety of tea.  I hope this gives you some ideas and inspiration for your own tea party!  I kind of envy the British after this...afternoon teas seem like something we should do more often!

Saturday, November 26, 2011

October Date - Bake a Birthday Cake

I am WAY behind on blogging, and I apologize!  Life has been changing pretty rapidly and time has been slipping away from me.  So, in an effort to catch up before the holiday season gets fully under way, I'm going to try to do a couple of posts today.  First up, the next date in the Dates for a Year Basket!  It's already November, so you'll get two today.  But this one is all about October!  


When thinking about what to plan for October, I had a lot of options.  I could have planned a fall activity, like a hayride or corn maze.  I could have gone with the Halloween theme and sent them to a haunted house or ghost hunting near local urban legend sites.  But, Kim & Larry are a unique couple in that both of them have a birthday in October, only a few weeks apart.  So, October's date was baking and decorating a cake together!

Here's what was included in the October envelope:
  • Date Card
  • 1 box of cake mix
  • 1 jar of sprinkles
  • 1 "Happy Birthday" banner
  • Birthday candles
  • Party poppers


Here is the date card that was included in the envelope:


This date was fun to plan, and super easy.  This date could be modified for just one birthday, or you could choose to use it as a "half-birthday" celebration or to celebrate something else entirely.  I got all the supplies at my local grocery store.  You could also include a tub of icing, but since I was assembling this in July, I didn't want to send them something that would expire.  I of course didn't include the eggs or oil that they would need for mixing their cake, but those are inexpensive and simple things they could pick up at the store if they didn't have them at home.  On the card, I also mention the Red Plate.  I forgot I haven't posted about that yet, but will do that soon.  It's another cheap, easy, and meaningful wedding gift!  

This date cost about $10-$15, but could be less if you didn't include the decorations and more if you wanted to add more decorating supplies.  Actually, you could go all out and make just a birthday decorating kit to give as a wedding/baby/birthday gift for anybody.  You could include icing tips and bags, food coloring, a cake plate, books with decorating tutorials and ideas...  You could really make it nice!  

I'm hoping to get the November date posted this afternoon, since December kind of snuck up on my!  This is date 4 of 13...many more great dates to come!

Tuesday, September 27, 2011

Easy Cheesecake Decor

My life is pulling me away from blogging, but hopefully I'll get into some kind of regular rhythm here soon.  For tonight, I've got a quick and easy tip for decorating a cake for any occasion.  My brother's birthday was yesterday.  I asked him what kind of cake he wanted, and he asked for a chocolate cheesecake with raspberry sauce.  So, I found a great recipe for a super easy marble cheesecake.  It was definitely yummy!  The problem is, I'm a cake decorator.  With icing.  Cheesecake and icing don't go too well together.  But, it WAS a birthday cake, so it needed to be festive somehow!  So, here's a simple trick to decorate cheesecake, cakes that won't be complimented with icing, or something to add to a store-bought cake to make it your own.  The best part?  Here's all you need:

Chocolate Chips
Ziploc Bag
Wax Paper

The first thing I did was dump a good amount of chocolate chips into a bowl.  I probably used a cup and a half (maybe a little more).  I microwaved the chocolate for one minute, stirred, and microwaved for one additional minute.  After two minutes in the microwave and some stirring, it was completely melted.  Next, I cut a small tip in the corner of the Ziploc bag and spooned the melted chocolate into the bag.  After you've done that, you're ready!  I laid down a nice size piece of wax paper, and started writing birthday sentiments.  I planned to just do one, but had extra chocolate, so kept going.  I figured the more choices I had, the better.  


This was my first time doing this, so I'll tell you what I've learned.

  • Cut a large hole (to match the thickness you want your letters) and write slowly.  I cut a smaller hole, so had to go over my writing a second time, and I didn't quite like the way that looked.  I think if you have a larger hole and write slower, you would get a better result.  
  • Make sure all your letters connect for each word.  If you notice, I even connected the "th" after 17 and the exclamation point.  It looks strange and not right when you do it, but it will make sense when it's on the cake. 
So after you've written your sentiments and/or drawn your designs, stick your chocolate in the freezer.  I slid my wax paper onto a cookie sheet to put into the freezer.  I wanted my letters to be flat (my cake wasn't that big), so I used the flat surface of the baking sheet.  You could also place it in a curved bowl or dish if you wanted your chocolate to set that way.  I let my chocolate sit in the freezer overnight plus about 6 hours.  But you're really just looking for the chocolate to be hardened, so it probably would be ready in about an hour.  


I chose my favorite words, and easily peeled them off the wax paper...


...and then just stuck them into the cake!  That's it!  (Please ignore my huge lack of water bath cheesecake crack)


I would change a few things the next time I do this, but I think it turned out alright.  It's different, simple, and still special.

Just imagine all the things you could do!  You could even use white chocolate or almond bark with added food coloring if you wanted to add some color.  I'm excited to incorporate this idea into future cakes and experiment to see what else I can come up with!

Tuesday, March 29, 2011

Spicy & Sweet Bachelorette Party!

The rush has finally ended!  I have been working like a busy little bee the past few weeks to prepare for an AMAZING party for one of my dearest and best friends, Beth.  She's getting married at the end of May and I couldn't be happier for her!  She currently lives in West Virginia, but also has a lot of friends in the Nashville area.  So I decided to host her lingerie shower and bachelorette party.  It was a blast to plan and I'm learning how much I LOVE planning parties and being creative with all things entertaining.  Now that it's over, I can finally unveil everything I've been keeping secretive.  For this post, I'll just give you a quick run-down of some of the things we included.  Later on, I'll do an individual post for invite how-tos, game explanations, favor assembly, etc.  For now, enjoy these:


More to descriptions and explanations to come!  I just had to share something!

Sunday, January 23, 2011

Striped Cake Trial

One of the things I've grown to love is cake decorating.  I love to cook...mostly bake...and last fall, my mom and I took a Wilton cake decorating class at JoAnn's.  It was tons of fun, and got me hooked.  I make a cake any chance I get now, making them for birthdays, holidays, parties, and just for fun.  I'm still an amateur and learning (mostly by trial and error).  My half-sister and niece were in town this past week and since Kelly's birthday was at the beginning of January, we had the chance to celebrate with her.  I immediately took the chance to make a cake!  I used my go-to recipe for cakes when I don't have to do a specific flavor.  I always use jelly as a filling and make two layers.  This time, I used Smuckers "Simply Orchard" Strawberry and it was delicious!  It tasted like homemade strawberry jam.  I have to say, even though it was still good, I was disappointed with the way it came out this time.  I don't know what it was yet...still trying to figure out what affected it.  Anyway...I was doing this cake as a surprise, so had no guidelines for decorating like I normally do when I make a cake.  I remembered seeing a cake on Food Network similar to this striped one a while back and thought it looked fun to try.


Well, I tried.  I think it's something that takes a lot of energy, stamina, and practice.  Here are some tips and steps to attempt this cake.  I think I'll be trying again when it hasn't been a long, exhausting day at work and it's earlier than 11:30 at night.  :o)


When you put icing into a decorating bag (or ziploc with the corner snipped off), fold the bag over itself about halfway. This helps you have room to get the icing all the way to the tip of the bag and also keeps your hand clean.  

I use a cake spatula to put the icing into the bag (you could also use a butterknife).   With the bag folded over like this, you can use your fingers to pinch the spatula at the top to slide the icing off and into the bag.  

Use a serated knife to cut off the "hump" left from baking.  It will make your cake level when stacked and also gives you something to snack on while you decorate.

It doesn't matter if they're the same height, as long as both cakes are relatively even.  choose the cake that has the smoother "bottom" surface to serve as the top of your stacked caked.  

Place the less smooth bottom on the cake stand or whatever you are serving your cake on with the cut side facing up.  Using your icing bag, pipe about a 1/2 inch tall "dam" around the edge of your cake.  This will keep the filling from oozing out the side and into your decorating icing.  

Here is that delicious jelly I was telling you about!  I use just enough to cover the surface and spread it just up to the edge of the icing dam.  You could add more or use less according to taste.  I also sometimes just pipe a spiral of icing in the center as opposed to jelly.  

Place the other cake crumb side down on top of your filling.  

When you ice a cake, start at the top with a HUGE glob, ice from the center out to the sides and push it over the edge.  

Once you have the cake covered with a thin layer, let it set for about 20-30 minutes.  Once it is hard, you can do another thin coat.  The first coat is called the "crumb coat" because you usually pull crumbs into your icing when you do it the first time.  If you let it set, you can add another layer of icing without pulling out crumbs so that you will not have crumbs in your final coat.  

While the second coat is setting, mix your colors.  I used store-bought liquid food coloring this time and HATED it.  You have to use a ton, you end up over-mixing the icing which makes it super stiff, and you don't get the colors you want.  I recommend getting the gel food coloring.  MUCH easier to work with.  

I used a small round bowl I had to indent a circle in the center of my cake so that I could make sure my stripes were evenly sized.

Now that I have a guide line, I can begin decorating.  The indentation will be covered with icing later.  

Using my stiff icing, I tried to make even stripes around.  I tried to do all one color, but soon realized it's easier to just switch bags while decorating, start on one side, and work your way around.  Now I know for next time.  

I wanted to do more stripes than this, but since I put orange on first, didn't have room.  Also, it was about 12:30 and I was tired.  :o)

I added a shell border to the bottom and piped stars on the top of the stripes to cover my uneven and messy ends.  

Using a small tip, I piped the lettering in the middle of the circle I left on top.  

Finished!
This was definitely a learning cake.  I would definitely use this design again, but with some adjustments.  I won't use liquid food coloring again.  I will just start on one side and work my way around.  I also need to adjust my cake and icing recipes, because they both turned out less than desirable for me this time.  Hopefully I'll be able to post again soon with a better attempt!

LinkWithin

Related Posts Plugin for WordPress, Blogger...