Showing posts with label Wreath. Show all posts

Thursday, August 25, 2011

Finally Fall Argyle Wreath!

I am super thrilled to announce that I am FINALLY back to doing monthly wreaths!  I had to take an unexpected hiatus after doing only four: December/January, February, March, and April.  When I began blogging, I had high expectations that I would be able to keep up with making one wreath per month to keep my front door happy and refreshed.  Once wedding season got underway, my schedule got a little uncontrollable, but I feel like I finally have the reigns back!

My mom and I are both unemployed and applying for jobs like crazy right now, but have decided to take one day a week until we get jobs to do something crafty/pinspired.  So, we decided to both make a wreath for our first of many weekly pinterest-inspired crafts.  (Once one/both of us are employed, we still plan to do this weekly, we'll just have to move it to an evening instead)  Here is my Pinspiration:


Now, this was a wreath someone was selling on etsy, so there were no tutorials.  But it looked simple enough, so I gave it a try.  I loved the argyle design, the simplicity, and the fact that it is a reminder that sweater weather is hopefully just a few weeks away.  I headed to our local JoAnn's and bought the following:


  • 2 skeins of Wool-Ease worsted weight Lion Brand Yarn in Wheat (number 402).  It was on sale at JoAnn's 2 for $5.  The texture didn't matter much since I was just going for the look, not the texture.  I ended up only needing one skein to wrap the entire wreath.
  • 1 skein of Lion Brand "Vanna's Choice" Yarn in Magenta.  (You don't need a whole lot, so if you have extra scraps of yarn at home, you could just use that).  
  • 4 sheets each of two colors of felt.  I actually only needed one sheet of each color I wanted, I don't know what I was thinking when I bought 4 of each!  I got an olive green and a chocolate brown
  • 1 14-inch straw wreath.  Typically, I use styrofoam wreath forms for my wreath projects, but since I was wrapping this wreath, I went for the cheapest option.  The straw wreath was only $2.99 and a 12-inch styrofoam wreath was $4.99.
  • You will also need some straight pins, but I didn't need to buy those since I already had them on hand.  
 To start this project, you need to wrap your wreath form in your base color.  Mine, as mentioned, was wheat.  I chose it because it was neutral and had little bits of darker fiber woven into the yarn.  This process takes a LONG time, but it's very easy.  To start, just tie the loose end of your yarn to the form in a basic, simple knot.


Then just wrap, wrap, wrap, wrap.  Make sure when you do this that you hold the yarn TIGHT to each piece you've already wrapped.  You also want to make sure you pull it tight.  With the gauge of this yarn, I had to pull it super tight and keep it tighter together, but if your yarn is thicker, you could probably leave it a little looser.  It actually would give it more of a cozy & cuddly look.   


Like I said, wrap wrap, wrap, wrap.  It gets boring.  And it gives your arm a workout.  I got into a rhythm of pulling the yarn tight, tossing the yarn ball through the center hole onto my lap, pushing the yarn close to the yarn already wrapped, and repeating.  It took me about an hour and a half to do the entire 14-inch form without a break.  With a cozy corner on the couch, a good crime show, and sleeping dogs at your side and your feet, it goes by pretty quick.  I even had a good bit of yarn leftover.  So now, I have an extra skein of wheat I need to find a project for...


When you're finished, you should have something that looks like this:  


You might notice there are some places where the straw form peeks through.  I left the plastic wrap on the form to keep it from poking out.  If I was not covering the whole wreath with detail, I would have been more of a perfectionist while I was wrapping to prevent "bald spots" or even wrapped it a second time.  But, I wasn't worried about that since this was really just the base.  

The next step is to decide on the size of diamonds you'll use for your argyle pattern.  I cut these three to choose from:  


After putting them on the wrapped wreath (and adding up how many of each I'd have to cut and attach) I decided on the largest size, which ended up being 3 1/2 inches tall and 2 1/2 inches wide.  


I used my sample diamond (which I cut out of cardstock) to trace directly onto my felt.  Like I said, I only needed one sheet of each color.  I like to line my shapes up with the already cut edge if possible to limit how much I need to cut.  That way, I can focus on cutting fewer lines and making them super straight.  I find the easiest tool to use when tracing onto felt is a ball-point pen.  It even shows up on darker colors because the ink leaves a little sheen.  


You'll end up having a bunch of cute little diamonds like this:  


Pictured is only six of each color, but for my 14-inch wreath I actually needed 7 of each color.  Once they are all cut, I laid them out, alternating colors and trying to line up the side corners of the diamonds by visualizing an invisible smaller circle.  Make sure when you do this that each diamond is "face-down" so that any ink lines from your pen tracing are not facing forward.  


The next step is to stick a straight pin in each of the diamonds at the top.  I chose to stick them on the outside edge.  You will remove these later, they are really only used to mark and hold each diamond for correct spacing.  


This part is the trickiest part of this wreath, but it's the FINAL STEP!  You will take your accent color yarn (in my case, the magenta).  To start wrapping this, you will need to tie it just like you did for wrapping the wreath form.  I rotated one of my diamonds to "hide" the tie underneath.  


Now, the tricky part is to start wrapping the wreath diagonally, trying to center the line on each diamond you pass over.  This is tricky to line it up so that it all looks symmetrical and even, but with some precision and focus, it's possible (and actually not as hard as it sounds).


As you can see, the way the back of the wreath looks really doesn't matter.  It will be against the door, so if the lines there are crooked, it's no big deal.  Once you get all the way around the wreath and have crossed over each diamond once, you will basically start going the opposite direction to cross over again diagonally.  You do not need to tie it again at the back.  If you have been keeping your yarn pulled tight, it should hold without tying.


The goal now is to cross over each diamond a second time, making the "X" across the center of each shape.  Something that also helped me keep things close to symmetrical and even was to try to make a smaller "x" between each pair of diamonds inside the center of the wreath (towards the bottom point of the diamonds).


Once you get all the way back around, you will tie your yarn off.  I chose to also pick up a couple pieces of my base yarn to make sure it was really secure.  I was really nervous that it would all fall apart once I let go!
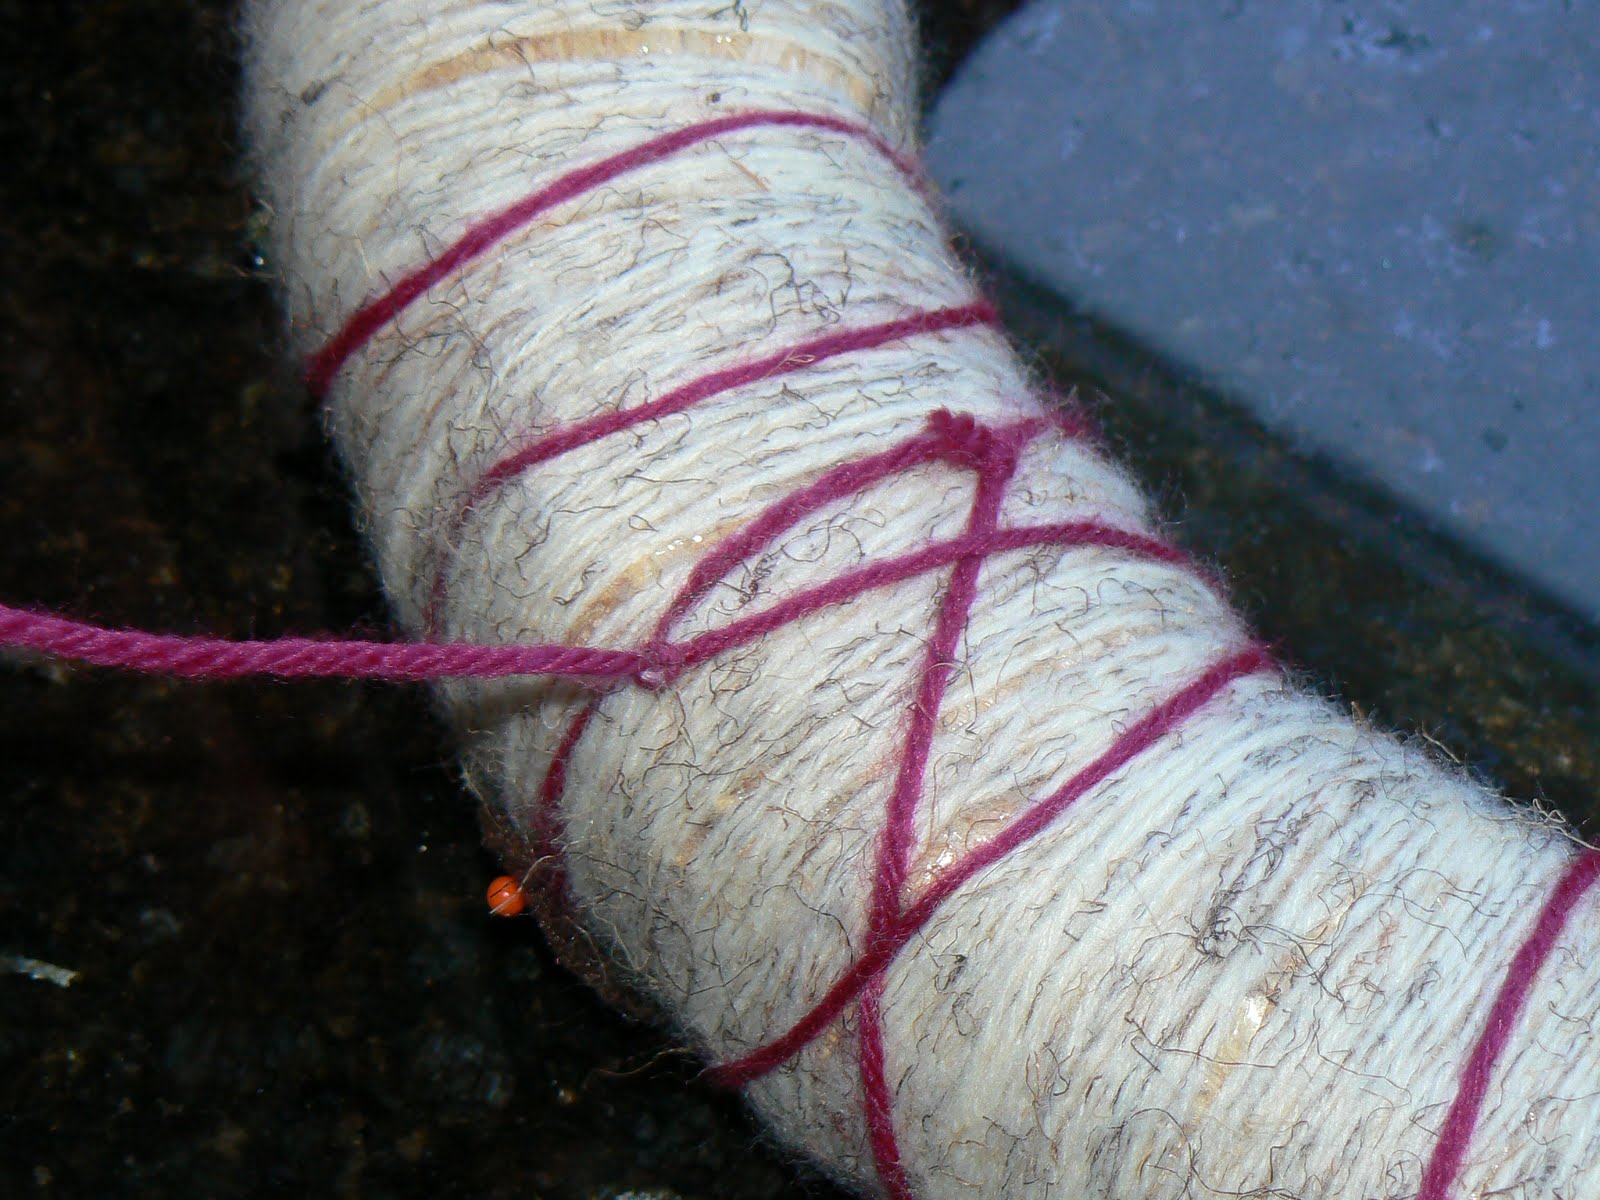

Once you have tied it off, you can pull out each of the straight pins because the magenta "x's" will hold the diamonds in place.  Finally, I used extra magenta yarn and just layered a bunch of it for my hanger.  I cut one piece that was probably about 4-5 feet long, and just kept "folding" it until I had a good, thick bunch I felt could hold the weight of the wreath.  I also looped this yarn under the base (wheat) yarn to make sure the magenta wouldn't snap and cause my entire wreath to fall apart.


And you're done!  Here's the completed wreath:


I think it's a perfect transition wreath from summer into fall.  I didn't want to get too fall-typical with pumpkins and corn husks just yet.  That's why I chose these colors, too...so that I wouldn't have orange and red on my door for the next three months!  I also like this one because it's adjustable.  Just since looking at pictures on my computer for blog posting, I noticed some un-even spaces between my diamonds, off-centered "X's"...at least I can slide things around until I like it.  Oh, the life of an OCD perfectionist!  :o)  Total time to make this wreath was about 2 1/2 hours, start to finish.  Total cost was about $10 (if you count only what you really need, not the surplus of yarn and felt I bought)!  Hope you can use this tutorial, or at least get inspired to make something fun for Fall.  I can't WAIT for it to get here!  I miss my hoodies, rosy cheeks, football Sundays, and nightly hot chocolate!


Friday, April 8, 2011

Jeepers Peepers!

It's time again for another wreath!  Actually...time for an EASTER wreath!


I meant to get to this last weekend, but time just didn't allow it.  I saw this idea in a FABULOUS magazine for lovers of creativity, entertaining, and cooking.  It's called "Celebrate" and is done by Phyllis Hoffman.  My mom is subscribed to it, and I always steal borrow it shortly after it comes in the mail to browse at all the cute ideas.  It is a great starting place for party planning, even if you want to throw a party but don't know what kind.  She comes up with party ideas for anything and everything, and everything is cute and coordinated which I love.  The crafts and decor are not ones that LOOK homemade, if you know what I mean.  But most of the ideas are cheap, and the magazine (and website) has wonderful printables.  I will someday subscribe myself so I can have my own collection!  

Anyway...on to the WREATH!  Here is your tutorial for my twist on the one that is in the most recent issue of "Celebrate" complete with pictures:

Here's what you'll need:
1 Flat-Sided wreath form
2 boxes of bunny shaped Peeps (I obviously overbought, but that's ok because I love the fluffy little treats!)
Wide ribbon the color of the Peeps you purchased (Satin is best)
Glue Gun
Scissors
Ribbon for hanging
Jellybeans to coordinate if you choose

Step One:
Wrap your wreath form with your ribbon, placing a dot of hot glue every now and then to secure it in place.  I accidentally bought the ribbon that is stiffer, so mine doesn't look as smooth as it would if you used satin ribbon.  However, I knew that it would be covered, so if it's cheaper you can use it!

Step Two:
Lay out your Peeps.  DON'T glue them down yet!  I just laid mine out to get the spacing.  To help it look more fluid, I only separated the peeps at the ears and heads, and left their bootylicious hips attached.  This gave me a very close idea of how many would fit.

Step Three:
Attach your Peeps to the wreath using TINY dots of hot glue.  I put one under each bunny.  I ended up  taking one bunny out eating one bunny to make my wreath even.  I started with one set of four and moved around, letting the hot glue sit on the wreath for about 30 seconds before placing the Peeps so they wouldn't melt or roast from the heat.

Step Four:
This is where the twist comes in.  Phyllis Hoffman left her wreath with just the Peeps, but I wanted to add a little more color.  I checked out the jellybeans in the grocery store to see if I liked anything and found these WONDERFUL pastel Lifesavers jellybeans that were on sale.  I love the color of them, and think I'll actually put the rest in a glass bowl for my table decor.  After playing around with different colors and patterns I decided on using blue, green, and purple to add some contrast, but still keep some sophistication and not getting to childish with all the colors.  To place them, I just put another tiny dot of glue between the each two bunnies, then squeezed the jellybean in between.  You don't have to push it all the way to the glue, but it helps keep it in place once it's hardened.  I pushed mine only about halfway down, the fluff of the Peeps hold them in place.  They touch the glue just enough for secure placement.

Step Five:
I might change this on my wreath, because I didn't take my time and didn't like the kind of ribbon I was working with.  If you do want to make a bow, here's what you do.  Cut a strip of ribbon that is the length of the bow you want when folded in half.  Glue the two ends together to make a ring.

Step Six:
Use another piece of ribbon and glue it around the center of your loop.  I ended up folding the ends under to make it look nicer.  Here's what it will look like on the front:


Step Seven:
Pull the center together and use a safety pin to pull it together.

Step Eight:
Attach another piece of ribbon, folding over and gluing the end you attach.  You'll attach one on each side of the center.

Step Nine:
To make a finished edge, fold the ends of the ribbons in half, and cut at an angle.  They should look like this:


Step Ten:
 I attached a thin ribbon to the back of my wreath to hang it, and attached the bow to my hanger separately.


And there you have it!  Cute little Peep wreath for Easter!  Hope everyone is enjoying some sunshine and Spring weather!

Wednesday, March 2, 2011

March Springtime Wreath!

Ok, I PROMISE there will be a surplus of blog posts in a few weeks.  I'm crafting, but keeping things under wraps until after my friend, Beth's shower.

In the meantime...it is March and time for a new wreath for my door!  Remember the heart wreath?  Well, that was fun and cute for February and Valentine's Day, but it was time to move on!  I wanted to do something green for St. Patrick's Day.  However, I didn't want to to be too cheesy or too shamrock-y because I wanted it to be able to stay up later than just for the holiday.  When I was trying to come up with ideas for this wreath, I decided I wanted it to be bright and colorful...something that looked "springy".  I also wanted it to have a lot of texture and fabric, but be different from my February wreath.  So...this is what I came up with:

It was SUPER easy, SUPER cheap, and SUPER fast!

Here's what you'll need if you want to make one similar:
  • A foam wreath form.  You could do any shape, any size.  Mine is an 8-inch round. 
  • Fabric in color/texture of choice for the main wreath.  I used a remnant of green soft flannel cotton I found in the bin at JoAnn's.  You could also use ribbon.
  • Extra fabric scraps for the flower/accent decor.  I didn't have a lot to choose from at home (at least not in the colors I wanted), so I bought this pack of quilting squares for $5.00 at JoAnn's.  
  • Scissors
  • Hot glue gun
  • Straight pins


Here's the steps I took:
  1. Snip the end of the fabric in about 1 inch sections.  


2.  Grab both sides of the slit, and pull apart to the other end.  Most fabric will naturally tear through in a straight line without a lot of effort. 


When you're done, you should have a bunch of strips like this with beautiful, slightly frayed texture!


3.  Glue down the end of the first strip and wrap around the wreath.  I put a dot of hot glue about every two-three wrap arounds on the back side.  I glued it at a slant so that the fabric wouldn't bunch up in the center.  


When you get to the end of one strip, glue it down, then start the next strip in the same spot you ended the first. 


4.  Continue wrapping around with the strips until you get all the way around the wreath form.

5.  Continue wrapping and gluing strips until you've covered all the white foam.  Then, I pulled up the ends on the back and snipped the excess.  

6.  I pulled out all the scraps to decide.  Here were my choices:


I narrowed it down to these three.  I added a fourth later because I still needed some more "fluff" to make my flower look right and cover the pins. 


7.  Cut each square in two pieces.  It doesn't matter if you use a straight pair of scissors or pinking shears.  I used two squares of each pattern.  


8.  Fold each piece like an accordion.  This reminded me of making paper fans when I was little.  :o)  


9.  Stick a pin through the end and just stick all the little fans in a cluster on your wreath.  This part took the longest, because I played around with the different arrangements, fluffing them in different ways, making sure the pins were covered, etc.  I chose to cluster mine off-centered.  


10.  For the hanger, I just used an extra scrap of fabric and hot glued it really good.  


Here's my flower cluster:


And my final wreath:


I like the way it turned out, but I may add a little more "something"...not sure what yet.  

Hope you like it!  This can definitely be modified for other holidays/months/themes with different colors and fabrics.  Have fun with it!

Look forward to my April wreath for Easter.  I'm SOOO excited about it and it is SO easy and fun!


PS...This is my first time ever, but I'm linking up to Under the Table and Dreaming.  Head on over for some more great ideas!


LinkWithin

Related Posts Plugin for WordPress, Blogger...