Saturday, November 26, 2011

October Date - Bake a Birthday Cake

I am WAY behind on blogging, and I apologize!  Life has been changing pretty rapidly and time has been slipping away from me.  So, in an effort to catch up before the holiday season gets fully under way, I'm going to try to do a couple of posts today.  First up, the next date in the Dates for a Year Basket!  It's already November, so you'll get two today.  But this one is all about October!  


When thinking about what to plan for October, I had a lot of options.  I could have planned a fall activity, like a hayride or corn maze.  I could have gone with the Halloween theme and sent them to a haunted house or ghost hunting near local urban legend sites.  But, Kim & Larry are a unique couple in that both of them have a birthday in October, only a few weeks apart.  So, October's date was baking and decorating a cake together!

Here's what was included in the October envelope:
  • Date Card
  • 1 box of cake mix
  • 1 jar of sprinkles
  • 1 "Happy Birthday" banner
  • Birthday candles
  • Party poppers


Here is the date card that was included in the envelope:


This date was fun to plan, and super easy.  This date could be modified for just one birthday, or you could choose to use it as a "half-birthday" celebration or to celebrate something else entirely.  I got all the supplies at my local grocery store.  You could also include a tub of icing, but since I was assembling this in July, I didn't want to send them something that would expire.  I of course didn't include the eggs or oil that they would need for mixing their cake, but those are inexpensive and simple things they could pick up at the store if they didn't have them at home.  On the card, I also mention the Red Plate.  I forgot I haven't posted about that yet, but will do that soon.  It's another cheap, easy, and meaningful wedding gift!  

This date cost about $10-$15, but could be less if you didn't include the decorations and more if you wanted to add more decorating supplies.  Actually, you could go all out and make just a birthday decorating kit to give as a wedding/baby/birthday gift for anybody.  You could include icing tips and bags, food coloring, a cake plate, books with decorating tutorials and ideas...  You could really make it nice!  

I'm hoping to get the November date posted this afternoon, since December kind of snuck up on my!  This is date 4 of 13...many more great dates to come!

Tuesday, October 4, 2011

September Date - Window Shopping

Time to share the next date from the Dates for a Year Basket!  Although I would have loved to plan awesome, spectacular, expensive dates for every month, it wasn't possible with my budget and to be able to include 12 complete dates.  So, I kind of "warned" Kim & Larry upfront that each date would be different, including the theme, experience, setting, and cost.  This month is a little more laid back and (I think) the least planned of all of them.  Or maybe I should say the most freedom for creativity.  :o)  


I decided to use this date for September because it could be indoors or outdoors, and I thought the "just before Fall" weather gave them the option to spend some time outside in the cool breeze, or if the Summer heat was lingering, hanging out indoors.  September's date is a window shopping date!

Here's what was included in the September envelope:
  • Date Card
  • $10 Cash


Here is the date card that was included in the envelope:


On the card, I mentioned a few local places for suggestions, but those could easily be swapped out for what's near you for drooling over expensive brands or local flair.  And although this date doesn't have a lot of "pre-planned" instructions, I think it's a good second month date for newlyweds.  A great chance to step away from the stress of finances and just focus on each other. 

This date only cost $10...obviously!  It could of course be less or more if you wanted.  It could be a free date if you chose to bring along your own coffee or not to snack while you were out.  Or, you could add a bit more cash for lunch or dinner...maybe even a little to buy a treasure from your trip.   

I haven't heard from my sis yet about if they went on this date yet, and/or how it went, but I will share when I find out!  I just wanted to get this date posted for those that were waiting.  This is date 3 of 13...stay tuned for October's date reveal!

Tuesday, September 27, 2011

Easy Cheesecake Decor

My life is pulling me away from blogging, but hopefully I'll get into some kind of regular rhythm here soon.  For tonight, I've got a quick and easy tip for decorating a cake for any occasion.  My brother's birthday was yesterday.  I asked him what kind of cake he wanted, and he asked for a chocolate cheesecake with raspberry sauce.  So, I found a great recipe for a super easy marble cheesecake.  It was definitely yummy!  The problem is, I'm a cake decorator.  With icing.  Cheesecake and icing don't go too well together.  But, it WAS a birthday cake, so it needed to be festive somehow!  So, here's a simple trick to decorate cheesecake, cakes that won't be complimented with icing, or something to add to a store-bought cake to make it your own.  The best part?  Here's all you need:

Chocolate Chips
Ziploc Bag
Wax Paper

The first thing I did was dump a good amount of chocolate chips into a bowl.  I probably used a cup and a half (maybe a little more).  I microwaved the chocolate for one minute, stirred, and microwaved for one additional minute.  After two minutes in the microwave and some stirring, it was completely melted.  Next, I cut a small tip in the corner of the Ziploc bag and spooned the melted chocolate into the bag.  After you've done that, you're ready!  I laid down a nice size piece of wax paper, and started writing birthday sentiments.  I planned to just do one, but had extra chocolate, so kept going.  I figured the more choices I had, the better.  


This was my first time doing this, so I'll tell you what I've learned.

  • Cut a large hole (to match the thickness you want your letters) and write slowly.  I cut a smaller hole, so had to go over my writing a second time, and I didn't quite like the way that looked.  I think if you have a larger hole and write slower, you would get a better result.  
  • Make sure all your letters connect for each word.  If you notice, I even connected the "th" after 17 and the exclamation point.  It looks strange and not right when you do it, but it will make sense when it's on the cake. 
So after you've written your sentiments and/or drawn your designs, stick your chocolate in the freezer.  I slid my wax paper onto a cookie sheet to put into the freezer.  I wanted my letters to be flat (my cake wasn't that big), so I used the flat surface of the baking sheet.  You could also place it in a curved bowl or dish if you wanted your chocolate to set that way.  I let my chocolate sit in the freezer overnight plus about 6 hours.  But you're really just looking for the chocolate to be hardened, so it probably would be ready in about an hour.  


I chose my favorite words, and easily peeled them off the wax paper...


...and then just stuck them into the cake!  That's it!  (Please ignore my huge lack of water bath cheesecake crack)


I would change a few things the next time I do this, but I think it turned out alright.  It's different, simple, and still special.

Just imagine all the things you could do!  You could even use white chocolate or almond bark with added food coloring if you wanted to add some color.  I'm excited to incorporate this idea into future cakes and experiment to see what else I can come up with!

Sunday, September 4, 2011

August Date - Bookstore Scavenger Hunt

I'm excited to finally be able to share one of the dates I planned for my sis and her new hubby for their Dates for a Year Basket I gave them as their wedding gift.  I wanted their first date to be fun, exciting, and different.  So after I planned all twelve dates, I decided to put this one first because of its originality and hopefully to get them excited to open their date envelope each month.  August's date is a bookstore scavenger hunt.  I got the idea from The Dating Divas originally, then googled "bookstore scavenger hunt" to come up with more ideas.  (Kim & Larry...hold off on visiting that site, because one more date I've planned came from them!)  They have AWESOME and creative date ideas, for all types of dates (including double or group dates) and all types of budgets.  You could even take some of their ideas and transfer them for something to do with friends or family.  GREAT resource.

Anyway, here's what was included in the August envelope:
  • Date Card
  • 6 labeled envelopes including "task cards" to be opened at the bookstore

Here is the date card that was included in the envelope:


I was super excited that I happened to have coordinating stickers in different colors to label Kim & Larry's envelopes!  I didn't even realize I did until I was trying to decide how they would know which envelopes to open together.  


For the task cards, I had planned to use the ones linked on the Dating Divas site, but when I clicked on it, the link was no longer available.  This inspired me to create my own task cards, which I actually enjoyed because I made three cards instead of two, and added some other tasks of my own and some that I found online.  Here are the three different cards that were in the envelopes:


Of course, I adjusted the cards for each of them.  This is Kim's set of cards; for Larry's, I replaced his name with Kim's and his last category was called "His".  If you don't like one of these, you could change them out with other ideas or shorten them to only two cards.  I kind of catered these tasks to fit Kim & Larry, but there are a lot of other ideas out there.  At first, I thought of just making one set of task cards since they were looking for the same things.  But I like the idea of separating and then coming back together to talk about it, so Kim got pink cards and Larry got green ones.  

Kim texted me the evening of their date when she got home and said they loved it and had lots of fun.  Here's some pics of their night:


This date really only cost the time it took to put it together and assemble the envelopes.  So, if you're looking for a free date, this is an easy and fun one to do.  But just like anything that's free, it takes time to prepare to make a success.  So, there is date number 2 of 13!  Stay tuned for September's date!

Tuesday, August 30, 2011

Pinspiration Tuesday

Last week, I told you about how my mom and I were starting to take one day a week to actually DO something we pin on Pinterest, and not just dream about it.  This week, we took a different spin on this, but I'm super excited about it.

One of the first things we decided was to make some of the yummy food we've been drooling over.  This week, mom made dinner and I made dessert.  Next week, we'll switch and I'll do dinner while mom finds something sweet for dessert.  It was fun, and a huge success!  I think my dad and brother are going to really enjoy Pinterest day for the great meals we'll get to try!

**Sidenote:  We're actually calling this Pinterest/Food Network Day, since we're excited about trying out some of the things we're seeing on The Pioneer Woman's new show.  I'm also subscribed to Monthly Christmas FN Magazine that has HUNDREDS of delish recipes included!**

Mom made these Spinach Lasagna Rolls (I took the picture after we ate some...hehe):


The linked recipe was the inspiration, but she actually used alfredo sauce, and combined a bunch of different recipes she found.  She also tossed some ready-made frozen meatballs in the pan.  It was DELISH and surprisingly filling.  

She also tossed together this Marinated Tomato Salad with Herbs from Pioneer Woman's cooking show debut:


It was also super yummy and went really well with the pasta dish.

For dessert, I made these awesome Caramel Apple Cheesecake Bars:


It already sounded yummy, but when I got to the bottom of the recipe and saw it was adapted from Paula Deen, I knew it was a good choice!  We couldn't wait to eat it, so dove in when it was still warm instead of waiting for it to chill.  Even warm, it was also a winner!

So, that was the meal for this week.  We also got some rosemary olive oil bread and stuffed mushrooms from Kroger.  I am totally full & happy as I write this!

The second part of today's Pinspiration actually wasn't inspired by anything on Pinterest.  I know, I know, I'm already breaking my own rules.  But I AM currently unemployed, so going to JoAnn's, Michael's, or Hobby Lobby each week to get supplies is not a great habit.  I'm hoping that will change in the very near future.  But for now, I needed to figure out a way to cut down costs on my crafting addiction.  So, mom suggested heading to Goodwill to find something to renew, upcycle, or change into something new.  I had a few doubts, but figured it was worth a shot.  I wasn't sure how many things I'd be able to find and/or how I could make something simple into something I could be proud of creating.

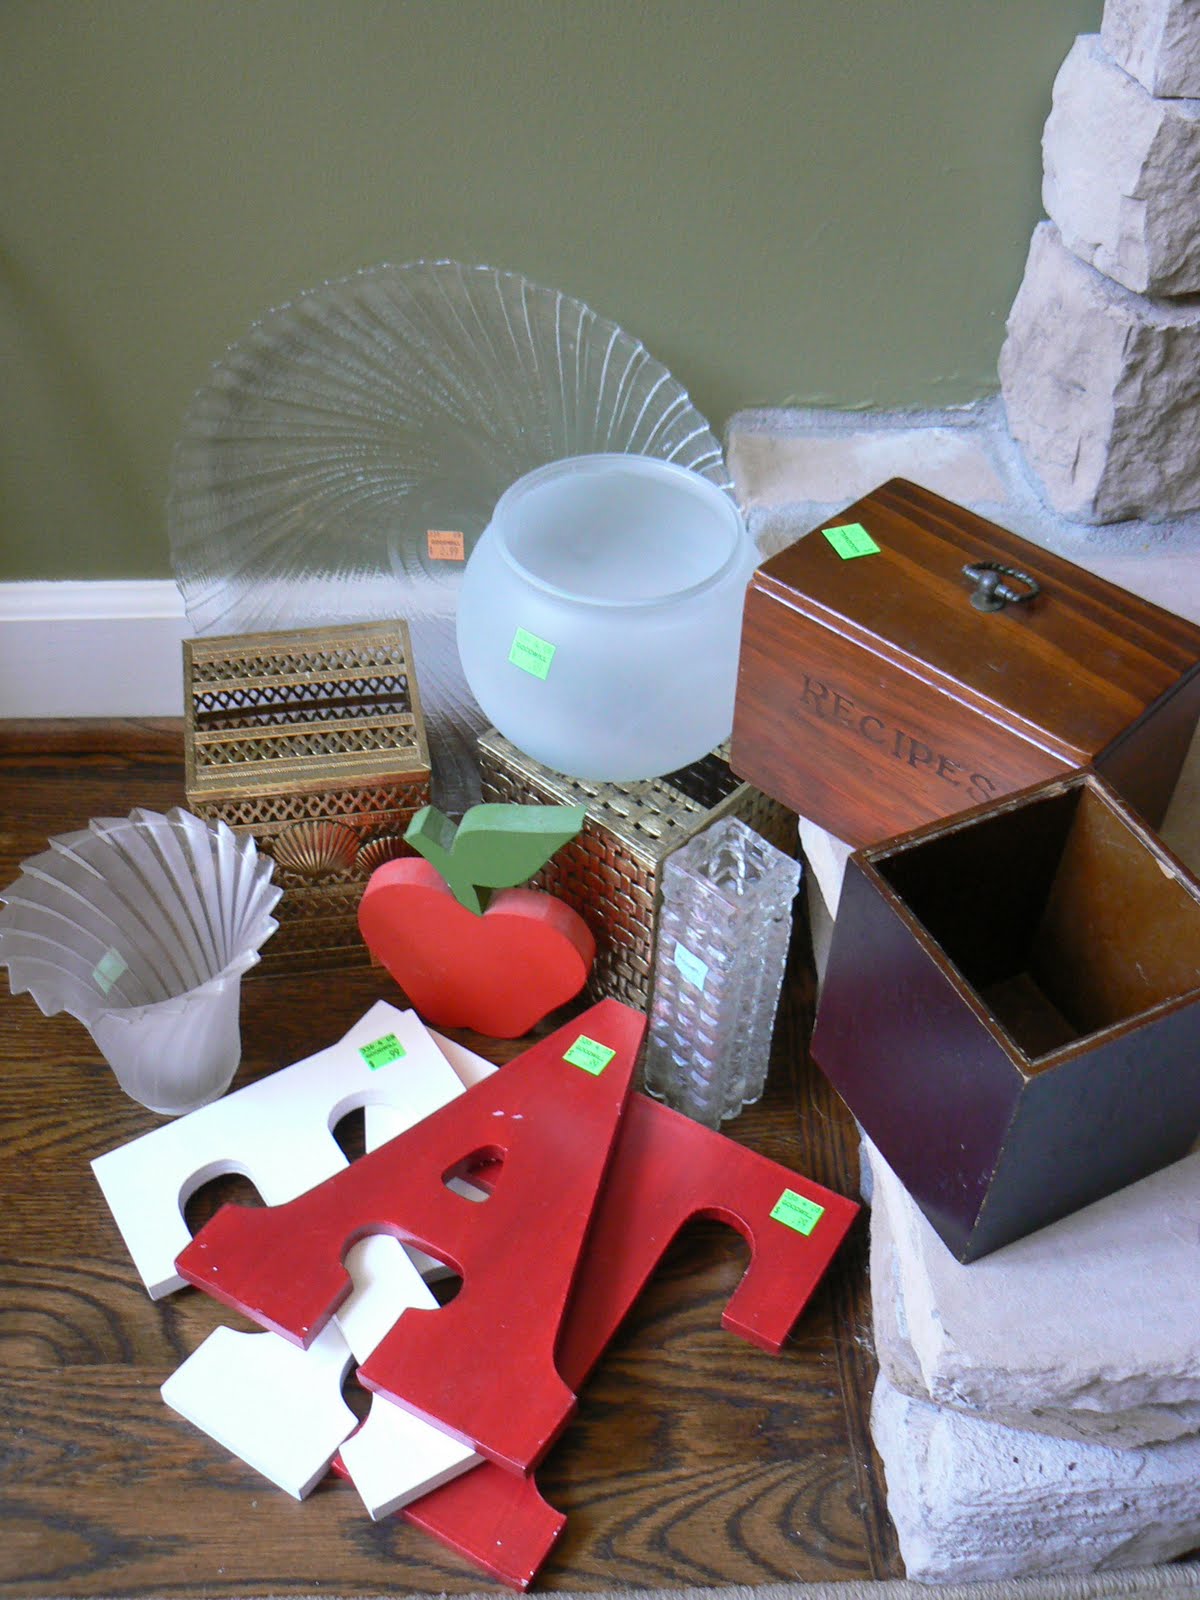
Well, We were not in Goodwill longer than 5 minutes and my arms were FULL of items I had plans for.  I actually had to start putting things back and deciding what to purchase and what to leave behind!  I found so many little treasures and my mind was racing with different ideas.  I've had many requests and suggestions from a lot of different people that I should launch my own etsy shop to sell some of the things I create.  So, my mind was going wild with what I could do.  Before I launch an etsy shop, I want to have a good stock of things to sell.  I think it's a great idea, because I love crafting and creating; it's definitely a deeply loved therapy of mine.  But in my little apartment, there's just not room for me to keep it all!  Walking around Goodwill, I got a ton of ideas of where I could start with that so hopefully my etsy will be up and running soon.  I'll keep you posted!  To start...here's what I got today:


A glass lampshade, four wooden painted letters, a wooden painted apple, two brass metal tissue box covers, a wooden box, a large glass plate, a tall rectangular vase, a frosted glass bowl, and my absolute favorite:  a wooden recipe box.  


Isn't she a beauty?  Well...she's pretty now, but with a little love and attention I think she'll be a star!  I love the vintage look, but the stain job has scratches, there are some nicks in the side, and it's a little dirty.  Nothing a little elbow grease and love can't fix!  I started on this project today, but don't want to reveal until I'm finished and know which direction I'm headed.  Most of my projects are a work in progress and ever-changing until the very end.  Stay tuned for how it turns out!

I'm excited about this new journey of creating things from my own mind an not necessarily copy someone else's creativity.  We'll see how it all goes!


AWESOME Giveaway!

Hey guys!  I'll be blogging later tonight or sometime tomorrow about today's Pinspirations.  For now, I wanted to fill you in on an amazing giveaway happening RIGHT NOW!

Caity Shinnick is the sister of my long-time best friend from high school.  She is very creative, and makes beautiful, classy, and elegant stationary, invitations, jewelry, and more.  I've been following her blog for a while, and am excited to tell you all that she has a brand new website up and running.  Caity's sister, Sarah gave me some stationary designed by Caity a few years ago and I love it so much that I only use it for very special notes and occasions.  Her stuff is just my style, and I'm anxious to see how far she goes now that the world is able to purchase her creations online.

To kick off the big launch of her website, she is having an AWESOME giveaway with some things we all love!  I encourage you guys to head over and enter (I'm entering as many ways I can).  Then, check out all her cute stuff...you can place an order right on her site!  GO NOW...HERE!


Check in later tonight...I'm excited to share some things with you guys that I'll be working on the next few weeks!

Thursday, August 25, 2011

Finally Fall Argyle Wreath!

I am super thrilled to announce that I am FINALLY back to doing monthly wreaths!  I had to take an unexpected hiatus after doing only four: December/January, February, March, and April.  When I began blogging, I had high expectations that I would be able to keep up with making one wreath per month to keep my front door happy and refreshed.  Once wedding season got underway, my schedule got a little uncontrollable, but I feel like I finally have the reigns back!

My mom and I are both unemployed and applying for jobs like crazy right now, but have decided to take one day a week until we get jobs to do something crafty/pinspired.  So, we decided to both make a wreath for our first of many weekly pinterest-inspired crafts.  (Once one/both of us are employed, we still plan to do this weekly, we'll just have to move it to an evening instead)  Here is my Pinspiration:


Now, this was a wreath someone was selling on etsy, so there were no tutorials.  But it looked simple enough, so I gave it a try.  I loved the argyle design, the simplicity, and the fact that it is a reminder that sweater weather is hopefully just a few weeks away.  I headed to our local JoAnn's and bought the following:


  • 2 skeins of Wool-Ease worsted weight Lion Brand Yarn in Wheat (number 402).  It was on sale at JoAnn's 2 for $5.  The texture didn't matter much since I was just going for the look, not the texture.  I ended up only needing one skein to wrap the entire wreath.
  • 1 skein of Lion Brand "Vanna's Choice" Yarn in Magenta.  (You don't need a whole lot, so if you have extra scraps of yarn at home, you could just use that).  
  • 4 sheets each of two colors of felt.  I actually only needed one sheet of each color I wanted, I don't know what I was thinking when I bought 4 of each!  I got an olive green and a chocolate brown
  • 1 14-inch straw wreath.  Typically, I use styrofoam wreath forms for my wreath projects, but since I was wrapping this wreath, I went for the cheapest option.  The straw wreath was only $2.99 and a 12-inch styrofoam wreath was $4.99.
  • You will also need some straight pins, but I didn't need to buy those since I already had them on hand.  
 To start this project, you need to wrap your wreath form in your base color.  Mine, as mentioned, was wheat.  I chose it because it was neutral and had little bits of darker fiber woven into the yarn.  This process takes a LONG time, but it's very easy.  To start, just tie the loose end of your yarn to the form in a basic, simple knot.


Then just wrap, wrap, wrap, wrap.  Make sure when you do this that you hold the yarn TIGHT to each piece you've already wrapped.  You also want to make sure you pull it tight.  With the gauge of this yarn, I had to pull it super tight and keep it tighter together, but if your yarn is thicker, you could probably leave it a little looser.  It actually would give it more of a cozy & cuddly look.   


Like I said, wrap wrap, wrap, wrap.  It gets boring.  And it gives your arm a workout.  I got into a rhythm of pulling the yarn tight, tossing the yarn ball through the center hole onto my lap, pushing the yarn close to the yarn already wrapped, and repeating.  It took me about an hour and a half to do the entire 14-inch form without a break.  With a cozy corner on the couch, a good crime show, and sleeping dogs at your side and your feet, it goes by pretty quick.  I even had a good bit of yarn leftover.  So now, I have an extra skein of wheat I need to find a project for...


When you're finished, you should have something that looks like this:  


You might notice there are some places where the straw form peeks through.  I left the plastic wrap on the form to keep it from poking out.  If I was not covering the whole wreath with detail, I would have been more of a perfectionist while I was wrapping to prevent "bald spots" or even wrapped it a second time.  But, I wasn't worried about that since this was really just the base.  

The next step is to decide on the size of diamonds you'll use for your argyle pattern.  I cut these three to choose from:  


After putting them on the wrapped wreath (and adding up how many of each I'd have to cut and attach) I decided on the largest size, which ended up being 3 1/2 inches tall and 2 1/2 inches wide.  


I used my sample diamond (which I cut out of cardstock) to trace directly onto my felt.  Like I said, I only needed one sheet of each color.  I like to line my shapes up with the already cut edge if possible to limit how much I need to cut.  That way, I can focus on cutting fewer lines and making them super straight.  I find the easiest tool to use when tracing onto felt is a ball-point pen.  It even shows up on darker colors because the ink leaves a little sheen.  


You'll end up having a bunch of cute little diamonds like this:  


Pictured is only six of each color, but for my 14-inch wreath I actually needed 7 of each color.  Once they are all cut, I laid them out, alternating colors and trying to line up the side corners of the diamonds by visualizing an invisible smaller circle.  Make sure when you do this that each diamond is "face-down" so that any ink lines from your pen tracing are not facing forward.  


The next step is to stick a straight pin in each of the diamonds at the top.  I chose to stick them on the outside edge.  You will remove these later, they are really only used to mark and hold each diamond for correct spacing.  


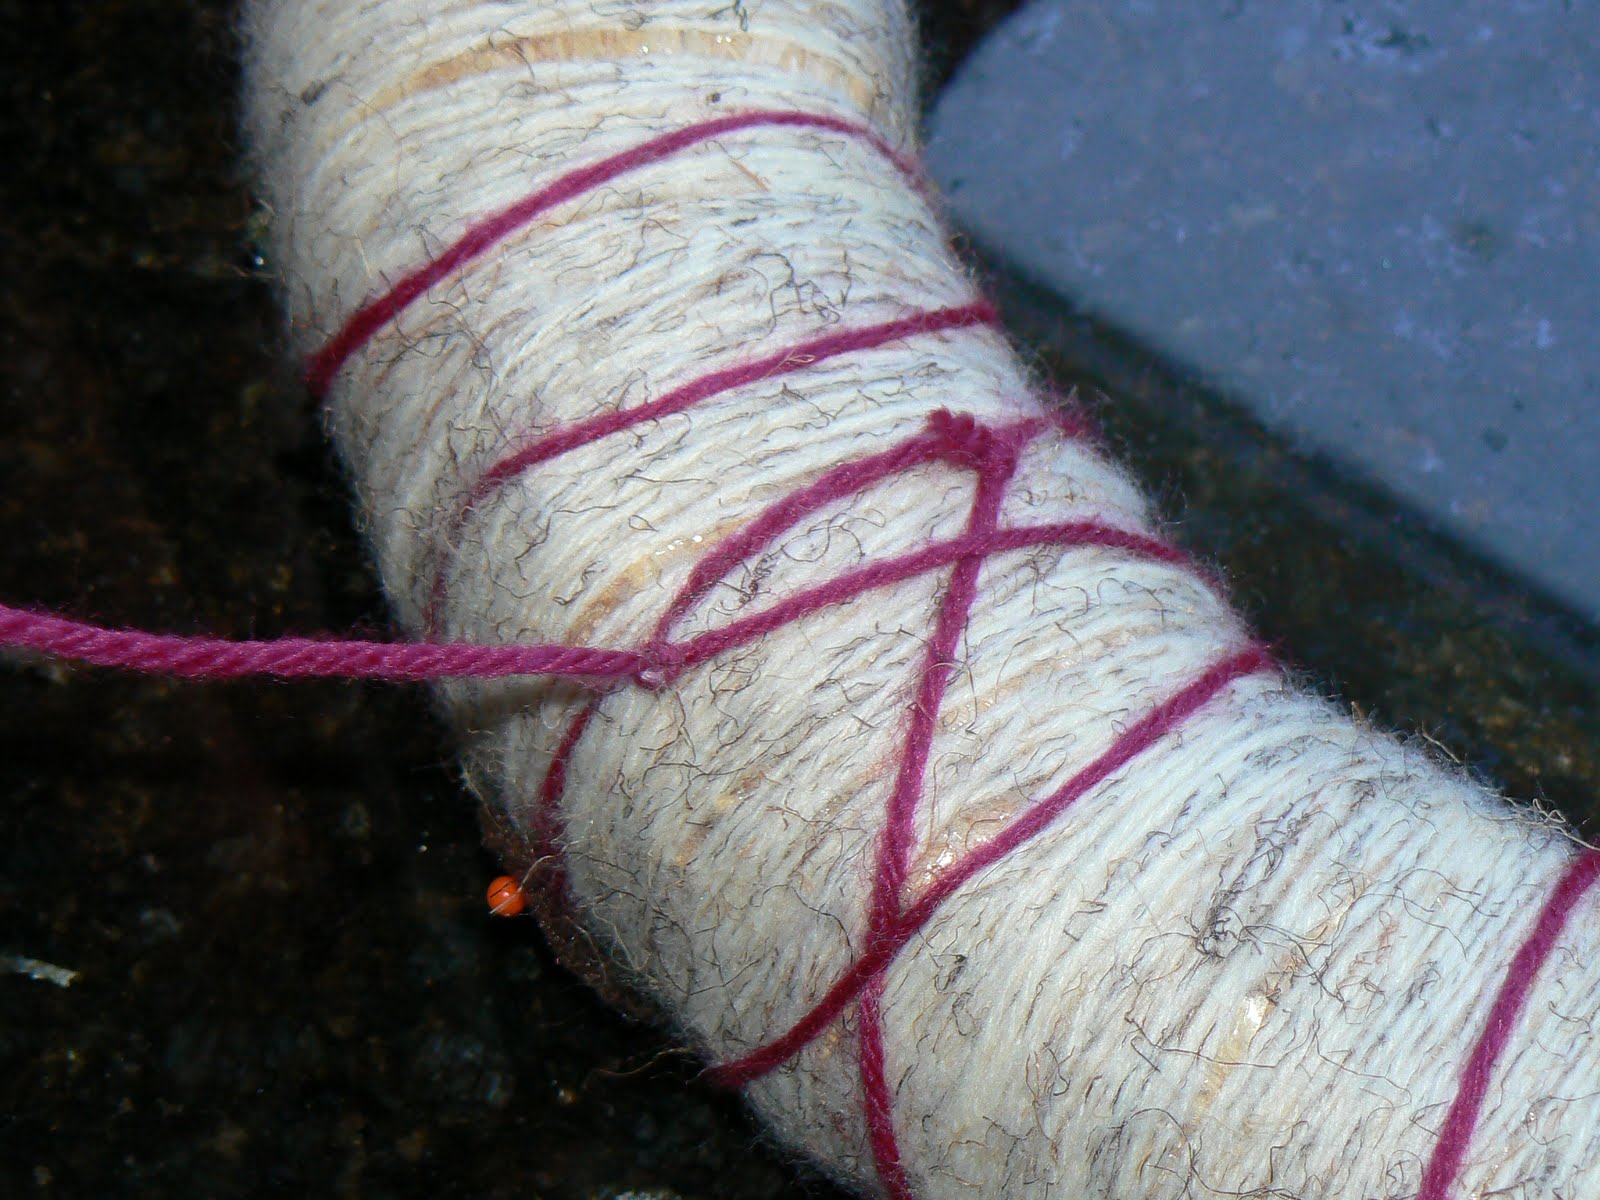
This part is the trickiest part of this wreath, but it's the FINAL STEP!  You will take your accent color yarn (in my case, the magenta).  To start wrapping this, you will need to tie it just like you did for wrapping the wreath form.  I rotated one of my diamonds to "hide" the tie underneath.  


Now, the tricky part is to start wrapping the wreath diagonally, trying to center the line on each diamond you pass over.  This is tricky to line it up so that it all looks symmetrical and even, but with some precision and focus, it's possible (and actually not as hard as it sounds).


As you can see, the way the back of the wreath looks really doesn't matter.  It will be against the door, so if the lines there are crooked, it's no big deal.  Once you get all the way around the wreath and have crossed over each diamond once, you will basically start going the opposite direction to cross over again diagonally.  You do not need to tie it again at the back.  If you have been keeping your yarn pulled tight, it should hold without tying.


The goal now is to cross over each diamond a second time, making the "X" across the center of each shape.  Something that also helped me keep things close to symmetrical and even was to try to make a smaller "x" between each pair of diamonds inside the center of the wreath (towards the bottom point of the diamonds).


Once you get all the way back around, you will tie your yarn off.  I chose to also pick up a couple pieces of my base yarn to make sure it was really secure.  I was really nervous that it would all fall apart once I let go!


Once you have tied it off, you can pull out each of the straight pins because the magenta "x's" will hold the diamonds in place.  Finally, I used extra magenta yarn and just layered a bunch of it for my hanger.  I cut one piece that was probably about 4-5 feet long, and just kept "folding" it until I had a good, thick bunch I felt could hold the weight of the wreath.  I also looped this yarn under the base (wheat) yarn to make sure the magenta wouldn't snap and cause my entire wreath to fall apart.


And you're done!  Here's the completed wreath:


I think it's a perfect transition wreath from summer into fall.  I didn't want to get too fall-typical with pumpkins and corn husks just yet.  That's why I chose these colors, too...so that I wouldn't have orange and red on my door for the next three months!  I also like this one because it's adjustable.  Just since looking at pictures on my computer for blog posting, I noticed some un-even spaces between my diamonds, off-centered "X's"...at least I can slide things around until I like it.  Oh, the life of an OCD perfectionist!  :o)  Total time to make this wreath was about 2 1/2 hours, start to finish.  Total cost was about $10 (if you count only what you really need, not the surplus of yarn and felt I bought)!  Hope you can use this tutorial, or at least get inspired to make something fun for Fall.  I can't WAIT for it to get here!  I miss my hoodies, rosy cheeks, football Sundays, and nightly hot chocolate!


LinkWithin

Related Posts Plugin for WordPress, Blogger...