Monday, August 22, 2011

College or BUST!

I realize I may be a little late with this list, but I'm hoping it will help someone somewhere.  Recently, I was cleaning off some files on my computer and ran across this list.  I know there's got to be some anxious moms and/or OCD new students getting ready to start college, so I figured I'd share what I have.  A few years ago, a family friend of ours had a daughter getting ready to go off to college.  The mom asked for my help to compile a list of what I thought was necessary for a college student to have on campus if they are away from home so that they can feel comfortable and prepared.  Well, if you know me (or have been keeping up with my blog), you probably have learned that I am someone who likes to be ready overly prepared for just about anything. On top of just having what I need for life at college, I also was  Resident Advisor (RA) for two years.  So, that gave me a self-appointed responsibility to have anything a girl would need should someone come to me for some help with something.  So, after looking back on my original packing list from my Freshman year and adding to it things I've collected/added to my "stuff"/found necessary for life as a co-ed, I compiled this list to send to our friend (who loves being prepared and organized as much, if not more than I do).

Here's a little background just to set the scene.  When I was going to college, I was moving two hours away from home (Franklin, TN) to a small little college town (Murray, KY).  Murray is a very small town, and at the time I went there, there was only one Wal-Mart within driving distance.  If I forgot something I needed from Target, Bed, Bath & Beyond, the mall, etc. I'd have to wait until my next trip home.  So, I tried to get as much as possible before moving.  My best friend from high school was my "suite-mate"...we had different roommates, but our rooms shared a bathroom.  So, we had a little time to talk and coordinate what we were bringing.  I later roomed with her, and it wasn't until my junior year that I lived on my own.  As an RA at Murray State, I had the privilege of living in my own room with my own bathroom.  So I started by just bringing the bare minimum, but once I got to living on my own, I needed EVERYTHING.  So, if you are using this list for yourself or your own college student, you may want/need to bring it down a couple notches.  Just wanted to give you that warning so this list doesn't completely overwhelm you.  Ready?  GO!


Kitchen
Refrigerator - Check with your residential hall for any size restrictions they might have.  
Hot Plate/George Foreman grill - Check with your residential hall on restrictions.  We  weren't allowed hot plates at Murray
Microwave - Check these rules as well.  Most colleges will have wattage restrictions.  
Plastic set (4) of bowls/cups/plates 
Knife
Coffee maker and mugs
Silverware
Can opener
Chip clips
Dish scrub brush
Dish towels
Oven Mitt
Pizza Cutter
Plastic containers (Tupperware, Gladware disposable containers)
Water filter
Bowl for popcorn, chips, etc
Plastic pitcher
Favorite recipes from home
Cookie Sheet
Saucepan (3qt or 4 qt), other cooking utensils

Basic Foods:
Bottled Water
Cereal
Condiments
Packaged Foods
Favorite Snacks
Peanut Butter & Jelly
Popcorn
Granola Bars
Ramen Noodles
Easy Mac
Soda
Soup

Bath/Toiletries
Shower tote
Shower flip-flops
Shampoo/conditioner
Hair products
Shower gel or bath soap
Face soap
Traveling-soap containers
Toothpaste and toothbrush
Dental floss
Comb/brush
Tweezers
Nail Clippers/file/polish
Razor and shaving cream
Hair dryer
Hair straightener/curling iron, etc
Cosmetics
Lotion
Facial moisturizer
Deodorant
Cotton balls and cotton swabs
Bath towels (2-4)
Washcloths
Hand/face towels
Shower cap
Possibly shower caddy or over-shower head shelves for storage
Bathroom cup
Bathrobe
Shower Curtain
Plunger

Medicine to have on-hand:
Aspirin or ibuprofen
Vitamin C
Stomach relief (Pepto-Bismol)
Neosporin
Band-Aids
Cough drops
Cold medicine (like Dayquill/Nyquill)
Midol
Vapor rub
Prescriptions
Decongestant
Eye drops
Ice packs
Heating pad
Basic first-aid kit
Rubbing alcohol
Hydrogen peroxide

Laundry
Drying Rack
Iron and Ironing Board
Laundry bag/basket
Laundry marking pen
Stain stick/stain remover
Sewing kit
Rolls of quarters
Lint brush
Clothes hangers
Safety pins

Bed
Two sets of sheets and pillowcases
Comforter
Two pillows
Two blankets
Mattress pad
Stuffed animal
Alarm clock
Bedside lamp (some clip onto the bed)
Nightlight

Clothing Guidelines
Underwear
Socks (more if you'll be playing sports)
Pants/jeans
Shirts/blouses…casual and also dressy for going out
Sweats
Pajamas
Slippers and/or flip-flops
Sweaters and/or sweatshirts
Light/heavy jackets
Gloves/scarf/hat
1 pair of boots
2 pairs of sneakers or comfortable/walking shoes
1 pair of dress shoes
1 set of business attire
1 set of semi-formal attire (optional)
Belts
Dress Clothes
Jewelry & Watch
Pantyhose
Purse
Swim Suit
T-Shirts
Workout Clothes
Sunglasses

School Supplies
CD–ROMs/Keychain Flash Drives 
Phone/address book
Assignment book
Heavy-duty stapler and staples
Pens and pencils
Pencil holder and sharpener
Notebooks
Notebook Paper
Pocket folders
3 x 5 cards
Post-it® notes
Paper clips
Rubber bands
Scissors
Scotch tape
Masking tape
Highlighter pens (multiple colors)
Ruler
Dictionary and thesaurus
Stamps/envelopes
Cables
Computer
Internet Access / Modem
Keyboard
Mouse & Pad
Phone Cord
Printer / Printer Paper
Printer Cartridge
Software
Speakers
Surge Protector
Backpack
Calculator
Calendar
Cell Phone / Electronic Services
Desk Lamp
Glue
Markers
Three-hole Punch
Waste Basket
White-Out

Electronics
Television
DVD/VCR player
Radio/CD player
Phone with answering machine (cordless is best) - Most buildings will have a phone system so you'll need this to call room-to-room.  
Headphones
Extension cords
Surge protectors
Fan
Portable vacuum cleaner
Camera and charger
Batteries (AAA, AA, C, and D)
Flashlight with batteries

Room Needs, Decorations, and Storage
Milk crates or other sturdy storage cubes (a collapsible crate also comes in handy for carrying laundry or other things)
Stacking baskets
Under-the-bed storage trays
Adhesive hooks, tacky adhesive, and mounting tape (3M brand)
Bulletin board and push pins
Dry erase board and markers
Toolkit
Area rug
Posters/art
Family Photos
Holiday Decorations
Folding chair/bean bag chair
Fly Swatter

Cleaning Supplies
All-purpose cleaner
Toilet cleaner/brush
Rubber gloves
Windex wipes
Bleach
Air freshener (spray, and plug-in)
Febreeze
Lysol

Miscellaneous Needs
Umbrella
Beach Towel
Board Games
Bug Spray
Sunblock
Cards
Duct Tape
Earplugs
Sports Equipment
Videos
Water Bottle

Important Documents to Have
Bank Account / Checks
Pre-Paid Credit Card
Driver’s License
Financial Aid Forms
Medical Insurance Card
Registration Information
Renter’s Insurance
Social Security Card
Student ID

Buy when you get there:
Ziploc Bags (sandwich and gallon size)
Paper Towels
Trash Bags
Light Bulbs
All-purpose cleaners
Laundry Detergent/Fabric Softener
Dish Soap
Hand Soap
Tissues
Wet Wipes
Toilet Paper

I'm sure some of this seems like common sense, but I guarantee if you shop without a list, you'll miss something basic.  It's overwhelming to shop and make sure to get everything you need, so using a list will give you something visual and concrete you can check off as you go.  

Something else I wanted to share with you is a few pictures of my room.  Dorm rooms are GROSS and plain and small.  It's hard when you walk in on that first day and see this:


 ...to imagine that it will be any kind of cute and comfortable.  But, with some creativity and hard work, you can make it unique, homey, and your own little oasis.  There are a TON of great ideas out there.  I've seen lots of great ideas on Pinterest for organizing and making your dorm room nice.  Here are some of the ways I made mine work for me (Most of these are from when I was an RA and had my own space, but you can still transfer some ideas to a shared space):


The TV stand was actually a cheap find at Goodwill that my mom restored for me.  She hand-painted the flowers and added some detail to match my "shabby-chic" look.  As an RA, I was able to set up the room the way I wanted, so I pushed my beds together.  This was perfect for movie nights and card games with a bunch of friends.  You can fit a LOT of people on that bed!  Plus, it gives you TONS of under-bed storage...a need at college!  Some girls did this even if they were roomies to give them more flexibility in their room.  


I got the sheer single-panel curtain and beading valance on clearance at TJ Maxx.  Since my window was so narrow, I only needed one, so clearance was the best place to look for cute stuff that didn't have a partner.  The signs above my bed are metal...I got them at a shoppe I worked at in the summer.  They are just hung with ribbon on 3M hooks.  My college had an annual poster sale, which is where I got the print of the famous Wars End Kiss.  I just stuck it on the wall with sticky tac.


Don't forget to bring closet hanging shelves!  They were a HUGE space saver and kept me organized!  It's also important to have a trash can with a lid.  That's a small space and you don't want your leftover lunch to be stinkin' up the joint.  For me, I was able to fit one of the tall plastic drawers under my pedestal sink for extra bath storage.  That laundry hamper was great, too because you could detach the bag and carry it straight to the laundry room!  If you notice, I got a couple of large binder rings and hung them on the wall with another 3M hook to hold my necklaces and bracelets without getting tangled.  


Here you can see my mom's awesome painting detail better.  :o)  Also...I brought lots of picture frames.  Not all my loved ones where in KY with me, but I still got to look at their beautiful faces every day!  Also...most colleges have a candle restriction.  The tea lights on top my TV were glass holders with battery-operated flameless lights.  Perfect for the candle vibe without the fire hazard.  


I got the matching shower curtain to go with my shabby chic sheet set.  I also hung a ceramic "love" sign with pretty ribbon using...you guessed it!  Another 3M hook!


I don't remember where I got them, but I put up these vintage bath signs for a little extra decor in the dull bathroom.  


If you are going to have a bathroom attached to your room, you will DEFINITELY want an over-the-toilet shelf for extra storage.  You'll notice not only here, but in my room also, that I used vintage doilies and table covers to soften the space.  Also, a sign I got at TJ Maxx and more pictures.  The bowl has fresh lavendar in it.  I kept my cleaning stuff on the floor on either side of the toilet.  


Be creative with your room set up.  Not everything has to go up against the wall.  I turned my desk and put my fridge on the other side to leave more room close to my door.  Any blank space on the wall should be filled with something colorful, whether it's a poster, pictures, or clothing.  I used more vintage prints above my bookshelves and a beach print in the tiny space between my shelves and my closet.  Put a 3M hook right inside your door so you always know where your keys will hang.  I HIGHLY recommend some kind of calendar, too.  I put a dry-erase one on the back of my door with two months, and couldn't have survived without it.  The back of the door was also a great place to put class calendars, due dates, sports schedules, and reminders of campus events.


 I was fortunate enough to get a hand-me-down loveseat from my parents for extra seating.  I can't tell you how many textbooks I read, phone conversations, counseling sessions, roommate debates, and gossip sessions were spent on that couch!  I got a jersey-knit slip cover to match my room.  It didn't perfectly fit, but did the job!  If your college sells sweatshirt blankets...GET ONE!  I still use mine to this day, it's one of my favorites.  The little iron shelf next to the couch is actually for the bathroom, but I got it cheap at Goodwill.  It was the perfect size for a side table, and held a couple more blankets for friend that came to visit.  I tacked paper lanterns on the wall.  You'll want as much lighting as you can manage. I hardly ever used the harsh neon lights and would just turn on all my lamps.  Nothing makes a place feel more like home like soft lighting.  :o)

WHEW!  That ended up being a lot longer than I expected!  Hopefully it will help you college kids get started and at least inspire you to think outside the box.  You CAN make it your own...you just have to be creative!


Tuesday, August 16, 2011

MORE Bachelorette Party Games

A couple months ago, I shared this post to tell you about the games we played at my friend, Beth's Bachelorette Party/Lingerie shower.  Well...I had another Pre-Wedding Bash for my sister two weeks before her wedding, and I'm not one to do the same thing twice (unless of course, it's really good).  So, I have NEW BACHELORETTE GAME suggestions for you!

PERSONALITY PANTIES
I did this same activity at Beth's party, but like I said...I'll repeat games/activities if they're a hit.  I like the Personality Panties idea because it gives the bride some extra pairs of panties for daily wear.  Also, (even though it's kind of strange) she's reminded of all her loving friends and the variety of personalities they have every time she opens her panty drawer.  To read the explanation, check out the previously mentioned post with more bachelorette ideas.

I didn't want to give my sis the same panties I gave Beth, so I picked these cute navy polka-dot lace-trimmed ones up at Target.  If you know me...you know I love polka dots!


THE SEX POT
I honestly don't remember where I saw this idea, but I made my own spin on it anyway.  The idea is to give the bride-to-be (and her groom) some kind of decorative pot or vase - empty.  The couple will add a quarter (or whatever change they have) every time they "do the deed" during their first year of marriage. Whatever money they have at the time of their anniversary, they can use to go out to a nice dinner, get a couples massage...whatever they wish.  I got this cute and simple round vase at Michael's pretty cheap, and then just made a card to explain what they'll do and attached it with tape:


I like this vase because once they remove the card, it can sit in their bedroom (or anywhere in their house) and collect change, and no on would know what it was.  I also used this to send home Kim's panties in, so it worked out great!

LINGERIE MENU
This is another repeat, and is explained in my first bachelorette games post.  I love the idea though, and was planning on doing it anyway when my sister suggested that we do it at her party.  Basically, we name each lingerie gift and after the party, I made a menu for their honeymoon.  


Some brides like to name their pieces something that sounds like food.  Some like to just use silly names that describe something about the way it looks.  We chose to use fantasy-type names for Larry's Menu.  Kim also had some lingerie she received before this shower, and even more at a shower after this one, so here's the completed menu:  (When I've done this before, people always have trouble getting started, so I thought it might help to see some of the names we used as examples)

Front
Back

Kim is the one that suggested adding the chili peppers after each selection.  I think it's a great idea, because like she mentioned...guys have completely different ideas sometimes than girls do about what these names would mean.  So, adding the spice rating after each one gave Larry a better idea so he can choose what he's really in the mood for, not what he's expecting.

NEWLYWED-TO-BE GAME
This is a popular game, but I LOVE the result.  It takes much more planning and preparation than any of the others, but I think the laughter and conversations that result are totally worth it.  I met with Larry, Kim's groom-to-be, a few weeks before the party.  I video-taped his responses to the following questions:

1.   What day did you first meet?  Where?
2.   Where was your first date? 
3.   Where was your first kiss?
4.   Who first said, “I love you”?
5.   Do you have a “song”?
6.   What is his favorite meal that the bride has made?  Worst meal?
7.    How old is his oldest pair of underwear?
8.    What day did he say is their anniversary?
9.    What exact words did he say when he asked her to marry him?
10.  What does he like on his pizza?
11.  What is your favorite thing about her?
12.  What would she say is her favorite thing about you?
13.   What is the bride’s guilty pleasure?
14.   Who is her celebrity crush?  Yours?
15.   If you were ordering drinks for both of you, what would you get?
16.   What is your most annoying habit?
17.   What is the last thing she says/does before bed?  You?
18.   If you could throw out one item of her clothing what would it be?  What would she throw out of yours?
19.   What does she keep on her nightstand?  You?
20.What is the nicest thing she’s ever done for you?  You for her?


These are a collection of different questions I found online/tweaked to fit Kim & Larry and what I thought would be fun to hear the answers for.  After I interviewed him, I edited the clips and made a slideshow video for us to watch that night.  I would let the question scroll on the screen and then pause while giving Kim a chance to answer.  After she answered, I played Larry's response.  If they said the same answer, we cheered and clapped and moved on to the next one.  If they disagreed on an answer, Kim had to chew a piece of bubble gum.  I really, truly thought that she would get most of them right.  But it's amazing how different people's perspective can be, even if they're really close.  And I didn't just pick up any bubblegum...I got the jumbo Bubblicious pieces.  Here's Kim at the end of the game...with all her gum:


She wanted to bring her big wad of gum to show Larry how much they disagreed on their answers!  It was fun (for us) to watch, and we laughed a LOT.  But, I don't think Kim is looking forward to chewing anything bubblegum flavored for a while now.  I've also seen where people use marshmallows, but I didn't want things to get too gross and slobbery since we were going out that night.  

THE HUMP GAME
I don't really know what else to call it.  But it's REALLY funny to watch.  And SUPER cheap. You need a pair of stockings (I found a pair in clearance at Target for like $0.98 or something like that...it doesn't matter what they look like), a tennis ball, a ribbon, a bottle of water (I had a 1 liter Smart Water bottle from the day before, so just saved that instead of buying a new one), and a stopwatch (We used an app on my phone).  You cut the leg off of the stocking (I suppose you could just leave it together and use one leg to tie it around your waist...but my guests were all different sizes so I wanted to make sure everyone was comfortable).  You will fill the water bottle with some water.  I added some red food coloring to make the water pink...just for fun.  The tennis ball goes in the "toe" of the stocking leg, then tied close.  I tied the stocking to the ribbon I was using after that.  Each guest will take a turn.  They tie the ribbon around their waist like a belt, with the ball stocking hanging behind them like a tail.  The water bottle stands on the floor in front of them.  Then, they are timed to see how long it takes to knock over the bottle of water.  At first, they were doing it with their legs together and doing it from the side, but I added the rule that they had to straddle the bottle of water and hit it with the ball between their legs. It is HILARIOUS to watch, because basically the girls are humping to try to hit this bottle...and HARD.  The other girls were all good at it (I think the record was something like 7 seconds)! You can also play this game with more players.  We had a small group, so we went one at a time.  You could also play on teams, and see which team can have each girl knock over a bottle of water the fastest, or score a point for whoever does it first between two against each other.  I have also seen where there is a large party and there are four girls running around with balls between their legs, trying to hit a larger ball into a goal.  There are a TON of variations on this game...and a bunch of videos on youtube to preview what kind  of laughter it brings.  

So, there you have it!  More fun and excitement for bachelorette parties!  Hope they're helpful!

Friday, August 12, 2011

First Basket Date!

I told you a few days ago about the dates basket I made as a wedding gift for my sister and brother-in-law.  As promised, I'll be sharing the contents of each month's envelopes so you can use the ideas yourself.  When Kim & Larry got back from their honeymoon, they came back to my parents' house and spent the night so we could catch up and spend some time together.  I knew they'd be hanging out that Monday, so I made one more envelope for their basket so they had one to do immediately.  (Probably selfishly, too...so I can be there for their first and explain how the date cards work).  As I told you before, I included one envelope per month, so this extra date made 13 total dates.


For each envelope, I labeled the outside with different scrapbooking stickers I had in my supplies.  Of course, you could also make labels on the computer in different fonts instead for a cheaper option but still make it cute.  I bet (although I haven't looked) you could even find a set of the month names in clip art or other downloadable images online.  I used the stickers because I had enough variety and supplies to do them all different, but probably would have either made some labels on the computer or written straight on the envelope if I didn't have them.  No need to spend extra money!


So, since Kim & Larry already had an "August" date (stay tuned for that reveal soon), I just labeled this envelope with the exact date of the Monday they'd be at my parents' house.  Inside this envelope were only two items:
  • Date Card
  • DVD of Kim & Larry's Wedding Reception

Here is the date card that was included in the envelope:  


So as I said, this isn't a date that most of you could or would probably include in your basket.  It took DAYS to take the 4+ hours of video from their reception and edit it down to 2 hours.  I used iMovie to edit and iDVD to format and burn the DVD.  I thought this would be a great way to remember their wedding day and a keepsake for the remainder of their marriage.  If you are giving this as a wedding gift, you could do the same thing for a 13th date or maybe even an album of pictures taken at the wedding.  I'm sure there are a ton of other ideas you have about how to include a "13th envelope" but it's certainly not necessary.  Twelve dates is definitely enough!


Kim & Larry opened their gifts after a long lazy Monday (Kim wasn't feeling too well, either).  Yes, the card did say that it would take place on my parents' "crappy couch"...this is a couch they've had for years and either swallows you or rolls you off when you sit on it.


They were pretty excited to have this keepsake and plan to watch it every year on their anniversary.  


So, this date wasn't super involved, very detailed, or even had a lot of stuff to "do".  It kind of worked out since we were all still getting out of "wedding coma" and Kim wasn't feeling well.  It was a good opportunity for us to take a minute to slow down and take in all that happened together.  Any of you that have been involved in a wedding know that during that night, you are totally absorbed in the moment and running around, dancing, eating cake, and mingling.  Before you know it, it's over!  Watching it back (at least for me) gave me the chance to appreciate it and enjoy it even more.  We had lots of fun watching the video, remembering different moments of the night and seeing things we didn't even know were going on.  There was LOTS of dancing, and I gave them permission to fast forward through some of it.  :o)

There you have it!  Date number 1 of 13 in the Dates for a Year basket!  Stay tuned for the August Date!  Kim & Larry opened the envelope while they were still at mom & dad's last weekend, but I don't want to reveal until they get to go and give me some feedback on whether it was all the fun I think it will be or a flop!  I'm hoping they'll snap a few pics I can share, too.  ;o)  

Wednesday, August 10, 2011

Avoid Bridal Meltdown!

In preparing for my sister's wedding day, I looked up a lot of "Bridal Emergency Kits" to make sure we were prepared for ANYTHING.  What started out a small makeup bag with some aspirin and hairspray turned into this:


THE ULTIMATE WEDDING DAY EMERGENCY KIT!

I compiled all the lists I could find and also went through my travel size toiletries and every inch of my bathroom to put this together.  My sister was pretty calm the last few weeks before her wedding, which was awesome.  But to be honest, kind of scared the heck out of me because I felt like it was the "calm before the bridal storm".  I wanted to have everything possible so there would be no snags, no worries, and no meltdowns.  Result?  SUCCESS!  

So what is in the ultimate wedding day kit you ask?  Well...I'll tell you!  First, I started by searching for the perfect bin.  I found this cute stackable, durable plastic carrier at Target for about $7.00.  It was perfect, because it had a lot of different compartments and all locked together.  I thought it would be perfect, because I could unlock and unstack so bridesmaids and relatives could grab what they needed while getting ready.  

So, the first level had two removable trays that had smaller compartments.  Perfect for all the little odds and ends that would need to be found quickly:
  • Meds (including aspirin, band-aids, eyedrops, cough drops, Benadryl, Midol, cold medicine, decongestant, Rolaids, anti-diarrhea, and nick powder which quickly stops bleeding after a nick or scratch)
  • Clear Elastics
  • Bobby Pins
  • Cotton Pads 
  • Q-Tips
  • Safety Pins
  • Sewing Kit (I took out my pincushion after this pic and replaced with the sewing kit)
  • Blue Yarn/Ribbon for "something blue" if needed
  • Scotch tape
  • Craft Glues
  • Shout Wipes
  • Mini Tide-To-Go Pen

The removable trays had these lids, so I added labels for easy locating:


The next level includes:
  • Compact Mirror
  • Clear Nail Polish
  • White Nail Polish
  • Earring Backs (Wal-Mart had a combo pack that had every kind)
  • Hand Sanitizer
  • Deodorant
  • Baby Powder
  • Nail Polish Remover
  • Static Guard
  • Wrinkle Release Spray
  • Tampons
  • Nail Files
  • Superglue
  • Dress Tape (added after my sister's wedding)

And the final level:

  • Pen & Paper
  • Spare Toothbrush
  • Toothpaste 
  • Floss (Added after my sister's wedding)
  • Tissues
  • Scissors
  • Lotion (Hand & Body)
  • Mints
  • Vaseline
  • Hair Spray
  • Hair Gel
  • Drinking Straws
  • Makeup Sponges


Believe it or not, there's more.  So, I grabbed this clear bag I had around my house to stash some other stuff that we *may* need and was too big to fit in my carrier.  Here's what else I brought:
  • Bug Spray
  • Sunscreen (I tossed both a 35 body and a 70 face bottle in since I had them)
  • Spray Bottle with fresh water
  • Makeup Remover
  • Lint Roller
  • Baby Wipes
  • Wet Ones Antibacterial Wipes
  • Pond's Facial Cleansing Wipes
  • White Chalk


So there you have it!  I had pretty much everything we needed, and the things I was asked for and didn't have, I've added since then.  I am super excited because I get to use this kit again in less than two months!  Taylor, a friend of mine (sidenote...check out her awesome crafty, creative, DIY blog) recently asked me to be her day of wedding coordinator.  I am SUPER excited about this and can't wait to see what it's like and dip my toes in bridal assistance.  So, since I knew I had that coming up, I knew making this kit would be useful.  I hope you find it useful, too!  

Monday, August 8, 2011

CHEAP Dates for a Year Basket


If any of you are bloggers and DIY enthusiasts, I'm sure you've checked out Young House Love.  I found them about a year and a half ago while browsing some home decor ideas and fell in love.  I think for two days straight, I just sat and read their blogs.  Anyway...If you follow Sherry and John's wonderful blog, I'm sure you've heard of the Pinterest Challenge.


**Side Note**  If you are not on Pinterest yet, get on the ball.  It's SO addictive and so full of amazing inspiration and ideas for anything and everything.


Anyway...one tell tale sign that you are a Pinterest fanatic is that you pin things all the time, but never seem to get around to do most of them.  I've been trying to be better about that, and in fact plan to endeavor a Pinterest journey in the coming months (stay tuned).  But, I've got to say, most of the things I've tried are ideas, recipes, or something simple.  I haven't taken on a big "project" yet...until now.


If you follow my blog, you know that my sister just got married last weekend.  For their wedding gift, I wanted to do something creative.  I'm huge on gift-giving and try to make every gift I give meaningful, sentimental, creative, and/or memorable.  So, I didn't want to just get them a set of dishes and call it a day.


Enter Pinterest.


I came across this idea when I first joined Pinterest back in May.  In the midst of wedding planning, my sis didn't join until probably mid-June.  I crossed my fingers that she wouldn't see this pin (I pinned it, but deleted it once she joined, then just re-pinned it today).  I like the element of surprise, which is the reason I think I liked this gift.  They got back from their honeymoon last night and opened gifts, including this one, so now I feel like I have the freedom to share my first big Pinterest project.

The original idea uses a lot of gift cards to nice restaurants, activities, etc.  Well...being that I can't afford to do that, I decided to do a bargain/free date basket.  Which I think actually works better for a newlywed gift, because they'll have ideas and some supplies to re-do the dates they enjoy without breaking their budget.  Here's what my completed basket looks like:


Each month has it's own envelope that has card describing the date and (most of) the supplies they'll need for that date.  I also added one extra envelope to include a letter that explained the gift:


I got the basket at Big Lots for I think only $4, then decorated each envelope with scrapbook stickers.  I decided on 12 dates, made supply lists, went shopping, and decided which month to assign each date to. I used a pack of coordinating scrapbook paper, then created cards for each date which includes a short poem, where, what time of day, the supplies they'll need, and explanation of what to do for the date.


They were super excited, and I think are looking forward to open the envelopes each month.  Of course, I can't post what all of the dates are because that would ruin the surprise!  But...it does give me something to blog about monthly.  I told them to give me some feedback and take lots of pictures.  I'm sure this will be something that they enjoy and build great memories from.  That's the hope anyway.


Overall...this entire basket cost about the same that I would spend on an actual wedding gift for my sister ($100-$125).  So, really, it was not much of a stretch to do it.  If you're interested in doing this as a gift for someone, let me know and I'll be happy to send you the card document for each date.  This would be a great gift for an anniversary, Christmas, wedding, and even for a couple having a new baby.  They have a great variety of dates, no two are alike, and each of them I think will bring out a different aspect of their relationship.  I hope it keeps things exciting and romantic for them.  Stay tuned to find out what's in each of those envelopes...I can't wait to share!

Wednesday, August 3, 2011

Knox & Co.

Thankfully and sadly, the wedding is over.  I'm sad because that means there's no more projects and last minute planning to do, but thankful because now I have an awesome new brother, my sister is a wifey, and I have time to share all the awesome things we did!  I'm currently waiting for the video I edited to be "prepared" for DVD, so I thought I'd share a quick post about one of the things I did for my sister's wedding.  

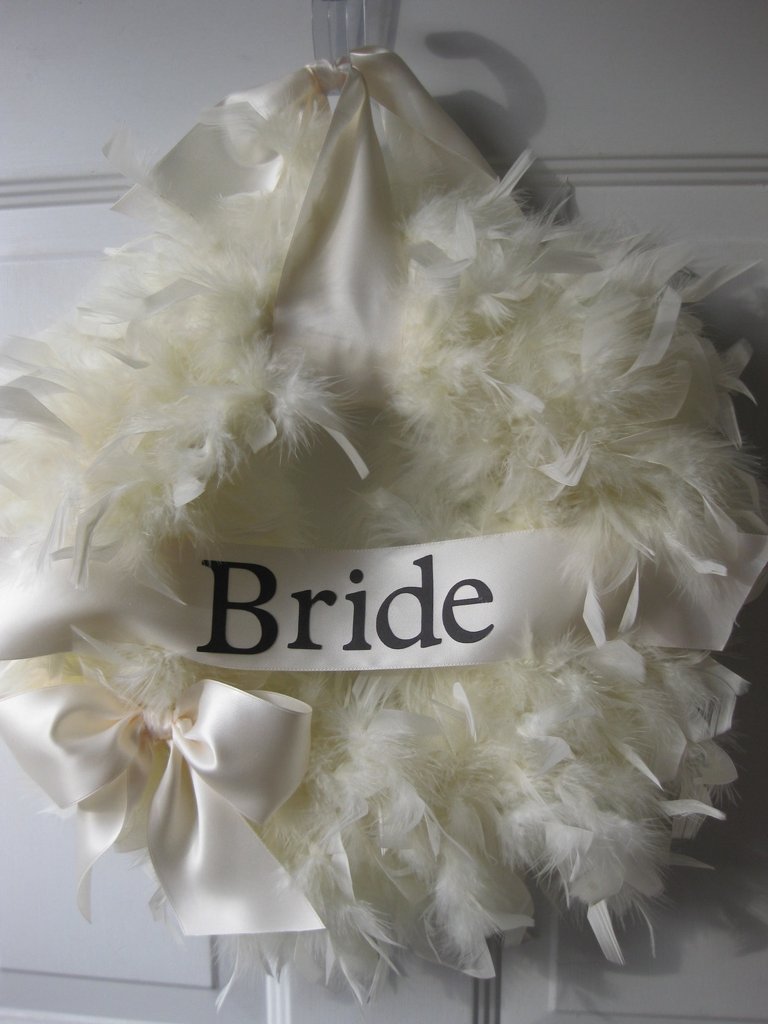
Months ago, she asked me to make her some feather wreaths.  Feathers were one of the things included in the wedding that honored and reminded us of those we've lost and couldn't be there.  Ya'll know how much I enjoy making wreaths, so I was thrilled to take on this project.  She wanted two small wreaths with banners or signs that said "Bride" and "Groom" to put on the door where each was getting ready.  I was imagining something like this:

She also wanted two large white wreaths to go on the front doors of the church.  Something like this:

I can't tell you how honored I was that she asked me to do this for her, and how excited I was to make them!  Well...time went by, I decided to leave my job (and lost the income that goes with it) and was fulfilling other maid of honor duties and got busy busy.  So, I ran out of time and money to complete the project.  I was still planning to do it, but a couple of weeks before the wedding when it still wasn't done, my sister told me not to worry about it.  She said the more she thought about it, the less important that part was.  I still wanted to do SOME kind of something for the doors where they were getting ready, because I liked that idea.  So, I started brainstorming.  

Back in February, I went shopping at Michael's and got this stash with some gift cards and coupons I got at Christmas:

I loved these little canvas signs with flocked detailing, and for only $1, I knew I had to have them!  


I thought about using them at my friend, Beth's shower but couldn't come up with any inspiration for what exactly to do with them.  Then, I thought about using them for one of Kim's showers, but still couldn't think of anything worth using them for.  So, when I discovered that I wasn't making the wreaths anymore and could make some other kind of door signs, these sang to me.  It's like it was meant to be! 

My sister's wedding was themed around "Breakfast at Tiffany's" and there were touches of Tiffany & Co. throughout.  I decided to run with it.  Why not do  "Bride & Co." and "Groom & Co." signs?  PERFECT!!  Here's how I did it:

I started by printing the words off of my computer using "Baskerville" font with the Small Caps setting.  First, I measured the framed part of the canvas prints to make sure the size would work once printed.  Then, I made text boxes to fit that size to prevent having to print, reprint, etc.  Then, I cut down to size.  The exact shape doesn't matter at all.  


I remember reading a friend's blog about transferring.  She isn't doing crafting blogging much anymore, but I wanted to give her credit for helping me figure out how to transfer font to canvas!  Thanks Caity!  You can head over to her site to see another tutorial, but I just followed her steps:

Flip over your printed paper and scribble over the letters with a pencil.  This doesn't have to be exact, and I recommend heavy coating for easier transferring.  


Once the back is scribbled (I forgot to finish taking step by step pics with the groom sign, so I switched to the bride sign), flip over the paper, center the text where you want it, and trace HARD over the letters.  The pressure from the tracing pushes the lead from the scribbling onto the canvas.  So, if you trace well and have heavy lead on the back, it should be a breeze.


The transfer will look like this:  


All I did after that was use acrylic black paint and a thin brush to trace over and fill in the transferred words.  


Here's the finished products:


Larry took his sign and hung it on his Groom's room door at the church where they got ready.  We hung Kim's bride door on my parents' front door where Kim got ready.  I loved them (I think the bride did, too) and I think they perfectly tied into the Tiffany & Co. theme without being too over the top.

Head over to Under The Table and Dreaming where I'm linking up this week!


Saturday, July 23, 2011

Spicy/Sweet Favors

I wanted to share the favors that I made for the Spicy/Sweet Bachelorette Party I threw for my friend Beth. I have a LOT of other projects to post about.  My sister is getting married in ONE WEEK!!!  So, needless to say, I've been elbow deep in parties and crafts, which I can't wait to share with you.  I may even ask my sis if I can do a post about some pretties she's been making for her big day.  Anyway...back to the point...

Since this was a spicy & sweet theme, I wanted the favors to reflect that.  So for the sweet, I got candy ...what could be better than sugary treats to represent my "sweet"?  The spicy was a little trickier.  Originally, I thought about ordering these chili chocolate jewels that I remember seeing on Food Network.  But, it would have been outrageously expensive to order, since I seemed to only be able to get variety boxes.  So I had to come up with something else.  Hot sauce?  Not with candy.  Salsa?  Not with candy.  Cinnamon?  Kind of random.  Eventually, I decided on getting seeds for guests to plant their own peppers. Once I came up with this idea, I was excited!  Target had little planting pots  in a 2-Pack for only a dollar in the $1 spot section (my favorite and must-stop spot every time I go in Target).  


Then I found a variety of pepper seed packs.  There were a lot to choose from since it was at the beginning of planting season!


The only issue I had with this project was the sticky stuff left over on the pots after pulling off the stickers.  But, that's nothing a little Goo Gone and elbow grease couldn't fix!


Once I assembled them, I decided to add a card to help get the point across and thank all of Beth's lovely friends for coming and celebrating with us.


I printed these out, that said "Thank You!  It was so SWEET of you to come help kick off Beth's marriage with some SPICE!"

They still needed a little "pop" so I added a line of my trusty blue glue around the edge...


...then dipped those edges in pink glitter.  It took almost no time at all, and added a nice finishing touch!


Here's a look at the final card:


The favors were a hit!  I never got my peppers to grow, but that's mostly because I didn't give them the proper love they needed.  :o(  I hope the other girls had luck.  I did love the candy!  I think this was a perfect favor to tie together the theme of the party and thank guests for coming!

LinkWithin

Related Posts Plugin for WordPress, Blogger...