Wednesday, August 10, 2011

Avoid Bridal Meltdown!

In preparing for my sister's wedding day, I looked up a lot of "Bridal Emergency Kits" to make sure we were prepared for ANYTHING.  What started out a small makeup bag with some aspirin and hairspray turned into this:


THE ULTIMATE WEDDING DAY EMERGENCY KIT!

I compiled all the lists I could find and also went through my travel size toiletries and every inch of my bathroom to put this together.  My sister was pretty calm the last few weeks before her wedding, which was awesome.  But to be honest, kind of scared the heck out of me because I felt like it was the "calm before the bridal storm".  I wanted to have everything possible so there would be no snags, no worries, and no meltdowns.  Result?  SUCCESS!  

So what is in the ultimate wedding day kit you ask?  Well...I'll tell you!  First, I started by searching for the perfect bin.  I found this cute stackable, durable plastic carrier at Target for about $7.00.  It was perfect, because it had a lot of different compartments and all locked together.  I thought it would be perfect, because I could unlock and unstack so bridesmaids and relatives could grab what they needed while getting ready.  

So, the first level had two removable trays that had smaller compartments.  Perfect for all the little odds and ends that would need to be found quickly:
  • Meds (including aspirin, band-aids, eyedrops, cough drops, Benadryl, Midol, cold medicine, decongestant, Rolaids, anti-diarrhea, and nick powder which quickly stops bleeding after a nick or scratch)
  • Clear Elastics
  • Bobby Pins
  • Cotton Pads 
  • Q-Tips
  • Safety Pins
  • Sewing Kit (I took out my pincushion after this pic and replaced with the sewing kit)
  • Blue Yarn/Ribbon for "something blue" if needed
  • Scotch tape
  • Craft Glues
  • Shout Wipes
  • Mini Tide-To-Go Pen

The removable trays had these lids, so I added labels for easy locating:


The next level includes:
  • Compact Mirror
  • Clear Nail Polish
  • White Nail Polish
  • Earring Backs (Wal-Mart had a combo pack that had every kind)
  • Hand Sanitizer
  • Deodorant
  • Baby Powder
  • Nail Polish Remover
  • Static Guard
  • Wrinkle Release Spray
  • Tampons
  • Nail Files
  • Superglue
  • Dress Tape (added after my sister's wedding)

And the final level:

  • Pen & Paper
  • Spare Toothbrush
  • Toothpaste 
  • Floss (Added after my sister's wedding)
  • Tissues
  • Scissors
  • Lotion (Hand & Body)
  • Mints
  • Vaseline
  • Hair Spray
  • Hair Gel
  • Drinking Straws
  • Makeup Sponges


Believe it or not, there's more.  So, I grabbed this clear bag I had around my house to stash some other stuff that we *may* need and was too big to fit in my carrier.  Here's what else I brought:
  • Bug Spray
  • Sunscreen (I tossed both a 35 body and a 70 face bottle in since I had them)
  • Spray Bottle with fresh water
  • Makeup Remover
  • Lint Roller
  • Baby Wipes
  • Wet Ones Antibacterial Wipes
  • Pond's Facial Cleansing Wipes
  • White Chalk


So there you have it!  I had pretty much everything we needed, and the things I was asked for and didn't have, I've added since then.  I am super excited because I get to use this kit again in less than two months!  Taylor, a friend of mine (sidenote...check out her awesome crafty, creative, DIY blog) recently asked me to be her day of wedding coordinator.  I am SUPER excited about this and can't wait to see what it's like and dip my toes in bridal assistance.  So, since I knew I had that coming up, I knew making this kit would be useful.  I hope you find it useful, too!  

Monday, August 8, 2011

CHEAP Dates for a Year Basket


If any of you are bloggers and DIY enthusiasts, I'm sure you've checked out Young House Love.  I found them about a year and a half ago while browsing some home decor ideas and fell in love.  I think for two days straight, I just sat and read their blogs.  Anyway...If you follow Sherry and John's wonderful blog, I'm sure you've heard of the Pinterest Challenge.


**Side Note**  If you are not on Pinterest yet, get on the ball.  It's SO addictive and so full of amazing inspiration and ideas for anything and everything.


Anyway...one tell tale sign that you are a Pinterest fanatic is that you pin things all the time, but never seem to get around to do most of them.  I've been trying to be better about that, and in fact plan to endeavor a Pinterest journey in the coming months (stay tuned).  But, I've got to say, most of the things I've tried are ideas, recipes, or something simple.  I haven't taken on a big "project" yet...until now.


If you follow my blog, you know that my sister just got married last weekend.  For their wedding gift, I wanted to do something creative.  I'm huge on gift-giving and try to make every gift I give meaningful, sentimental, creative, and/or memorable.  So, I didn't want to just get them a set of dishes and call it a day.


Enter Pinterest.


I came across this idea when I first joined Pinterest back in May.  In the midst of wedding planning, my sis didn't join until probably mid-June.  I crossed my fingers that she wouldn't see this pin (I pinned it, but deleted it once she joined, then just re-pinned it today).  I like the element of surprise, which is the reason I think I liked this gift.  They got back from their honeymoon last night and opened gifts, including this one, so now I feel like I have the freedom to share my first big Pinterest project.

The original idea uses a lot of gift cards to nice restaurants, activities, etc.  Well...being that I can't afford to do that, I decided to do a bargain/free date basket.  Which I think actually works better for a newlywed gift, because they'll have ideas and some supplies to re-do the dates they enjoy without breaking their budget.  Here's what my completed basket looks like:


Each month has it's own envelope that has card describing the date and (most of) the supplies they'll need for that date.  I also added one extra envelope to include a letter that explained the gift:


I got the basket at Big Lots for I think only $4, then decorated each envelope with scrapbook stickers.  I decided on 12 dates, made supply lists, went shopping, and decided which month to assign each date to. I used a pack of coordinating scrapbook paper, then created cards for each date which includes a short poem, where, what time of day, the supplies they'll need, and explanation of what to do for the date.


They were super excited, and I think are looking forward to open the envelopes each month.  Of course, I can't post what all of the dates are because that would ruin the surprise!  But...it does give me something to blog about monthly.  I told them to give me some feedback and take lots of pictures.  I'm sure this will be something that they enjoy and build great memories from.  That's the hope anyway.


Overall...this entire basket cost about the same that I would spend on an actual wedding gift for my sister ($100-$125).  So, really, it was not much of a stretch to do it.  If you're interested in doing this as a gift for someone, let me know and I'll be happy to send you the card document for each date.  This would be a great gift for an anniversary, Christmas, wedding, and even for a couple having a new baby.  They have a great variety of dates, no two are alike, and each of them I think will bring out a different aspect of their relationship.  I hope it keeps things exciting and romantic for them.  Stay tuned to find out what's in each of those envelopes...I can't wait to share!

Wednesday, August 3, 2011

Knox & Co.

Thankfully and sadly, the wedding is over.  I'm sad because that means there's no more projects and last minute planning to do, but thankful because now I have an awesome new brother, my sister is a wifey, and I have time to share all the awesome things we did!  I'm currently waiting for the video I edited to be "prepared" for DVD, so I thought I'd share a quick post about one of the things I did for my sister's wedding.  

Months ago, she asked me to make her some feather wreaths.  Feathers were one of the things included in the wedding that honored and reminded us of those we've lost and couldn't be there.  Ya'll know how much I enjoy making wreaths, so I was thrilled to take on this project.  She wanted two small wreaths with banners or signs that said "Bride" and "Groom" to put on the door where each was getting ready.  I was imagining something like this:

She also wanted two large white wreaths to go on the front doors of the church.  Something like this:

I can't tell you how honored I was that she asked me to do this for her, and how excited I was to make them!  Well...time went by, I decided to leave my job (and lost the income that goes with it) and was fulfilling other maid of honor duties and got busy busy.  So, I ran out of time and money to complete the project.  I was still planning to do it, but a couple of weeks before the wedding when it still wasn't done, my sister told me not to worry about it.  She said the more she thought about it, the less important that part was.  I still wanted to do SOME kind of something for the doors where they were getting ready, because I liked that idea.  So, I started brainstorming.  

Back in February, I went shopping at Michael's and got this stash with some gift cards and coupons I got at Christmas:

I loved these little canvas signs with flocked detailing, and for only $1, I knew I had to have them!  


I thought about using them at my friend, Beth's shower but couldn't come up with any inspiration for what exactly to do with them.  Then, I thought about using them for one of Kim's showers, but still couldn't think of anything worth using them for.  So, when I discovered that I wasn't making the wreaths anymore and could make some other kind of door signs, these sang to me.  It's like it was meant to be! 

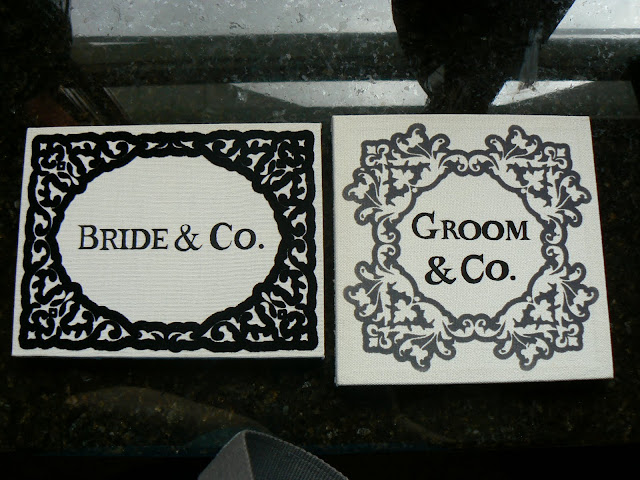
My sister's wedding was themed around "Breakfast at Tiffany's" and there were touches of Tiffany & Co. throughout.  I decided to run with it.  Why not do  "Bride & Co." and "Groom & Co." signs?  PERFECT!!  Here's how I did it:

I started by printing the words off of my computer using "Baskerville" font with the Small Caps setting.  First, I measured the framed part of the canvas prints to make sure the size would work once printed.  Then, I made text boxes to fit that size to prevent having to print, reprint, etc.  Then, I cut down to size.  The exact shape doesn't matter at all.  


I remember reading a friend's blog about transferring.  She isn't doing crafting blogging much anymore, but I wanted to give her credit for helping me figure out how to transfer font to canvas!  Thanks Caity!  You can head over to her site to see another tutorial, but I just followed her steps:

Flip over your printed paper and scribble over the letters with a pencil.  This doesn't have to be exact, and I recommend heavy coating for easier transferring.  


Once the back is scribbled (I forgot to finish taking step by step pics with the groom sign, so I switched to the bride sign), flip over the paper, center the text where you want it, and trace HARD over the letters.  The pressure from the tracing pushes the lead from the scribbling onto the canvas.  So, if you trace well and have heavy lead on the back, it should be a breeze.


The transfer will look like this:  


All I did after that was use acrylic black paint and a thin brush to trace over and fill in the transferred words.  


Here's the finished products:


Larry took his sign and hung it on his Groom's room door at the church where they got ready.  We hung Kim's bride door on my parents' front door where Kim got ready.  I loved them (I think the bride did, too) and I think they perfectly tied into the Tiffany & Co. theme without being too over the top.

Head over to Under The Table and Dreaming where I'm linking up this week!


Saturday, July 23, 2011

Spicy/Sweet Favors

I wanted to share the favors that I made for the Spicy/Sweet Bachelorette Party I threw for my friend Beth. I have a LOT of other projects to post about.  My sister is getting married in ONE WEEK!!!  So, needless to say, I've been elbow deep in parties and crafts, which I can't wait to share with you.  I may even ask my sis if I can do a post about some pretties she's been making for her big day.  Anyway...back to the point...

Since this was a spicy & sweet theme, I wanted the favors to reflect that.  So for the sweet, I got candy ...what could be better than sugary treats to represent my "sweet"?  The spicy was a little trickier.  Originally, I thought about ordering these chili chocolate jewels that I remember seeing on Food Network.  But, it would have been outrageously expensive to order, since I seemed to only be able to get variety boxes.  So I had to come up with something else.  Hot sauce?  Not with candy.  Salsa?  Not with candy.  Cinnamon?  Kind of random.  Eventually, I decided on getting seeds for guests to plant their own peppers. Once I came up with this idea, I was excited!  Target had little planting pots  in a 2-Pack for only a dollar in the $1 spot section (my favorite and must-stop spot every time I go in Target).  


Then I found a variety of pepper seed packs.  There were a lot to choose from since it was at the beginning of planting season!


The only issue I had with this project was the sticky stuff left over on the pots after pulling off the stickers.  But, that's nothing a little Goo Gone and elbow grease couldn't fix!


Once I assembled them, I decided to add a card to help get the point across and thank all of Beth's lovely friends for coming and celebrating with us.


I printed these out, that said "Thank You!  It was so SWEET of you to come help kick off Beth's marriage with some SPICE!"

They still needed a little "pop" so I added a line of my trusty blue glue around the edge...


...then dipped those edges in pink glitter.  It took almost no time at all, and added a nice finishing touch!


Here's a look at the final card:


The favors were a hit!  I never got my peppers to grow, but that's mostly because I didn't give them the proper love they needed.  :o(  I hope the other girls had luck.  I did love the candy!  I think this was a perfect favor to tie together the theme of the party and thank guests for coming!

Friday, June 24, 2011

Spicy and Sweet Bachelorette Games/Menu

A bridal shower/bachelorette party just isn't complete without some good games to play and ways to make the bride feel special and the center of attention.  I'm not one for typical, "cliche" games like toilet paper dresses or the forbidden words (though I've played them before and think they're fun).  I like to try to find games that are new to the guests and unique.  Here's what I came up with for Beth's:

MEMORIES AND ADVICE CARDS  
As I mentioned in my invite tutorial post, I had each girl fill out a card with a spicy or sweet memory they made with Beth (our bride) during their time as friends.  These were enclosed with the invites, but I also had a few extra on hand for the girls who forgot them at their hotel room or lost it along the way.  I also had separate cards using the same format for the guests to give beth some spicy or sweet marriage advice or wishes.  I had collected the finised cards and posted them like this:


I used simple white ribbon (which I actually got for a dollar at Dollar Tree) and hot glued clothespins that were decorated with the same glitter and flocking I used on the invitations.  It was a simple project that I actually threw together last minute when I realized I didn't have a place to display our cards yet!


The girls had lots of fun filling them out, reading all the memories and advice, and it gave us each an opportunity to reflect and reminisce with Beth on our fun times during our friendship.

PERSONALITY PANTIES  Also included with the invitation was a separate card asking the girls to pick up an extra item when they shopped for beth.  I asked that they each pick out a pair of panties for the bride that best describes or portrays THEIR personality.  I hope that makes sense.  Basically, Beth got a bunch of pairs of panties and each one matches each of her guests personalities.  This was the first "game" we played.  Beth opened every pair and had three guesses to see if she could match the panties to the lady.  It was fun to see the variety.  We had Disney Princess panties, cotton briefs, lacy thongs, edible undies, and even "commando".  Beth now has a good variety of options that she might not even choose for herself.  


Here's Beth and I with my cute frilly pink panties with a bow.  Very cute and girly...just the way I like them!  :o)

MR. RIGHT  Ok, so this is one that's a little more common.  I printed out a story that I inserted Beth and Scott's names into titled "Mr. Right".  Throughout the story, the words "right" and "left" are used A LOT.  I had three gift bags with these little goodies:


I spread out the gifts around the circle and as I read the story, the girls had to pass the gifts around the circle every time they heard either the word "right" or "left" in the direction that I said.  Whoever ended up with the gifts at the ends of the story got to keep them.  It sounds easy, but sometimes I would say things like "She LEFT the RIGHT card RIGHT there on the table before they LEFT RIGHT to meet Mr. RIGHT."  It was fun!  

BANANA RACE  It wouldn't be a Bachelorette party if there wasn't a condom somewhere!  I've played this before using Twinkies...which actually I think is much more fun and interesting.  Basically, each girl got a banana and a condom, and had to race to see who could unwrap and put the the condom on the banana the fastest.  Winner got another little pamper me prize bag!


It's a mess...but worth it for the belly laughs!

KISS THE PRINCE  This is the bachelorette version of "Pin the Tail on the Donkey".  I printed out a bunch of pictures of HOT men, including newly married Prince William and Beth's fiance, Scott.  I decided to call mine "Kiss the Prince".  The cute frames I got at Michael's, they were wall decals for about a dollar.  I blindfolded the girls, they applied some lipstick, I spun them around 5 times, and let them go plant a kiss on one of the men.  Whoever got closest to kissing their man on the lips won a prize.


LINGERIE MENU  Finally, after Beth opened all her gifts, we named each of them.  It was fun to giggle and come up with sexy names for each piece of her new wardrobe.  After the party, I made a Lingerie Menu for Scott to be able to look at and choose what Beth should wear.  I also made a key for Beth so she knew what each name was matched to.  


RISQUE MENU  Just like I don't like to do typical cliche games, I also am not a big fan of male anatomy food at a party.  However, I just didn't want to serve chips and dip and be done with it.  So here's what I served:

Sticks in Creamy Dip (These were just clear plastic cocktail glasses with a little ranch in the bottom and celery and carrot sticks in them.  Kinda like these.)
Little Weenies (Lil' Smokies in BBQ/Cocktail Sauce/Grape Jelly)
Sweet Balls (Red Velvet Cake Balls...made by my wonderful friend Amber!)
and of course...I make her a Strawberry cake with buttercream icing


So there ya go!  Next time I'll fill you in on the decor and favors!
**UPDATE:  Check out even more bachelorette game ideas I did at my sister's shower here.

Saturday, June 18, 2011

Spicy and Sweet Invitation Tutorial

So, I'm way behind on blogging, but I kind of love it because I'm too busy with creating and party planning to blog.  So, it's coming!  I promised to share more about my friend's bachelorette party/lingerie shower that I planned, so I'll do small bits to get there.  Today is all about the invitation! 

My friend Beth is super cute, and very stylish and classy.  :o)  I know her party had to be totally "her" and I also know the importance of a first impression.  I think invitations almost set the mood for the party and can either be a piece of paper that is stuck on the fridge without a second thought or something that leaves a "WOW" impression.  If you pause when you open an invitation, I feel like you're more likely to attend the event.  That's why wedding invites are so fancy.  To leave an impression.  

So, long story short, I wanted to combine Beth's style and my desire to have a full house for her party into a fabulous invitation.  I think I accomplished that goal.  

I started with these supplies:  Some shiny, pearlescent type navy blue scrapbook paper, white cardstock, silver envelopes, Martha Stewart flocking powder in Cosmos, Martha Stewart tinsel glitter in Onyx, and my AMAZING 2-Way glue pen!


So, once I spent some time at Michael's getting inspiration and pulling together different materials, I came up with this:


I decided on a Spicy or Sweet theme for the party after stumbling across this one on 100 Layer Cake.  Beth is a sweet and innocent girl, but I know she has some spice to her personality, and will bring a lot of it to her new marriage.  I wanted guests to feel like they could provide her with gifts for either side so Beth (and Scott) had a variety of goodies to "play" with.  :o)  After I formatted, edited, and printed the wording, I had to add some more flavor.  

I started by tracing the words "Spicy" and "Sweet" with my 2-way glue pen to help them POP.  


I used the sexy black tinsel glitter for the word "Spicy" and for the first time ever, tried flocking powder. I was a little nervous because it was my first time using it, but it turned out great.  I just used my glue pen over the word "Sweet" and then sprinkled the flocking powder right over it, then tapped off the excess, just like you would with glitter.  If you're doing this, make sure the glitter COMPLETELY dries first, and tap it again...otherwise you get extra flecks of glitter on the wet glue with your flocking powder.


I love how the embellishment gives both the exotic feel for spicy and a soft, "comfy" feel for sweet.  I put one together and thought I was done.  But...after sleeping and looking at it again, I decided it needed something else...


So, I found these sweet little sequins flowers that I have had in my scrapbook supplies for YEARS.  I used my tiny hole punch, and attached the flower with a small white brad, which made a cute little center for the flower.  It added a great "aww, cute" to my sweet side.


So, then I wrapped my blue scrapbook paper (that I cut just an inch larger on each side than the invite) with some pretty pink glitter ribbon I found at JoAnn's.  All I used for this was Scotch tape.  Really.  


You don't need much.  I just taped the end in the center of the front, and then one on top and bottom of the other end wrapped around and on top.  This part will be covered, so it really doesn't matter what it looks like underneath.  :o)


Then I used my larger 2-Way glue pen (same company that makes the thin one) to attach the invite on top.  Again, it doesn't have to be pretty.  And I didn't want to put the glue to close to the ribbon, or there would be a very noticeable bump on the front of the invite once it was glued down.  


So, once it was attached, I thought, "Well, I guess the Spicy side needs something, too!" So, I used some pink ink and a kissing lips stamp I had to add a little more spice.  But then...I went back to JoAnn's (I know...it's a tough habit to break)....


I found this AMAZING stuff!!


I just traced over the stamp and let it dry, and it looked like some pretty sexy, glossy lips!


So, here's the finished product, all pulled together:


Of course, I had to include shopping information, so I created this cute little guide to help our guests find something PERFECT for Beth.  I searched FOREVER to find a silhouette of a respectable woman's body that was realistic.  Then, I added the sizes pointing to where on the body it would be used.  


Then, I made this card to go with the invitation to help guests come prepared.  I'll explain more about what we did with these things in another post:


And finally, I sent a card asking guests to think of a Spicy or Sweet memory they've had with Beth.  I figured they would have more time to come up with something special if they had more time to think of it before the party.  It made a wonderful surprise for Beth, and provided lots of giggles, reminiscing, and celebrating friendship with Beth once the party started.  


One final tip that I learned a bit too late, but know for the future.  Make sure your invitation FITS the envelope you plan to use before doing them.  I know...duh, right?  But I got so excited about making the invitations, I didn't think about the size for mailing.  I ended up buying bigger envelopes and it worked out, but I definitely learned my lesson!

So that's it!  I'm hoping to figure out how in the world to use Etsy soon so I can make these things available for customizing and printing for anyone who would want to use them.  I spent the time to make them, and would love for someone else to have the opportunity to use it.  I'll post back if and when I get that part accomplished.  

Stay tuned for more bridal shower/wedding updates.  My sister's wedding is only 42 days away, so we are in full wedding swing...planning showers, crafting for the big day, and organizing!  Lots of tips and ideas coming your way!


LinkWithin

Related Posts Plugin for WordPress, Blogger...