Tuesday, October 2, 2012

Photo A Day September

Oh, friends, how I have missed you!!  Life has most certainly been moving at the speed of light, and unfortunately, I have accidentally been pushing fun things (like blogging) to the end of the priority list.  Which is crazy, because I even purchased a pocket calendar to plan out my blog posts at the end of July.  Anyway...long story short I'm BACK!  The holidays are right around the corner, and I am so pumped to share some things I did last year and some things I have planned for this year!


To get back into the swing of things, I thought I'd share another Photo A Day challenge that I completed.  If you remember, I did my very first one back in June.  I only got a few days done in July and then slacked off as I was trying to find a job.  I picked up again with September.  Here's the list from fatmumslim:  


And here are my photos:


Follow me (I am 'staceycarleen') on Instagram to keep up with my pictures for October.  Join the fun!  Here's the list:  


Thursday, August 2, 2012

Ombre Dot Cake

One of the things I have sadly gotten away from that I absolutely LOVE to do is cake decorating.  I have posted a few tutorials in the past, like the striped cake where I go over a lot of basics of cake decorating and the simple way to decorate a cheesecake with chocolate.  Being unemployed over the past year, I haven't had the money or reasons to bake and decorate many cakes.  I'm hoping to start again this year and experimenting with different recipes, too.  I'll be sure to share them with you!  

When I was going through my old pictures on my computer recently, I came across a cake that I never shared with you but clearly meant to because of all the tutorial pictures I had available!  I absolutely LOVE this cake design technique and it can be used for just about any occasion.  It's simple, classy, unique, and in my opinion, very impressing even for a new cake designer!  

Here is the photo I took inspiration from:


I think I originally saw this picture on Pinterest back when I first joined.  From what I could tell, the cake above was actually made for a Mexican birthday party.  I think the carnation detail really adds to that theme.  But, when I saw this picture, I fell in love with the ombre dot design.  Now, it would be ambitious to try to tackle the multi-tiered, multi-colored design.  But I thought it would actually be pretty simple to just focus on one color.  

So, when I had the opportunity to try out this new technique, I jumped on it!  During the summers, I work at a summer day camp.  Last year, one of our counselors got engaged and the other found out his wife was pregnant within a week of each other.  So, to celebrate, I brought in a cake!  Here's the steps in case you'd like to give it a try, too...

First of all, I baked two 8-inch round cakes and made a double batch of buttercream icing.  **Side Note:  I almost always make double batches of icing when I know I'm going to be decorating.  It's not that expensive if you have to freeze or throw out extra and it is KILLER when you have to stop in the middle of creative madness decorating to make a new batch**  I completely iced the cake with a crumb coat, let it dry, and did a thick second coat.  I smoothed out the icing as much as possible with a spatula.  You can always use the Viva method to make it smoother, but I wasn't worried about it being completely smooth with the detail I was adding.  


Next, I decided on my colors.  Like I said, it would be super ambitious to try to do a lot of colors.  It's definitely possible, and if you're making a large cake for a large crowd or for an extra special event, it would be worth the time for the outcome you would have.  

For me, and for the simple cake that I was taking to work, I just chose one color and made different shades.  You can do this a couple of ways.  You can either add your food coloring a little at a time, or start with the darkest color and add white icing to lighten it.  This time, I started with white icing and added my food coloring a little at a time.  I started with the light teal color, then added a little green and a little more blue each time until I had four colors.  

However, when I use this design technique again, I will more than likely start with the darkest color and add white icing each time to make it lighter.  This will help to make sure your color is consistent and only the shade changes, not the tone.  (Shade is the same color, lighter or darker - Tone is colors in the same family but different "degrees"...one might be a little more red, another a little more yellow, etc.)  I think it would also be helpful because you would know that you have enough of each color, instead of running out of one having too much of another.  

Here are my colors once they were mixed:


Once mixed, I put each color in its own bag.  You don't have to do it all at once: you can do one at a time, but you won't want to use the same bags because the colors will mix.  That would be no bueno.  Typically, I would tell you to be sure you that all of your colors are mixed and bagged before starting your decorating so that you can go back and forth with colors.  But since this design is really one order of colors and not needing a lot of "touch ups" you could just bag one color at a time to keep your icing fresh.  Oh, and you'll notice that I didn't put any icing tips in my bags.  I just cut the tips off since I was just doing round, simple circles.  Just make sure you hold up your tip when you cut the other bags so that your dots are all the same size!


Once my colors were ready, I needed to decide where to start my line of dots.  I opted to start towards the top and tier down my design.  Instead of starting right on the edge where the top meets the sides, I wanted my line to start about an inch below the edge.  I don't know about you, but I have a hard time making a straight line on a round surface.  To help me out, I used a piece of regular old string.  (Make sure it's not string you found under the couch or in your junk drawer.  Since it's going on something that will be eaten, you'll want it to be super clean.)  It took some trial and error, but I placed and replaced my string around the cake until I was happy with a nice, straight line.  Pull it a little tight so that you make a small indentation in the icing as a visual starting point.  It doesn't have to be super deep, this is just like using a stamp or stencil to trace.


Using my indented line as a guide, I started icing small, smooth dots around the cake.  I placed them close together, and released pressure before pulling away to prevent the "Hershey Kiss" look. I started with my darkest shade as the longest line and the one that goes all the way around.  You could start with the lightest shade, but I like the effect better when it fades away as it gets smaller.


After my line was completed all the way around the cake, I moved on to my next shade.  If you are a perfectionist, you'll want to count your dots around the first line so that you can equally divide your ombre pyramids.  I'm a perfectionist and didn't think about that, but adjusted my "back side" to make it work (more on how to do that in a minute).  With the next shade (one shade lighter than my darkest), I made three dots using the same icing technique and leaving one dot-sized space between each section.  This is going to start the shape of your ombre pyramids.


Continue in the same pattern, using a lighter shade and decreasing the number of dots each time until you get to one.  Since I only used four shades, that meant I did four lines, including the first all-around line.

I didn't want this small cake to be crowded, so instead of repeating the mirror of the design on the bottom, I added my lightest shade dots between each pyramid.  For the bottom, I just used a larger tip with my darkest shade of icing and did a layered, large bead border.


Since the side of my cake was so detailed and gorgeous, I didn't want the top to take away too much attention.  So, I just did simple lettering (with not very good space planning on my part...oops!) to congratulate our friends, the groom- and hubby- to-be.


I am so happy with how this cake turned out and will most definitely do it again!  I think I learned a few things.  Next time, I will start with my darkest color and add white icing to lighten for each shade.  I think I would also try smaller dots and be a little pickier with the straight-ness of my lines.  And of course, better planning for the top!  


Overall, I'm happy with how it turned out and can't wait to try it again!  How cute would this be for a baby shower?  It's so simple and plain, you could really use this design for any occasion.  And trust me....it's super low on the difficulty scale.  If you can squeeze icing through a bag, you can do it! 

Sunday, July 22, 2012

July Date - All About Us

I feel like it is the end of an era.  It's already time for the final inclusion in the Dates for a Year Basket!  This labor of love has been truly that...a lot of work, made with a lot of love, and really made with the purpose to continue to spark and grow the love of my sister and her new husband in their first year of marriage.  There have been some simple dates, some extravagant ones, some silly, some romantic.  I feel like I included a large range of dates so that they wouldn't get bored by doing similar things each month.  

Their final date was actually the one that I had planned first.  I wanted Kim & Larry to have an opportunity to reflect on their first year of married life, their love story, and who they have become as a couple while remaining individuals.  This month, Kim & Larry are reflecting and recording "All About Us".  

Here's what was included in the June envelope:


Here is the date card that was included in the envelope:


I was inspired to get this book for Kim & Larry by seeing a similar one on Amazon.  I was at Barnes & Noble one day and came across this version.  I had completed the All About Me version while I was in college, so I had an idea of the style of this book.  It's personal, serious, funny, a little scandalous, and a lot of fun.  I thought it would be the perfect way to reflect on being newlyweds and looking to the future.  This is a long book and probably something that they will not finish in just one date.  I hope that it's something they continue to do until it's completed throughout the month.  The idea for the date is for them to find a cozy spot together...either at home or out in a quiet park and begin working through the book.  I suggest that they bring a bottle of wine (I meant to write a couple glasses of wine on their card, not bottles...but whatever floats your boat) {And yes, I also realize I misspelled Sharpies}.  Then they can laugh, talk, and relax together.  I also like this book because it asks a lot of unusual questions, some they may have never even discussed before.  For a couple that has been together for about 5 years, it's hard to find questions they haven't conquered yet, but I would be surprised if they don't find something new to talk about!


This date cost me around $18.00...the book was $12.99 and I splurged to give them brand new markers instead of tossing in a couple I already owned.  You could make this an entire gift basket, and actually I think it would be a really sweet basket to give to a newly engaged couple, as a wedding gift, or for an anniversary.  Find a nice picnic basket and fill it with everything they need...wine & glasses; cheese, meat, and crackers; a nice picnic blanket; the book and pens; chocolate.  Maybe even add a picture from when they first met, their wedding day (for an anniversary gift), or special things that remind them of their relationship.  


I think the only way to make this date cheaper than what I did is to DIY a book of your own.  It actually might be fun to customize your own "All About Us".  If you search "conversation starters" or "relationship questions" on Google, you will get a TON of ideas.  There's also this great blog floating around Pinterest with ideas.  And do ya'll remember those silly surveys we used to fill out ALL THE TIME in the early 2000's on e-mail and forward to our friends?  See what I mean?  There are plenty of ways to create your own book if you don't want to shell out the cash for a published copy.  The only real disadvantage is that if you're making it for a spouse or significant other, you'd already know the questions so the element of surprise and actually thinking out the question together would be taken away.  Also...if you didn't want to spend the time researching and finding just the right kinds of questions, you could instead opt to give a journal or notebook and just plan to write your love story.  You could take turns telling and recording moments of your relationship in your journal.  You could talk about dreams/hopes/plans for the future.  How romantic?!?!  And what a great keepsake for your marriage and eventually your kiddos to have?  


I can't believe I'm saying this now, but that is date number 13 of 13!  We made it a WHOLE YEAR!  I hope you guys have enjoyed it as much as I have and got some great ideas for yourself or for gifting to others.  I plan to do one more post to walk you through how I planned it all and pulled it together.  


My little sister's anniversary is in just over a week.  I can't believe she's been married almost a year!


But Larry has fit right in with our family.  


Also...I'm secretly planning a new year-long gift.  Stay tuned to find out what it is!

Sunday, July 1, 2012

Photo A Day (June)


One of my favorite things I've come across on Pinterest in the past year that I've been excited about trying are the "photo a day" challenges.  I'm a girl that LOVES lists.  And as you know, I love anything that gives me the motivation and opportunity to be creative.  So, in June, I finally decided it was time.  It was tough to keep up once I was working full time (and with a broken cell phone camera), but I was able to complete all 30 days for June.  The list that I found most people followed was from fatmumslim.  I loved it so much, I wanted to share it with my blog friends.  Here's the list she put up for June:
  

And here are my photos:


You can follow my photo a day and/or see the full pictures on my Pinterest Photo.A.Day board.  After taking my pics, I edited them and added the text on PicMonkey, which I love because you don't have to go through signing in and individual user steps.  Just upload, edit, and save!

So, now that June is over it's time to start on July!  I've had a lot of fun with this, it's been a little challenging at times, and my hope is that it will help me grow into a better photographer.  If anything, I'm better about documenting my life through photos.  Why don't you join me??


Saturday, June 30, 2012

Summertime Sun Tea

It seems like everyone across the country is pushing through this dreadful heat!  Nashville actually broke its record this past week by getting above 107 degrees!  In this miserable climate, we all need to stay hydrated.  I've been trying to make water a regular habit and something I crave, but I've got to be honest...nothing beats a big glass of sweet tea on a hot summer's day.  And my FAVORITE sweet tea is made with the sun!  If you haven't ever tried making sun tea, it's super easy.  I'll walk you through the steps.  It has a flavor I can't describe, besides to say it's different and delicious.  

Here's what you'll need:
  • A large clear jar or container  
  • Tea bags (not cold brew)
  • Sugar
  • Lemon (optional)


You can use any container you like, but the best option is an actual "sun tea jar" like the one pictured above.  I bought mine last summer season at Publix for $4.00, but you can get them at Target, Wal-Mart, Kroger, Bed Bath & Beyond...pretty much any place that sells picnic/kitchen dishes and glasses.  If you can't find one, you can certainly use a large glass mason jar, just be sure to adjust your ingredient proportions.  I haven't tried to make it in a frosted plastic or opaque container, but I don't think that will work.  The heat from the sunlight is what helps to brew the tea, and I think it would be pretty tough to get it right if the sunlight can't get through.

For the tea, you can use any kind you like.  I prefer to use either Luzianne or Lipton regular iced tea bags.  It's the most plain tea you can get, and the most traditional.  Actually, sometimes there are sun tea directions printed on the side of the box!  You don't want cold brew because the sun is going to be the heat for brewing.  You could also use green tea or another flavor, but I've never tried it myself.

Although I was born in Pennsylvania, I consider myself a southern lady.  I've lived in the south the majority of my life, and am about as ingrained in the culture as a natural born southerner.  That being said, I like my tea SWEET!  You can cut back on this amount if you prefer unsweet or less sweet tea.  For my taste, I measured out 1 cup of sugar.  This seems like a good amount because it's enough to make it sweet, but you still get that unique sun tea flavor.


Next, you'll need to prep your tea bags.  For my 1 gallon container, I used three tea bags.  Simply take each bag out of the paper wrappers and tie the strings together in a regular knot.  I try to place the knot in the middle, so that the tea bags are close together, but have room to spread out in the water.


Next, put it all in the jar!  I dumped my cup of sugar in the bottom, then filled the jar with water.  No need to stir, your sugar will dissolve in the sun and you'll need to stir later.  Next, put your tea bags in the water.  You'll need to use a spoon or other utensil to push them under so that the tea bags and leaves absorb the water.  Finally, I sliced half of a lemon and added them to the top.  You can leave this out if you'd like, but I think the lemon adds the perfect amount of citrus, fresh flavor.  


The next part is that hardest...the waiting.  You'll want to make your sun tea on a hot, sunny day and find a spot that will get direct sunlight for 2-4 hours.  Of course, you'll want it also sitting somewhere that will be undisturbed by weather, animals, people, etc.  I have a tiny patio, so I used a little table and moved it with the sun during the day.  Although this step is the hardest, it's also the easiest.  Find that special brewing place, get your full jar all comfy, and LEAVE IT ALONE!  

You will be able to watch your water slowly transform to tea over a few hours.  I remember doing this as a kid when my mom made sun tea and it was so fun to watch.  It was like magic in my youthful eyes.  So if you have kiddos, be sure to let them watch the magic of the sun!  But remember, don't move it, don't stir it, just let the sun do its thing, girl.


It is really up to you to decide how long to let it brew.  You can bring it inside as soon as you think your tea is brewed to your desired strength.  For my taste, 3 hours seems like the perfect length.  


Once it's finished brewing, bring it inside, give it a stir, and stick it in the fridge.  At this point, it's ready to drink and you can pour it over a glass of ice and enjoy!  I leave the lemon and tea bags in my jar, but I know a lot of people take them out.  I just leave them in because it's a lot less messy to dump them when the jar is empty (which for me, doesn't take very long)!  Sun tea is delicious, but be mindful that this was brewed fresh and was sitting in the sun for several hours.  So although it is uniquely refreshing and enjoyable when you pour your first glass, it doesn't stay fresh for long.  Be sure to drink it all up in about two days and then it will be time to dump what's left (if any).  

This is a great drink for barbecues, pool days, having friends over, etc.  It's not something you can make all year, and I think that small window of opportunity is what makes sun tea so special and enjoyable to me.  I hope you like it as much as I do!  

Sunday, June 17, 2012

June Date - Dollar Store Delight

I'm late this month, but I'm down to the second to last envelope in the Dates for a Year Basket!  Since last month was kind of a big date and I had already purchased something special for the last date (July), this month had to be a smaller date.  Sticking with summertime fun, I thought this date should be something that gets them out of the house and excited about spending some quality time together more unique than their regular nights at home.  As I was looking for date ideas, I came across a pretty common date idea, but thought it would be fun to include for June.  This month, Kim & Larry get to create their own date with products from the Dollar Store!


Here's what was included in the June envelope:
  • Date Card
  • Two $5.00 bills (one for each of them)


Here is the date card that was included in the envelope:


Since Kim is in the wedding planning business, I knew it would be tough to plan a date that had to take place on a weekend.  She's usually busy with rehearsals, setting up, etc.  So this date is one that can be done pretty much any time:  morning, noon, night, weekday or weekend.  That way, they could just grab their envelope and head out when they had a free night together.  There wasn't a lot of planning for this date besides just giving them the cash and the idea.  Really, there's not much planning on their part, either...it's kind of a do-as-you-go date.  For the date, they will head to the dollar store (I suggest going to the kind where everything is a dollar so they can have a larger number of items to use).  The idea is for them to split up and come up with a random 5 items (or whatever they can purchase for $5.00) and then meet again afterwards.  They use whatever they buy to make their date!

I envisioned them buying a CD to listen to, food to munch on, maybe a game to play, scarf to wear, etc.  The possibilities are really endless.  What I love about this one is that if they split up, they will have no idea what the other one is choosing.  This will add the element of surprise and be sure to be the beginnings of a date they will never forget!

This date cost me $10.  You could certainly make this cheaper by only giving them a couple of dollars each, or better yet...give them the challenge to head to the store and collect a variety of items and have their date in the store.  Scratch that.  I'm all about a bargain, but you can't get much cheaper than $10 for a date!  You could make it more expensive by giving them more cash or gift cards.  If they have more money to spend, you could send them to a mega store like Target or Wal-Mart, even the local mall where there would be a lot more to choose from.  

You could make this a basket by doing the shopping for them.  You could put together random items and wrap them, numbering them and instructing them to open one every 15 minutes or so.  That would be kind of a fun basket to do, and fun for the couple to see how the date unravels.  It would be fun to put together for the giver, but I think it might take part of the fun away from the date, too.  

That's pretty much it, folks!  Simple, easy, cheap, and something that would be unlike any other date you've been on.  This is date 12 of 13...only one more to go, and I'll be posting it in only a few short weeks!    

Monday, May 28, 2012

Happy Memorial Day!

I hope you were able to spend the day with those you love most.  I have been humbled today while being surrounded by so many blessings and freedom that others have sacrificed so much for to give me.  I am forever grateful.  


I am on vacation, but plan to tell you all about it when I return.  Happy Memorial Day!

Friday, May 25, 2012

Bridal Tea Party Favors

One of my favorite things to do when I am hosting any party is to provide favors for the guests who attend.  Personally, I think it's a simple and easy way to show your guests how much you appreciate their presence at an event you worked so hard to create.  It's also another excuse to be creative and add detail to make a party feel even more special.  

When Mom and I started deciding on favors, we were overwhelmed with so many options!  I had just joined Pinterest a few weeks before we began planning, so that is one of the places I checked when we were trying to decide on the perfect souvenir to send home with our tea party ladies.  Here are some options we thought about:
Teacups & Flowers
Teacup Candles      
Teacup Rings
Mints in Dahlia Tissue
Tea Bags
Cookies


These are all great ideas and if we had more time, more money, or a smaller crowd expectancy, we may have chosen one of these options.  Although we were gathering a collection of teacups for the tea bar, we weren't sure if we would have enough to send home with everyone.  We thought Kim may want to keep some of them as sentimental reminders (she ended up choosing a set and so did I), and also...we wanted teacups to be available for their intended use and didn't want to sacrifice that by filling them with wax or dirt.  So, we disqualified any favor that involved actual teacups.  We thought about tea bags, cookies, candies, etc. but we were already serving a lot of the things we thought about sending home and if someone wasn't a tea drinker, they wouldn't be excited about getting tea.  And although the rings were super cute, we didn't feel that everyone coming would enjoy them enough to wear them.


So, we came up with an idea which incorporated some of the inspiration we got from searching and finding the above options.  One of my parents' tenants actually worked at a chocolate shop where she learned (and grew a passion for) making chocolate treats.  So, with some creative thinking and her help, we came up with these:

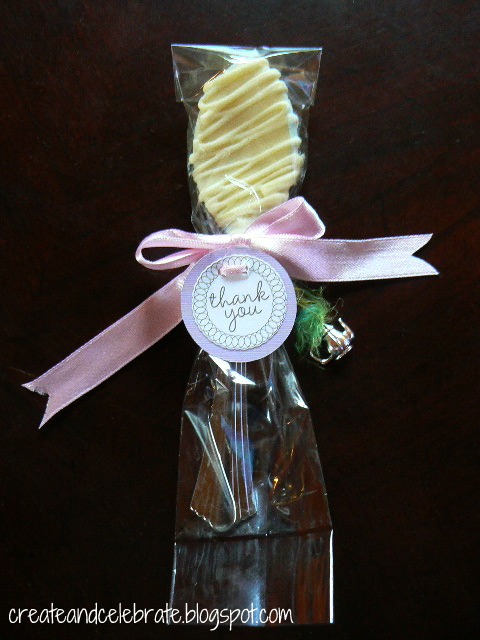
Aren't they adorable?  We thought these were the perfect favor because they still had a "tea party" vibe without being too theme-y.  These "Vanilla Creme" spoons are perfect for adding a bit of creaminess and subtle flavor to your cup of tea, coffee, hot chocolate, warm milk, or even eaten by itself.  And let me tell you...they were DELICIOUS!  Mom and I tried one when we first got them, and we were lucky to have a few leftover.  We tried to spread out the remaining few to savor them, they were so yummy!  You can check out more pictures, a better description, and other things DeAnna makes at her etsy store or facebook page.  

Mom and I got the idea while we were looking around, then asked DeAnna if she could come up with a flavor for us.  We purchased the plastic spoons (that look like real silver) at GFS, but I've also seen them at other party stores, Costco, and even in smaller quantities at Wal-Mart.  We dropped the spoons off to DeAnna and picked them up once they were dipped, decorated, and finished.  She sent them back to us in individual cellophane wrappers (shown) and a simple "Thank You" tag.  

I didn't get a picture of them before I added some extra touches, unfortunately.  They were ready to be handed out as they were when we picked them up.  However, Mom and I had just been shopping at an adorable little Scrapbooking store in Destin while we were vacationing and I picked these up:


I knew we'd be doing favors, but didn't know what that would look like when I got these.  But, I had purchased a few sheets of these simple, pretty "thank you" stickers and had to use them.  Keeping with our tea-party theme, I dug through both my mom's and my own ribbon collections to tie the tags on.  Of course, I had to stick the stickers to something, so I used a 1.5" circle punch to cut out small circles just slightly bigger than the stickers to give them a pop of color and a simple border.  I used card stock to do this...half in green and half in purple.  Once they were all cut, I placed a sticker in the center of each circle (pattern side up), then used my tiny hold punch to make holes for the ribbon.  If you don't have a tiny hole punch, you can use a regular size hole punch.  


When I threaded the ribbon through the holes (using a blunt yarn needle to help them along), they looked like this:
  

I didn't worry about matching the ribbon or using a certain number of each kind, etc. (Which drove my OCD tendencies a little wild).  I think the mixed patterns, textures, and colors made the bunch of them really pretty and eclectic.  

Mom and I also loved the idea of the ring, but thought it might be better to add a charm that could be added to a charm bracelet, necklace chain, or looped onto a key ring.  We purchased an assorted set from Oriental Trading Co. and I attached these to the ribbon with a smaller piece of yarn or edging.  The set came with a slice of pie variety, but we opted to leave those out and only used the teacups and teapots.  


I think these added the perfect finishing touch to our delicious favors!


Once they were all finished, I arranged them in a round wicker basket my mom had at her house:


Then the basket was placed at the table by the front door so that guests could grab a favor on the way in or on their way out.


Kim also chose to use DeAnna for her wedding favors.  Kim's wedding had a "Breakfast at Tiffany's" touch, so she wanted each guest to have a blue Tiffany's box at their seat when they arrived at the reception.  Of course, real diamonds would be a little pricey, so DeAnna made milk and dark chocolate diamonds dusted with shimmer.  These were then packaged into Tiffany blue boxes and of course tied up with a white ribbon:


LinkWithin

Related Posts Plugin for WordPress, Blogger...