Monday, May 28, 2012

Happy Memorial Day!

I hope you were able to spend the day with those you love most.  I have been humbled today while being surrounded by so many blessings and freedom that others have sacrificed so much for to give me.  I am forever grateful.  


I am on vacation, but plan to tell you all about it when I return.  Happy Memorial Day!

Friday, May 25, 2012

Bridal Tea Party Favors

One of my favorite things to do when I am hosting any party is to provide favors for the guests who attend.  Personally, I think it's a simple and easy way to show your guests how much you appreciate their presence at an event you worked so hard to create.  It's also another excuse to be creative and add detail to make a party feel even more special.  

When Mom and I started deciding on favors, we were overwhelmed with so many options!  I had just joined Pinterest a few weeks before we began planning, so that is one of the places I checked when we were trying to decide on the perfect souvenir to send home with our tea party ladies.  Here are some options we thought about:
Teacups & Flowers
Teacup Candles      
Teacup Rings
Mints in Dahlia Tissue
Tea Bags
Cookies


These are all great ideas and if we had more time, more money, or a smaller crowd expectancy, we may have chosen one of these options.  Although we were gathering a collection of teacups for the tea bar, we weren't sure if we would have enough to send home with everyone.  We thought Kim may want to keep some of them as sentimental reminders (she ended up choosing a set and so did I), and also...we wanted teacups to be available for their intended use and didn't want to sacrifice that by filling them with wax or dirt.  So, we disqualified any favor that involved actual teacups.  We thought about tea bags, cookies, candies, etc. but we were already serving a lot of the things we thought about sending home and if someone wasn't a tea drinker, they wouldn't be excited about getting tea.  And although the rings were super cute, we didn't feel that everyone coming would enjoy them enough to wear them.


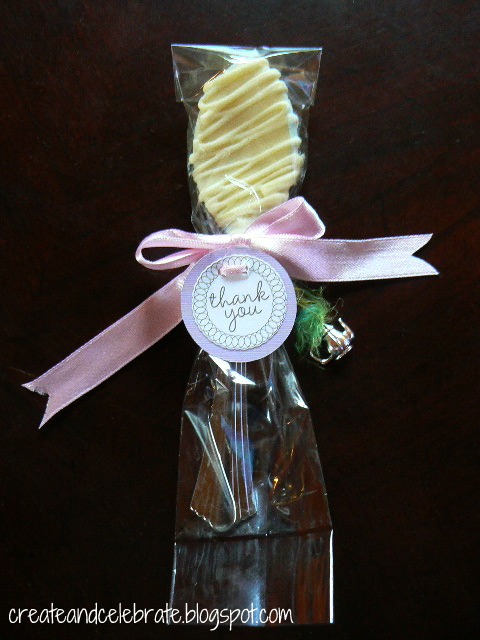
So, we came up with an idea which incorporated some of the inspiration we got from searching and finding the above options.  One of my parents' tenants actually worked at a chocolate shop where she learned (and grew a passion for) making chocolate treats.  So, with some creative thinking and her help, we came up with these:

Aren't they adorable?  We thought these were the perfect favor because they still had a "tea party" vibe without being too theme-y.  These "Vanilla Creme" spoons are perfect for adding a bit of creaminess and subtle flavor to your cup of tea, coffee, hot chocolate, warm milk, or even eaten by itself.  And let me tell you...they were DELICIOUS!  Mom and I tried one when we first got them, and we were lucky to have a few leftover.  We tried to spread out the remaining few to savor them, they were so yummy!  You can check out more pictures, a better description, and other things DeAnna makes at her etsy store or facebook page.  

Mom and I got the idea while we were looking around, then asked DeAnna if she could come up with a flavor for us.  We purchased the plastic spoons (that look like real silver) at GFS, but I've also seen them at other party stores, Costco, and even in smaller quantities at Wal-Mart.  We dropped the spoons off to DeAnna and picked them up once they were dipped, decorated, and finished.  She sent them back to us in individual cellophane wrappers (shown) and a simple "Thank You" tag.  

I didn't get a picture of them before I added some extra touches, unfortunately.  They were ready to be handed out as they were when we picked them up.  However, Mom and I had just been shopping at an adorable little Scrapbooking store in Destin while we were vacationing and I picked these up:


I knew we'd be doing favors, but didn't know what that would look like when I got these.  But, I had purchased a few sheets of these simple, pretty "thank you" stickers and had to use them.  Keeping with our tea-party theme, I dug through both my mom's and my own ribbon collections to tie the tags on.  Of course, I had to stick the stickers to something, so I used a 1.5" circle punch to cut out small circles just slightly bigger than the stickers to give them a pop of color and a simple border.  I used card stock to do this...half in green and half in purple.  Once they were all cut, I placed a sticker in the center of each circle (pattern side up), then used my tiny hold punch to make holes for the ribbon.  If you don't have a tiny hole punch, you can use a regular size hole punch.  


When I threaded the ribbon through the holes (using a blunt yarn needle to help them along), they looked like this:
  

I didn't worry about matching the ribbon or using a certain number of each kind, etc. (Which drove my OCD tendencies a little wild).  I think the mixed patterns, textures, and colors made the bunch of them really pretty and eclectic.  

Mom and I also loved the idea of the ring, but thought it might be better to add a charm that could be added to a charm bracelet, necklace chain, or looped onto a key ring.  We purchased an assorted set from Oriental Trading Co. and I attached these to the ribbon with a smaller piece of yarn or edging.  The set came with a slice of pie variety, but we opted to leave those out and only used the teacups and teapots.  


I think these added the perfect finishing touch to our delicious favors!


Once they were all finished, I arranged them in a round wicker basket my mom had at her house:


Then the basket was placed at the table by the front door so that guests could grab a favor on the way in or on their way out.


Kim also chose to use DeAnna for her wedding favors.  Kim's wedding had a "Breakfast at Tiffany's" touch, so she wanted each guest to have a blue Tiffany's box at their seat when they arrived at the reception.  Of course, real diamonds would be a little pricey, so DeAnna made milk and dark chocolate diamonds dusted with shimmer.  These were then packaged into Tiffany blue boxes and of course tied up with a white ribbon:


Tuesday, May 15, 2012

Teapot Cake Tutorial

Last time, I posted a nice preview of the teapot cake I made for my sister's Bridal Tea Shower, but today I'm going to try my best to do a written tutorial.  The cool thing about this cake is that it looks way more complicated than it actually is.  If you're a little hesitant, give it a try.  I think you'll surprise yourself.


If you've been following my blog or know me at all, you know that I love decorating cakes.  I have become "the cake lady" and am the one everyone turns to when a cake is needed for a birthday or event.  I absolutely LOVE it.  So, for Kim's tea party I decided I wanted to try doing a shaped cake as opposed to my regular round and square decorated cakes.  It was so fun, and I can't wait to try it again!  Actually, I was having so much fun, I forgot to take pictures while I assembled the teapot cake I came to be so proud of!

I started by purchasing a Wilton Sports Ball 3D Cake pan from JoAnn's for about $12.  There are directions included, but it's pretty much the same as baking in a regular pan besides having to balance each half of the ball on the discs included (which is really not a challenge at all).  I used my favorite strawberry cake recipe and filled the two halves 3/4 full with batter.  I saved the rest for the hydrangea cupcakes I also made that day.  Once they were done, I let them cool for about five minutes, then let them finish cooling on a wire rack.


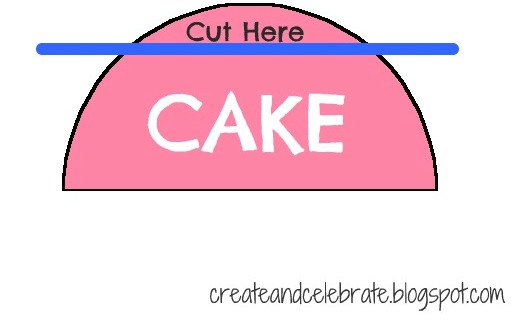
Unfortunately, here is where my camera was forgotten.  However, I am a visual learner and as a teacher, like to provide as many channels of learning as possible.  So, please forgive my TuxPaint elementary diagrams.  I wanted to make sure you could understand what I explain.


Once both pieces were cool, I needed to cut one of the halves so that it would stand flat and sturdy on the cake stand.  So, I cut about two inches off the rounded edge of one dome.  This was perfect because it later ended up being used as the "lid" of the teapot.  Here's an image to help you get an idea of where I cut:


Okay, if you can understand this next part of assembly...awesome!  This is the trickiest part, so bear with me.  I'm going to number these next steps to try to keep it easy to understand.
  1. I took the dome that I just sliced and turned it over, so the wider part was facing up and the side that I just cut from is on the cake plate.  You may also want to add a dot of icing to your plate before placing your piece to keep it from sliding around while decorating.
  2. Add your filling to the wide part of the bottom piece that is facing up.  So now you should have only one piece on your plate and filling on top of it.  
  3. Next, put the other half (not cut...even though the picture looks like it is cut) on top, wider side facing the filling.  When you place this piece on top, it should look like you have a ball sitting on your cake plate with a flat bottom.
  4. Like I mentioned, I created this image without taking too long to figure out how to do the top.  So, try to understand this part.  On TOP of your full dome half, put a small dot of icing.  Take the cut piece leftover from the bottom half that you cut to make the bottom flat.  Place that small part of cut cake on top of the dot of icing on top of the dome.  There will be a small gap between your top dome (half) and the small piece you placed on top.  So you should have a huge cake ball with a "hat," if you will.
Hopefully you could follow that.  I feel awful for not taking pictures this time around!  Here's a diagram to help you out:


Okay!  So, after you have assembled your cake pieces, you get to do the fun part...decorate!  Don't forget to start by covering your entire giant cake ball with a "crumb coat" or a first, light layer of icing.  This first layer will also help pin down the edges of the lid piece so you can't see the gap.  Let this dry first before doing a second layer.  The first layer also catches all of the crumbs that come off of the cake and put those speckles in your icing.  By allowing it to dry, your second layer should be near flawless.


For my spout, handle, and lid button, I used plain white, store-bought fondant.  You can find this at Wal-Mart, craft stores, or anywhere they sell cake-decorating supplies.  It is completely edible, and you can add flavor and/or color by kneading it in.  This was my first time working with fondant, and the white matched my cake, so I did nothing but take it out of the package to use it.  Once you take it out, you can pull off a chunk, roll it, and mold it into whatever shape you'd like.  It's kind of fun and reminded me of Play-Doh days!  If you are not a fan of fondant or can't find any, you could definitely use other things.  Royal icing is great for making solid shapes to decorate with, which is what I used to top the sugar cubes we used at the tea bar.  You could also bake cookies and stick them in as your extra pieces.  They're much lighter, easy to decorate, and, in my opinion, taste better than fondant.


One tip I would have for a cake this size is to make these pieces as thin and small as you can.  One problem I had is that my spout was a little heavy, so it took a lot to get them to stay where I wanted them!  Once your pieces are molded, allow them to air-dry a bit to harden.  That way, when you place them on the cake and are moving them around, you won't change their shapes too much.


So, once your cake is completely iced and your extra pieces are ready, add them to the cake.  This should be done when the base icing is complete, but you haven't decorated yet.  I did this by using toothpicks and sticking part in the fondant and part in the cake.  You will have to play around with angles and the number of picks you need to keep it sturdy.  I've learned this time to use smaller pieces next time.  I had to use lots of toothpicks.


Finally, you get to be creative!  I would recommend adding some kind of border around the edge of the lid to set it apart from the rest of the teapot.  I would also recommend adding a border around the spout and the handle to cover and imperfections or bumps from pushing them into the cake.  I always add a border to the base, too.  At this point, you can decide how to decorate your teapot.  I did small rosebuds around the middle with a polka-dot background.  You could make it fancier by doing flowers all over.  More whimsical by changing the colors and doing swirls, polka dots, and other fun shapes.  Have fun!


I had so much fun with this cake.  I am excited to find an excuse to make another teapot cake (and next time, I'll take pictures and edit this post).  Since the cake was so pretty and kind of realistic, I didn't want to write on it but did want there to be some recognition for Kim.  So, I added the words "Congrats Kim!" Straight to the cake plate.  


I got a lot of compliments on this cake.  Not only was it cute, but definitely delicious!  When I was trying to find a tutorial to help me out with figuring out how to do this, it was tough to find a step-by-step article or blog post anywhere.  I hope that my directions were easy enough to follow so you can make one, too!

Tuesday, May 8, 2012

Bridal Tea Food

When we started planning this Bridal Tea Shower one of the most important (and most fun) things to plan was the menu!  When you're planning any kind of tea party, you want to provide the right variety of food that will feed your guests' appetites without being too heavy.  A tea party menu should be light, fresh, and delicious!

Since this shower was at 2:00 in the afternoon, we wanted our guests to have enough to snack on in case they didn't eat lunch before arriving, but not fill them up in case they had dinner plans shortly after.  Here's what we decided on for our buffet table:


  • Veggies and Ranch Dressing
  • Rainbow Fruit Kabobs as inspired from here.
  • Variety of Mini Quiches (purchased from the frozen section of Costco)
  • Chicken Salad Rolls (sliced Hawaiian rolls and pre-made chicken salad from our grocer's deli)
  • Seafood Pastries (purchased from the frozen section of GFS)
  • Petit Fours (purchased from the frozen section of GFS)
  • Earl Grey Meringue Cookies (see below)
  • Butter Mints
  • Strawberry Cake and Cupcakes (see below)
As you can tell...mom and I were trying to make this as simple as possible.  There was more heating up and assembling than there was actual cooking involved.  We knew there would be a lot of set up with decorations and preparing for the activities, so we wanted the food to be as easy as possible.  Which is what a tea is supposed to be, I think...little work so you have more time to focus on your guests and less time in the kitchen!

I didn't get a close picture of the Earl Grey Meringue Cookies, but I do want to tell you about them.  I have been a lifetime subscriber of Food Network Magazine, and absolutely fell in love with a recipe that was included in one of their issues a while back.  The recipe is for Tea Cakes with Earl Grey Icing.  The first time I made the recipe, I made it as-is.  It was good, the cakes were alright, but the icing....the icing was freakin' incredible.  So the next time I made them, I made them with a plain chocolate cupcake from a box.  To.Die.For.  I have since been asked to make them several times.  They are so unique and different, I can't recommend them enough.  So, for Kim's shower, I wanted them incorporated somehow.  But, I had already decided on strawberry for the cake and cupcakes...there was no need to make MORE cake of any kind.  The icing is a meringue icing, made with mostly egg whites.  Our family loves the airy, light meringue cookies you can buy in the bakery at the grocery store.  So, why can't we use the icing recipe and just bake them as cookies?  That's exactly what we did!  They were delicious.  But I still prefer the cupcakes and icing over the cookies.  

Kim loves strawberries, and I liked the idea of having a teapot-shaped cake, so I came up with this strawberry cake.  I will do a separate, detailed post with how I created this beauty:


I had a ton of leftover batter, so also made a batch of cupcakes.  I incorporated one of the colors from our theme (purple) and the hydrangeas that I brought for the table, AND the inspiration I got from here to create these:


And of COURSE, you can't have a tea party without tea!  Mom and I had so much fun making a tea bar for this shower.


 As you read about in the decorations post, the teapots we used were from our grandmothers on both sides.  We brewed black tea, green tea, and had another carafe with just hot water.  We also set out cream, sugar, honey, lemon, and a variety of tea bags.  I got the idea for these jars here and the tea tags here.  I used my mom's Cricut machine to cut the hearts out of cardstock, then just pulled off the original paper tags and stuck the hearts together on the string with a dot of glue.  The tags for the jars were also made using her Cricut machine, and taped onto mason jars with a band of the same paper we used for the invitations.


To add a touch of elegance and indulgence, I made these:


This was as easy as buying a box of sugar cubes and whipping up a batch of royal icing.  I piped the leaves first and allowed them to dry before switching icing tips and adding the flowers.  I probably made way too many, but they were cute.  


For non-tea drinkers, we also provided a pitcher of ice water and a drink dispenser of raspberry lime punch.  You can also see the teacups we provided for each guest.  Mom and I had a blast hunting down a good selection and number of teacups and saucers.  Goodwill has a new set available almost every week.  Of course, you get odd numbers, but you can buy a set of cups and saucers for about $4.  Can't beat that!  We also looked around at thrift and antique stores, but they were a little pricier.  If you were doing a smaller shower, you could look there, but it wasn't price conscious for us.  With our collection, there were different colors and patterns, so guests had fun choosing one to claim for the afternoon.  We also used some from mom's (grandmother's) china set to make sure we had enough.  It's little touches like this that add personality and sincerity to a party!


The menu for this kind of event was absolutely perfect.  It provided light snacking, some indulgence, and a lot of fun for our guests.  We got a lot of compliments on the food, and I saw several guests going back to the tea bar to mix a new variety of tea.  I hope this gives you some ideas and inspiration for your own tea party!  I kind of envy the British after this...afternoon teas seem like something we should do more often!

Saturday, May 5, 2012

May Date - Be A Kid Again!

I finally get to tell you about my FAVORITE date I included in the Dates for a Year Basket!
Spring is my favorite time of the year, especially when it's getting to the end of the school year and heading into summer vacation.  When you think back on this time of the year in your lifetime, when were you the happiest and most carefree?  When you were a kid, right?  So I thought it was time to pull some of that childhood joy into being a grown up because, let's be honest...being a grown up is just not as fun sometimes.  This month, Kim & Larry get to be kids again!


I got so excited and over-enthusiastic for this date, I ended up needing two envelopes to include everything!  


Here's what was included in the May envelopes:
  • Date Card
  • Two coloring books... (I used ones I had)
  • 1 box of 16 Crayola crayons... (nothing beats Crayola)
  • 2 stunt gliders/foam make it yourself planes
  • $15 gift card for McDonald's
  • 2 bottles of bubbles
  • 2 ready to eat bowls of Lucky Charms cereal


Here is the date card that was included in the envelope:


This is my favorite date because I'm definitely young at heart.  Kim & Larry are, too...so I'm thinking they'll have a lot of fun on this date.  They could really do this any day, but I suggested Saturday on the card so that they can get up in the morning and then color and watch Saturday morning cartoons while they eat their Lucky Charms.  Of course, Saturday morning cartoons where much better in the 80's & 90's than they are now, but...oh well.  Then, they can head to a local park to play on the playground, blow bubbles, and race their gliders.  I included the McDonald's gift card so that they could REALLY be like kids that day and not have to worry about how to pay for lunch.  I suggest on the card that they end the date making forts and shadow puppets and doing all those fun things we did at sleepovers when we were younger.  

This date cost me around $20-$25.  It was definitely one of the more expensive dates, but I already mentioned that I went a little overboard.  Actually, if I would have left out the McDonald's card, it would have been one of the cheaper dates.  It was really simple to pull together.  I used a few things I had on hand (Being a teacher, I had a stash of bubbles, crayons, and coloring books), but everything else was purchased at the drug store right up the road.  I've seen a lot of variations of this date (I'm sure you even have some new ideas swimming in your head now), and you could definitely do it differently, or add more.  

As I mentioned, this date could be much cheaper by leaving out the gift card for lunch.  You could also just cut back on the items you include.  Suggest they use their own cereal,  replace the bubbles and gliders with ideas for games to play instead.  Add a stack of paper and have them create their own paper airplanes.  But, really...you can't get much cheaper unless you just give them the idea.  

I went a little crazy, and believe it or not, had so many more ideas to add to this date!  You could certainly make this an extravagant "kid" basket, and it would be so much fun putting together!  It would be cute to get little plastic bowls and spoons for the cereal to include.  You could also get them footie pajamas or fun socks.  For the park, you could include a whole set of playground equipment...jumpropes, sidewalk chalk, a kickball, frisbee, football...be imaginative!  I mentioned that they could make forts when they get home, so you could include a fort kit and flashlights, maybe even also add a gift card for pizza or ice cream for dinner.  Add a kids' movie or a DVD of classic cartoons.  You get the idea.    

This is date 11 of 13!    I can't believe I'm already saying that.  We've got two left, with a very special one to finish it out.  Have fun being a kid again this month!

LinkWithin

Related Posts Plugin for WordPress, Blogger...